Many customers will also ask: Can I cut LED strip lights?
Yes, most LED strip lights can be safely cut to a custom length. LED strips are designed with marked cut points—usually indicated by a scissor icon and copper pads on the PCB. Cutting at these marks will not damage the circuit.
To cut LED strip lights safely:
- Turn off the power supply.
- Locate the marked cut line on the strip.
- Use sharp scissors to cut straight along the line.
- Avoid cutting through the LED chips or outside the copper pads.
- Test the strip before installation.
For waterproof LED strips or LED neon flex, the cut points and sealing method may differ, so always check the manufacturer’s specifications.
LED strip lights are very flexible lighting solutions that can not only be bent for installation but can also be cut to fit the actual length required. This article will give you a comprehensive understanding of whether the LED strip can be cut, where to cut the safest, how to cut so as not to damage the line, and how to reconnect after cutting to avoid construction rework.
How to Cut LED Strip Lights (Step-by-Step)
You can cut most LED strip lights by following a few simple steps. The key is to cut only at the designated cutting marks on the strip.
Step 1 – Turn Off the Power
Before cutting any LED strip lights, disconnect the power supply to avoid electrical damage or short circuits.
Step 2 – Locate the Cut Line
Look for the scissor icon or marked line printed on the LED strip. These marks indicate where the PCB circuit is designed to be safely cut.
Step 3 – Use Sharp Scissors
Cut straight along the printed cut line. Using sharp scissors helps ensure a clean cut and prevents damage to the copper pads.
Step 4 – Inspect the Copper Pads
After cutting, check that the copper pads remain intact. These pads are needed if you plan to reconnect the strip using connectors or soldering.
Step 5 – Test the Strip
Reconnect the strip to the power supply and test it before installation to confirm the circuit is still working correctly.
Can all LED light strips be cut?
Yes, most LED strips support cutting, but different types of strips have different cutting methods and precautions.
Generally speaking, the regular manufacturers of the strip in the FPC circuit board will be printed on the clear “cut line” or “cut mark,” which is to ensure that the cut can still be normal power and does not damage the LED chip of the only position. For example:
COB LED Strip: Generally every 25mm or 50mm there is a cut point; the lamp beads are arranged densely; the precise cutting requirements are higher;
SMD LED Strip: According to the density of lamp beads (such as 60 lamps/meter or 120 lamps/meter), the cutting spacing is usually 50mm or 100mm;
LED Neon Strip: The outer layer is covered with silicone or PVC, which needs to be cut at the specified position, otherwise the waterproof structure will be damaged.
If you arbitrarily cut at a non-cutting point, it may cause the whole segment can not be lit, or even cause a short circuit. Therefore, before formal construction, we must confirm whether the cutting position, light strip specification and power supply mode are matched.
How to find the cut location of an LED light strip?
The first step to determine whether the LED strip can be cut is to find the location of the cut line. Most high-quality LED strips have a “scissor icon” or “copper soldering pad” printed on the FPC circuit board, which is a safe cut point. The circuitry in this location is designed to allow for disconnection without affecting the normal operation of the rest of the strip.
The shear line manifests itself slightly differently for different types of light strips:
COB Light Strips: The cut line is usually a horizontal line or scissor pattern with short spacing for fine cutting. High-density COB strips can also be spliced without dark areas.

SMD Strip: After each section of beads, there is usually a copper pad (+/- poles); cut in the middle of the pad is the safest.

Neon Strip: The line can not be seen on the outside surface, according to the manufacturer, to provide a “cut pitch mark” to cut. The product surface has a transparent cut window; the cut window will see the black cut line mark.

Typical Cutting Intervals for Different LED Strip Lights
Different LED strip lights have different cutting intervals depending on their voltage and circuit design.
| LED Strip Type | Typical Cutting Interval |
| 12V LED strip lights | Every 3 LEDs |
| 24V LED strip lights | Every 6 LEDs |
| COB LED strip lights | 25mm – 50mm depending on model |
| LED neon flex | Fixed cutting points marked on the sleeve |
Always check the product specifications, as the exact cutting interval may vary between manufacturers.
Can I reconnect the LED strip after cutting it? How to connect?
LED strip lights can be reconnected and used normally after cutting, but make sure the polarity is the same, the circuit is continuous, and choose the appropriate connection according to the structure of different light strips.
The following are three common ways to connect LED strip lights:
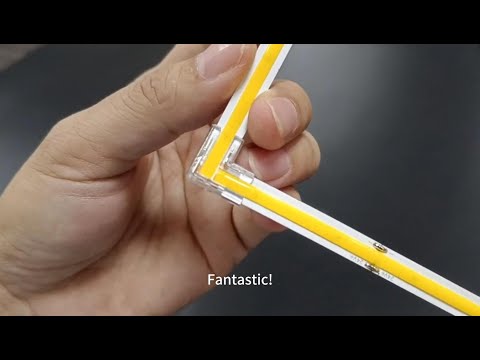
COB LED Strip: Due to the dense arrangement of LED chips, it is recommended to use the soldering method to connect. Expose the copper soldering disk at the end of the two sections of the strip, and use a soldering iron to weld the positive and negative poles. If you are not skilled in soldering, you can also use our matching COB solderless connector; plug it in, and it is suitable for quick on-site installation.

SMD LED Strip: Support soldering or snap-in connector both ways. Pay attention to the positive and negative positions of the SMD strip; inserting the reverse will not be bright. For outdoor projects, it is recommended to use a waterproof connector, a heat-shrinkable tube, or waterproof glue for encapsulation after connection.

Neon LED Strip: After cutting, special end caps, glue, and waterproof connectors must be used to seal or splice. The internal wiring of the neon strip is encapsulated in silicone, so it is not recommended to solder it by yourself but to use the connection fittings provided by the original manufacturer.

Tips:
If the LED strip does not light up after cutting, prioritize checking whether the connection direction and voltage are the same and whether it is cut to a non-cutting point. If using a connector, make sure the copper piece has fully contacted the pad area of the strip.
How to Cut SMD, COB, and Neon LED Strips (Step-by-Step Hands-on Guide)
Although there are structural differences between different types of LED strips, the core steps of the cutting process are similar. The following basic steps apply to SMD, COB, and Neon LED strips. It is recommended that the process be carried out on a clean, dry, and flat workbench to avoid damage to the wiring or housing.
① Preparation Tools
- Scissors (small sharp scissors are recommended)
- Specialized neon cutters (for neon strip)
- Multimeter (optional, used to test the on-off after cutting)
- Soldering equipment or connector (depending on the type of connection)
② Finding the Cutting Position
- Follow the previously mentioned “cut line” position to make the cut. Common markings include scissor patterns, dotted lines, and black lines.
- COB strips have shorter cut point spacing and are suitable for high precision;
- The neon strip should be cut strictly according to the manufacturer’s marking position; otherwise, it may lead to poor conductivity or waterproof structure failure.
③ Vertical and Smooth Cutting
- Must be cut vertically; otherwise, it will tear the copper foil or damage the substrate of the strip.
- For neon strips, it is necessary to use special neon scissors to cut, align the black cutting line, and then cut accurately;
- After cutting, it is recommended to use a multimeter to test whether the positive and negative poles of each section are on or off.
④ Connection and Packaging (if required)
- SMD and COB strips: Use soldering or solderless connectors to connect the strips; pay attention to the alignment of positive and negative poles;
- Neon Flex: use a special connector, potting, sealing cap, and other accessories to ensure waterproof;
- Waterproof treatment is recommended for outdoor projects (e.g., heat-shrink tubing, glue potting, etc.).
Tips:
- Do not perform cutting operations while the light strip is energized;
- You can use a 5V temporary power supply to test the light-up after each cutting before formal installation.
What happens if I cut LED strip in the wrong position?

LED light strips are not cut in any position. If you cut it in the wrong position, the most common consequences are as follows:
1. A section does not light up at all
The most common problem is that a section of the strip will not light up from the cut point backward. This is because the circuit has been broken at a point where it should not have been, resulting in the power supply not being able to continue to supply power.
2. Shorted or burned
If you cut to the middle area of the board instead of the pad location, it is possible to damage the structure between the positive and negative terminals, resulting in a short circuit. In some cases, access to the power supply may be directly burned LEDs, resistors, or even damage to the power supply driver.
3. Unable to reconnect
Wrong cutting not only damages the circuit but also may make you unable to find the available pads or connection points so that you can’t splice or repair, and the whole section of the light strip can only be scrapped, resulting in material waste.
Practical advice:
- Check the markings on the back of the strip (scissor symbol, +/- pads, manufacturer’s markings, etc.) before cutting.
- It is not recommended to attempt “remedial soldering” of non-pad areas, especially on neon tape, which is more complex and has a lower success rate.
If you are afraid of cutting wrongly during construction, we can provide you with customized pre-cut length service or an LED strip with pre-installed connectors to reduce the risk of on-site operation.
Can LED strip lights be reconnected after cutting?

The answer is yes, as long as it is cut correctly, an LED light strip can be completely reconnected after cutting and continue to be used normally. However, different types of LED strips, connection methods, and precautions are different; the following are a few common situations:
1. SMD LED strip connection method
- Soldering connection is the most common and secure method. Expose the pads of the two ends of the strip and use a soldering iron to solder the positive and negative poles.
- If it is not convenient to solder, you can use a solderless quick connector. Insert the two ends into the connector and press the copper sheet to contact the pad to light up, suitable for rapid deployment and space-constrained projects.
- For waterproof LED strips, be sure to do heat shrink tubing or potting encapsulation after connection to prevent water oxidation.
2. COB LED strip connection method
- Although the COB light strip is light-emitting and dense, its structure still supports welding or special connector splicing.
- If you choose to solder, please make sure the solder joints are neat and not too much solder to avoid a short circuit.
- The use of COB strip connectors can improve connection stability and is suitable for scenarios that require repeated disassembly or fine alignment.
3. Neon LED strip connection method
- The neon strip connection is more special. The LED strip is wrapped in silicone or PVC and needs to be connected with a special terminal kit.
- When connecting, you need to cut off part of the outer skin, insert the copper pin or slot, and fix it with sealant + plug + nut to ensure electrical connection and waterproof rating (e.g., IP65/IP67).
- It is strongly recommended to use the original matching parts provided by the manufacturer; otherwise, it may lead to poor sealing or poor contact.
Summary:
| Strip type | Connectable or not | Recommended connection method | Suitable scenes |
| SMD Strip | Yes | Soldering / Solderless connector | Indoor and outdoor universal application |
| COB Strip | Yes | Fine soldering / special connector | High-density luminous items |
| Neon Strip | Yes (accessories required) | Original connector + potting package | Outdoor / waterproof installation |
Warm Tips:
If you plan to cut and rewire several times in the project, it is recommended to choose the light strip model that supports short pitch cutting + matching connector when purchasing and prepare the accessories in advance to avoid delaying the progress on site.
What tools do I need to cut and reconnect LED light strips?
In order to successfully complete the cutting and reconnecting of LED light strips, it is crucial to have the right tools on hand. Whether you’re a lighting project contractor, an engineering technician, or a do-it-yourself (DIY)er, the following tools will make the process more efficient and safer.
Cutting Tools
- Pointed scissors: Used to cut light strips accurately, especially suitable for SMD & COB light strips, sharp and with good control to avoid tearing copper foil.
- Neon cutter or carving knife: For the neon strip, used to peel off the silicone shell to expose the electrodes for easy plugging or gluing.

Connecting Tools
- Soldering Iron + Solder: For SMD and COB strips, solid soldering effect, suitable for long-term use environments. It is recommended to use a fine-tip soldering iron tip for more delicate operation.
- Solderless Connector: Plug and play, no need to solder, suitable for small-lot rapid deployment or docking. There are corresponding models for COB and SMD strips; you need to buy the connector with a matching width (e.g., 8mm, 10mm, 12mm, etc.).
- Neon strip special connector kit: including metal pins, caps, sleeves, waterproof adhesive, etc., must be used in conjunction to ensure stable and waterproof connection.
Inspection and Protection
- Multimeter: Used to check whether the line is on and off after cutting to prevent non-lighting caused by wrong cutting or welding mistakes.
- Heat Shrink Tubing / Waterproof Adhesive / Potting Adhesive: necessary for encapsulation at the cut joint, especially for outdoor projects to prevent water oxidation.
Recommend several LED strip models suitable for cutting and splicing
If your project requires flexible lengths and multiple cut-and-splices, it is crucial to choose an LED strip model that supports short-pitch cuts, is easy to install, and has a stable connection structure. Below are a few recommendations of LED light strip types that are perfect for custom installations:
COB Flexible LED Strip Light
Short cutting pitch (25mm for 12V version), suitable for detail lighting or narrow area installation; Continuous particle-free light spot, more advanced for display cabinets, furniture wire channel, back wall; Support soldering or use the original factory solder-free connector, fast wiring, and friendly on-site installation; Optional waterproof version, adapting to more indoor and outdoor environments.
Suitable scenes: cabinet lighting, customized furniture lighting, and complex shape commercial space lighting.

Model No.: FYX08T480C
LED Chip QTY per Meter: 480
CRI: >90
PCB Width: 8mm
Cut Section: 25mm/50mm
Color Temperature: 2700K/3000K/4000K/6500K
Input Voltage: DC12V/DC24V
Power per Meter: 11W
Efficiency: 90lm/w – 105lm/w
IP Grade: IP20/IP54/IP65/IP67/IP68
Warranty: 3 years
Price: From USD $1.08/meter
High Density SMD LED Strip Light
One shear point per 50mm (24V version), suitable for fine light distribution and multi-segment combination splicing; supports a variety of connection methods: soldering, snap connectors, adapter wires, flexible installation; a variety of voltages/colors to choose from, cost-effective, suitable for large area use.
Suitable for scenes: large signboard backlighting, the top of the exhibition hall contour light, and office lighting.

Model No.: FQW10T120A
LED QTY per Meter: 120
PCB Width: 10mm
Cut Section: 25mm/50mm
Color Temperature: 2700K/3000K/4000K/5000K/6500K
Input Voltage: DC12V/DC24V
Power per Meter: 19.2W
Efficiency: 95lm/w – 110lm/w
IP Grade: IP20/IP54/IP65/IP67/IP68
Warranty: 5 years
Price: From USD $1.31/meter
LED Neon Strip
Internal integrated SMD beads, high precision of cutting point (e.g. 100mm section); with the original connection kit, it can be spliced after cutting and keep IP67 waterproof grade; support DMX/RGB control, suitable for creating curved surface and three-dimensional contour lighting effect.
Suitable scenes: outdoor contour light, building facade lighting, etc.

Model No.: NAQ1220SC
LED QTY per Meter: 60
PCB Width: 10mm
Cut Section: 100mm
Color: RGB/RGBW(2700K-6500K)
Control Type: DMX512
Input Voltage: DC24V
Power per Meter: 12W/19W
Bending Method: Side bend
IP Grade: IP65/IP67
Warranty: 3 years
Frequently Asked Questions
Conclusion
During the installation and customization of LED light strips, the correct steps of cutting and connecting are crucial. Whether you’re a remodeler, a contractor, or a DIY enthusiast, mastering cutting techniques, choosing the right tools, and understanding the characteristics of each type of light strip will make the entire process go more smoothly.
If you are looking for High-Quality LED Light Strips suitable for cutting and splicing, our COB LED Strips, SMD LED Strips, and Neon LED Strips will be your best choice. They support precise cutting and easy splicing while meeting a wide range of indoor and outdoor lighting needs.
Related Posts