Disponibili in un'ampia gamma di dimensioni, densità e colori, le luci a striscia LED sono diventate una scelta popolare per i proprietari di casa e le aziende che desiderano creare un'atmosfera o migliorare l'arredamento grazie alla loro facilità di installazione. Tuttavia, come molti apparecchi di illuminazione, le strisce LED possono presentare problemi che ne compromettono le prestazioni. Di conseguenza, la risoluzione dei problemi e la riparazione delle strisce LED possono essere uno dei maggiori grattacapi.
Ma non preoccupatevi! Grazie agli anni di esperienza di SignliteLED nello sviluppo, nella produzione, nella vendita all'ingrosso e nell'utilizzo di strisce luminose a LED, abbiamo riassunto alcune delle cause più comuni di guasto delle strisce luminose a LED e le soluzioni che è possibile adottare per risolverle, per aiutarvi a imparare a diagnosticare e riparare strisce luminose tremolanti o danneggiate. In questa guida, abbiamo probabilmente trattato i problemi specifici che state riscontrando, spiegando brevemente ogni problema e fornendo una semplice soluzione.
Consigli di sicurezza prima di iniziare
Prima di immergersi nel processo di risoluzione dei problemi, assicuratevi di dare la priorità alla sicurezza, che viene sempre prima di tutto. Sebbene le strisce luminose a LED siano anche dispositivi elettronici a basso voltaggio in corrente continua, generalmente considerati sicuri e a basso rischio di folgorazione, è sempre meglio essere sicuri che dispiaciuti.
Ecco quindi alcuni importanti consigli di sicurezza per garantire che il lavoro venga svolto in modo sicuro ed efficiente:
1. Girare Off il Power: Assicurarsi sempre che l'alimentazione sia scollegata prima di eseguire qualsiasi operazione di installazione o manutenzione sulla striscia LED. In questo modo si evitano scosse elettriche e potenziali danni all'alimentatore.
2. Utilizzare strumenti adeguati: Utilizzare strumenti isolati quando si lavora con componenti elettrici per evitare cortocircuiti o lesioni. Assicurarsi che metro a nastro, cacciaviti e altri strumenti siano in buone condizioni.
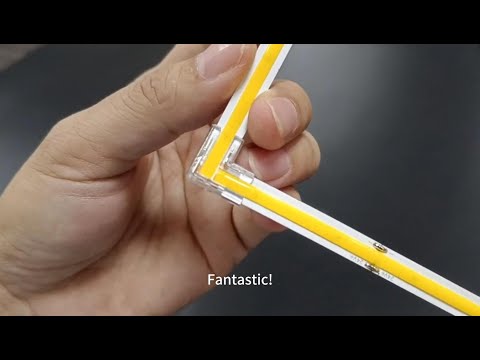
3. Evitare Sarpa Bfine: Non piegare mai le strisce LED ad angolo acuto per non danneggiare i LED o i circuiti FPCB.
4. Controllare la tensione: Verificare sempre la corrispondenza di tensione tra la striscia LED e l'alimentatore. Una tensione errata può causare surriscaldamento o danni elettrici.
Per favore Note: Per alcune delle operazioni di risoluzione dei problemi proposte di seguito, è necessario collegare e alimentare l'alimentatore per completare il test. Se non siete sicuri di come eseguire questi test in modo sicuro, fate attenzione e rivolgetevi a un professionista.
I guasti più comuni delle strisce luminose a LED e come risolverli
Problemi di alimentazione e connessione
1. Il LED non si accende affatto
Causa e descrizione: Se il LED non si accende, è possibile che l'alimentazione del LED sia interrotta.
Soluzione: Se si dispone di più di una scheda di alimentazione, provare a collegare diversi alimentatori LED alla stessa scheda per verificare se funziona correttamente. Se non funziona correttamente, significa che l'alimentatore è danneggiato e deve essere sostituito con uno nuovo.
2. La striscia luminosa a LED non può essere accesa
Causa e descrizione: Avete appena scollegato la striscia LED. È ancora accesa? Allora è possibile che l'abbiate ricollegata, ma la striscia LED non si accende. Potrebbe trattarsi di una striscia di scarsa qualità, oppure l'alimentatore non funziona o funziona male.
Soluzione: Una striscia luminosa a LED di scarsa qualità non vale il vostro tempo; potete buttarla via e acquistare una striscia luminosa a LED di alta qualità. Ma prima di buttare via la striscia LED, controllate che l'alimentatore funzioni correttamente; nella maggior parte dei casi, infatti, l'alimentatore non funziona o funziona male. Se non siete sicuri, portate l'alimentatore in un negozio di elettronica per un test rapido.
Se la striscia luminosa utilizza l'alimentazione a batteria, provare a sostituirla con batterie nuove. Naturalmente, questo vale anche per il telecomando a LED. Infine, controllate i cavi; i collegamenti difettosi dei fili possono causare un'illuminazione anomala o la mancata accensione della striscia.
Per ulteriori informazioni su come scegliere l'alimentatore giusto, leggete il blog: Come scegliere l'alimentatore giusto per le strisce luminose a LED.
3. L'intera striscia LED non si accende
Causa e descrizione: Quando si collegano tutti i componenti e si collega l'alimentazione alla striscia LED, si accende l'interruttore, ma non c'è risposta. Qual è il motivo? Innanzitutto, la tensione della striscia LED e quella dell'alimentatore LED potrebbero non essere uguali; in secondo luogo, i poli positivo e negativo della striscia LED non sono collegati correttamente ai poli positivo e negativo dell'alimentatore; in terzo luogo, è stato utilizzato un dimmer o un controller LED non adatto; in quarto luogo, il connettore della striscia LED è allentato; infine, l'alimentatore è difettoso.
Soluzione: Assicurarsi che la tensione e la corrente nominale dell'alimentatore siano compatibili con la striscia LED. Se l'alimentatore è a 12 V CC, non è compatibile con una striscia LED a 24 V. Controllare l'etichetta sull'alimentatore, che indica la tensione di uscita. Quindi, controllare la striscia LED stessa; la tensione di ingresso è indicata sul punto di connessione della striscia LED.
Assicurarsi che i cavi dei poli V+ e V- della striscia LED siano collegati correttamente a V+ e V- dell'alimentatore LED. Per i principianti, questo è probabilmente l'errore più facile da commettere. Le strisce LED e gli alimentatori sono solitamente etichettati con V+ e V-. Assicurarsi che i cavi collegati siano correttamente connessi alla polarità corrispondente.

Per Dimmer e controller LED per abbinarli, è necessario innanzitutto rimuovere tutti i dimmer e i controller opzionali e determinare se è possibile far brillare la striscia LED senza l'uso di accessori aggiuntivi. Se la striscia LED funziona correttamente, c'è un problema con il dimmer o il controller o con il collegamento tra questi accessori. È necessario controllare i collegamenti o sostituire il dimmer o il controller. Per questo test è necessario che l'alimentazione sia attiva, ma non collegare una striscia LED a bassa tensione CC (ad esempio, 12V/24V) direttamente a una presa di corrente a tensione di rete (ad esempio, 120V/240V)!
Assicurarsi che tutti i connettori e i fili siano al loro posto e non siano scollegati. Provate a stringere le viti sull'alimentatore e poi reinserite la striscia LED nel connettore senza saldature, assicurandovi che la pressione sia salda e che i punti di connessione facciano contatto correttamente. I connettori senza saldature sono in genere un punto comune di guasto dei contatti.
Se avete controllato e verificato tutti i passaggi sopra descritti e la striscia LED continua a non funzionare, è possibile che l'alimentatore o la striscia LED siano danneggiati. È sufficiente sostituire l'alimentatore o la striscia.
4. Il LED si accende e poi si spegne
Causa e descrizione: A volte le strisce LED si accendono e si spengono improvvisamente. Ciò può essere dovuto al dimmer LED installato. Queste strisce non funzionano con molti dimmer economici.
Soluzione: Questo problema può essere risolto sostituendo il dimmer. Prima di procedere alla sostituzione, è necessario individuare il dimmer LED più adatto alla propria striscia. Se il problema persiste, è possibile che le spine siano difettose e che sia necessario acquistarne una nuova.
5. La striscia LED è intervenuta
Causa e descrizione: Il problema può essere dovuto a due motivi. Una è che l'alimentatore potrebbe non funzionare. Se l'alimentatore non funziona, l'interruttore automatico non è in grado di gestire una grande quantità di corrente. L'altra è che l'interruttore non ha una capacità sufficiente.
SoluzioneSe si ritiene che uno degli alimentatori sia guasto, è necessario scollegare l'interruttore automatico e quindi provare a ricollegare gli alimentatori uno alla volta finché l'interruttore automatico non scatta, in modo da poter stabilire quale alimentatore è guasto.
Se l'interruttore continua a scattare anche se è collegato più di un alimentatore e nessuno di essi è guasto, l'interruttore non è in grado di gestire la corrente in ingresso ed è necessario aumentare la capacità dell'interruttore. È necessario sostituire l'interruttore con uno di maggiore capacità di corrente.
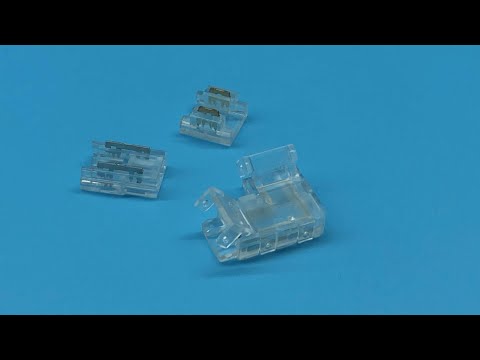
6. Il connettore della striscia LED non funziona
Causa e descrizione: A volte è necessario un connettore specifico; le strisce LED RGB, RGBW e bianche hanno diversi tipi di connettori. Non importa se hanno un aspetto diverso. È sufficiente assicurarsi di aver scelto il connettore giusto per la striscia LED e che i punti di connessione facciano buon contatto.
Soluzione: I punti di connessione delle strisce LED RGB, RGBW e bianche corrispondono a connettori per strisce LED a 3 PIN, 4 PIN e 2 PIN ed è necessario acquistare i connettori corrispondenti. Connettori per strisce LED.
È sufficiente collegare il disco di rame della striscia luminosa alla parte in rame del connettore. Aprire il connettore e vedere l'interfaccia. Successivamente, inserire la striscia luminosa nel connettore. È importante non applicare troppa forza. È sufficiente inserire la striscia luminosa nel connettore da entrambi i lati. Inoltre, è necessario rilevare la polarità del connettore.
Esistono connettori buoni e cattivi. Se il contatto è buono, il connettore scatta quando lo si chiude, indicando che tutto è al suo posto. Se il coperchio non aderisce bene, tornate indietro e rimettetelo a posto con attenzione.
7. La striscia LED si accende solo quando la tocco.
Causa e descrizione: È possibile che sia stata installata più di una striscia LED. Alcune strisce si accendono e funzionano sempre correttamente, mentre altre non si accendono. Quando si tocca per sbaglio una delle strisce che non si accende, a volte si accende.
Le ragioni sono due: In primo luogo, la maggior parte delle strisce LED reagisce a fattori che causano problemi nella rete, come il WiFi, gli inverter fotovoltaici o gli alimentatori a impulsi economici. Gli esperti chiamano questo fenomeno "accoppiamento capacitivo". In sostanza, si tratta di una trasmissione che può essere o meno quella desiderata. In secondo luogo, il filo di collegamento o il connettore non fanno bene contatto.
Soluzione: Controllare prima la striscia per scoprire qual è il problema. In questo modo è possibile individuare la fonte dell'interferenza ed eliminarla. Ancora meglio, sostituire l'adattatore LED con un alimentatore LED certificato EMC. Questo è molto meglio di un filtro di soppressione del rumore dell'alimentatore standard.
Ricontrollare i fili di collegamento degli ingressi o la porzione di connettore della striscia per vedere se ci sono pastiglie che si staccano, collegamenti allentati o nessun collegamento, ecc. In caso di contatto difettoso, è possibile ricollegare o riparare la striscia.
8. La striscia luminosa a LED non può essere completamente spenta o non può essere spenta.

Causa e descrizione: A volte la striscia luminosa a LED rimane accesa anche se l'interruttore della presa è spento. Avete provato rapidamente a individuare la causa dell'illuminazione irregolare, ma non riuscite a risolvere il problema. Potrebbe trattarsi di un problema di tensione indotta.
Soluzione: Spostare la striscia LED in un'altra posizione ed eseguire alcuni test per individuare il problema. È possibile che vi sia un'interferenza che causa l'oscuramento delle luci. Spesso è possibile risolvere il problema sostituendo semplicemente l'interruttore. Se il problema persiste, potrebbe essere necessario installare un nuovo interruttore compatibile con i LED, ad esempio Z-Wave.
La striscia LED in parte non si accende o presenta problemi di luminosità
1. La luminosità della striscia LED diminuisce gradualmente in prossimità della fine del ciclo di vita.

Causa e descrizione: La luminosità dei LED diminuisce all'estremità della striscia a causa di una caduta di tensione alle due estremità della striscia. Le strisce LED più comuni possono essere alimentate da un'estremità per un massimo di 5 metri senza una significativa caduta di tensione. (Alcune strisce LED speciali, come quelle a corrente costante, sono disponibili in lunghezze fino a 10, 15 o 20 metri).
Soluzione: Per la caduta di tensione causata dalla ridotta luminosità dell'estremità della striscia. Esistono due modi per risolvere il problema: (1) separare le strisce e collegare due strisce da 5 metri in parallelo alla stessa alimentazione; (2) installare un cavo di rete ad anello con un cavo di avvio e uno di uscita su una striscia da 10 metri e collegare entrambi i cavi alla stessa alimentazione.
Per ulteriori informazioni sulla caduta di tensione, leggere il blog: Caduta di tensione sulle strisce LED: Cause e soluzioni.
2. Una o più sezioni della striscia LED non si accendono.

Causa e descrizione: Se l'intera striscia LED si accende, ma uno o più dei 3 LED o dei 6 LED non si accendono, uno dei componenti potrebbe avere un "circuito interrotto". Ciò significa che, a causa di un difetto di fabbricazione o di un danno meccanico durante il trasporto o l'installazione, uno dei LED o delle resistenze di una sezione si è allentato o si è rotto, causando la completa disconnessione del LED di quella sezione.
Soluzione: Se si ha dimestichezza con i metodi di saldatura, si può provare a riscaldare i giunti di saldatura di ciascun LED e componente sulla sezione scollegata. Se non si ha dimestichezza con i metodi di saldatura, la cosa migliore da fare è chiedere al fornitore una sostituzione (se offre una garanzia) o rimuovere la sezione difettosa tagliando il segmento di LED non illuminato direttamente lungo la linea di taglio e ricollegando poi i due segmenti con un connettore senza saldature.
3. Nello stesso segmento LED, solo un LED è spento, mentre gli altri LED sono accesi.
Causa e descrizione: Il chip del LED potrebbe essersi bruciato, il che può essere determinato osservando la presenza di evidenti macchie nere sulla superficie del LED. Tra le possibili cause vi sono la rottura statica, un'alimentazione instabile dei LED, una corrente di spunto eccessiva o un valore di resistenza insufficiente di alcuni LED. La causa è da ricercarsi in problemi del circuito interno della PCB.
Soluzione: La cosa migliore da fare è chiedere al fornitore una sostituzione se offre una garanzia. In alternativa, è possibile tagliare l'intero segmento di LED (è necessario seguire la linea di taglio) e quindi utilizzare connettori senza saldature per ricollegare insieme i due segmenti buoni, eliminando così la parte difettosa.
4. Diminuzione della striscia LED nel tempo
Causa e descrizione: Se si nota che la striscia LED si oscura con il passare del tempo, le cause possono essere due: un calo della tensione di ingresso o una diminuzione della luminosità del LED stesso.
Soluzione(1) Controllare la tensione di ingresso. Misurare la tensione di ingresso con un multimetro per verificare che rientri nell'intervallo previsto. Se la tensione misurata è inferiore al valore nominale, potrebbe essere necessario correggere il cablaggio o sostituire l'alimentatore. Una bassa tensione di ingresso provoca una diminuzione della luminosità della striscia. (2) Valutare le condizioni dei LED. I LED perdono gradualmente luminosità nel tempo a causa dell'invecchiamento o di difetti. Se si esclude un problema di tensione di ingresso, potrebbe essere necessario sostituire l'intera striscia di LED.
5. Fine della striscia LED indirizzabile SPI non illuminata
Causa e descrizione: Strisce LED indirizzabili SPI sono progettati per controllare 1/3/6 LED tramite circuiti integrati sulla striscia; un circuito integrato = un pixel. Pertanto, assicurarsi che il numero di pixel che il controller SPI può gestire sia maggiore del numero di pixel della striscia LED SPI e che l'impostazione dei pixel del controller sia corretta.
Soluzione: Verificare il numero di pixel (IC) della striscia LED SPI indirizzabile e controllare il numero di pixel supportati dal controller SPI. Se il numero di pixel del controller è inferiore al numero di pixel della striscia LED, è necessario sostituire il controller SPI con uno che supporti un numero maggiore di pixel; se il numero di pixel del controller è superiore al numero di pixel della striscia LED, è necessario verificare se le impostazioni dei pixel del controller sono corrette.
Problemi di visualizzazione del colore
1. I LED RGB/RGBW mostrano colori diversi in alcune piccole aree della striscia.
Causa e descrizione: La maggior parte del vostro Striscia LED RGB/RGBW funziona correttamente, tranne che per uno o due segmenti all'interno del punto di taglio? Ad esempio, quando si seleziona "Arancione", una sezione all'interno del punto di taglio mostra solo il verde. Ciò significa che il LED rosso o il resistore in quella sezione è difettoso. È possibile confermarlo facilmente: Se si imposta la striscia sul rosso, i LED di quella sezione non si accendono affatto.
Il semplice motivo è che uno dei colori dei LED RGB/RGBW non si illumina in quell'area e il LED o il resistore devono essere sostituiti. Questo può essere causato da danni statici, piegatura e torsione eccessiva della striscia, calpestio, danni durante il trasporto, strisce economiche e di scarsa qualità o giunti di saldatura secchi.
Soluzione: Nella maggior parte dei casi, l'unica opzione è quella di sostituire quella parte della striscia. È possibile sostituire l'intera striscia. In alternativa, è possibile tagliare la sezione danneggiata e saldare nuovamente la sezione buona della striscia luminosa, oppure utilizzare connettori senza saldature per collegarla.
Prima di procedere, si può provare a toccare o premere il LED/resistore sulla sezione difettosa. Nel migliore dei casi, si potrebbe vedere il LED riaccendersi. In questo caso, il problema è un giunto di saldatura secco e, se sapete saldare, potete riparare questa striscia luminosa con una piccola risaldatura!

2. I LED RGB o RGBW mostrano colori diversi
Causa e descrizione: Se tutti i colori dei LED sono normali tranne uno, e il problema riguarda quel colore sull'intera striscia di LED, ad esempio l'intero LED rosso non funziona. Ciò indicherebbe una saldatura difettosa del cavo V rosso alla scheda della striscia, un cavo rosso difettoso dalla striscia al ricevitore o un collegamento difettoso o rotto del cavo rosso al ricevitore.
Soluzione: Verificare che non vi siano cavi allentati tra l'alimentatore, il controller e la striscia, soprattutto se i cavi sono stati prolungati con delle morsettiere. Un test efficace consiste nello scollegare tutti i cavi di prolunga e i comandi, collegando l'alimentatore direttamente alla striscia luminosa.
Per prima cosa, collegare il lato positivo dell'alimentatore al cavo positivo della striscia LED. Quindi collegare il lato negativo dell'alimentatore al cavo di colore negativo corrispondente sulla striscia. Se entrambi si accendono, significa che c'è un problema di connessione altrove. Quindi, ricostruite gradualmente il sistema aggiungendo il controller (e i cavi di prolunga, se li avete) per vedere quale componente fa sì che un colore non si accenda.
3. Le strisce LED mostrano colori incoerenti in alcune aree

Causa e descrizione: Se si installa una striscia LED bianca fredda e poi si vede una luce bianca calda in qualsiasi area o sembra "spenta", ciò è dovuto al fatto che la striscia è stata dipinta o a qualcos'altro. Di solito questo accade quando gli imbianchini vengono a dipingere una stanza e non sanno che ci sono strisce LED nella stanza perché sono nascoste.
Soluzione: A seconda della quantità di vernice, a volte le strisce luminose a LED possono essere trattenute. È possibile rimuovere la vernice dalla striscia, ma non utilizzare prodotti a base d'acqua per non danneggiare i LED. È anche possibile utilizzare un coltello per raschiare con cautela e attenzione la vernice secca dai LED, assicurandosi che la striscia sia spenta.
4. Quando seleziono i colori per la striscia RGB/RGBW, sono tutti sbagliati.
Causa e descrizione: I fili del controller RGB/RGBW sono invertiti. Ad esempio, se si collega il filo rosso al terminale blu e il filo blu al terminale rosso, quando si seleziona un colore sul controller, la miscelazione dei colori non verrà eseguita correttamente e il colore delle luci che si vedranno sarà diverso da quello selezionato.
Soluzione: È necessario controllare i cavi e ricollegare eventuali cavi incrociati ai terminali corretti. Se i cavi sono stati prolungati con connettori per cavi, è necessario controllare anche questi collegamenti.
A volte i diversi cavi possono entrare in contatto, producendo risultati imprevedibili. Ad esempio, se i cavi rosso e blu si toccano, è necessario separarli per garantire una connessione perfetta e priva di interferenze.
5. La stessa temperatura di colore della striscia LED, il colore di emissione della luce non è lo stesso

Motivo e descrizione: I diversi produttori di strisce LED hanno tolleranze diverse per la temperatura di colore. Anche se la temperatura di colore è la stessa, ma il DUV del LED è diverso, il colore luminoso sarà diverso.
Soluzione: Di solito, è necessario acquistare lo stesso lotto e la stessa temperatura di colore di strisce LED dallo stesso produttore di strisce LED. Per i grossisti, è necessario chiedere al produttore della striscia di utilizzare lo stesso numero di PIN di perline LED per produrre la striscia LED dall'inizio alla fine.
6. Colore rossastro all'estremità della striscia RGB quando si mescola il colore bianco
Causa e descrizione: La causa principale di questa situazione è la caduta di tensione. Poiché le sfere RGB sono composte da chip rossi, verdi e blu, la tensione necessaria per illuminare il chip rosso è piccola (2,0-2,2 V). A causa della caduta di tensione, la tensione all'estremità della striscia LED diminuisce. A causa della maggiore tensione richiesta (3,0-3,2 V), i chip verdi e blu saranno meno luminosi, ma il chip rosso potrà essere illuminato come di consueto, facendo apparire rossa l'estremità della striscia LED.
Soluzione: Separare le strisce RGB e collegare due strisce da 5 metri in parallelo alla stessa alimentazione, oppure collegare i fili all'estremità delle strisce RGB e collegarli alla stessa alimentazione.
7. Striscia luminosa a LED bloccata in un colore
Causa e descrizione: Il problema delle strisce LED bloccate in un colore può verificarsi in qualsiasi momento. Molto probabilmente il controller dei LED è bloccato. In particolare, le impostazioni del controller non funzionano più correttamente.
Soluzione: Se il controller della striscia LED è dotato di una funzione di ripristino rapido, la soluzione è semplice. Se il controller LED non è stato fornito con un manuale di istruzioni, ecco una soluzione comune. Innanzitutto, collegare tutti i dispositivi come previsto. Quindi, collegare l'adattatore di corrente e, dopo circa cinque o sei secondi, scollegarlo: la luce della striscia si spegnerà. Ripetere questa procedura fino a ripristinare le impostazioni di fabbrica del controller. Nella maggior parte dei casi sono necessari da cinque a dieci passaggi.
Danni fisici, surriscaldamento e problemi di installazione
1. Il LED è troppo caldo, quasi bruciato al tatto
Causa e descrizione: Le cause possono essere due. O la striscia LED a 12 V è collegata a una fonte di alimentazione a 24 V, oppure c'è un leggero "cortocircuito" nella striscia. Se si dispone di un cavo di uscita, è possibile che i fili di uscita positivi e negativi si tocchino, causando un leggero cortocircuito.
Se il problema è causato dall'applicazione di 24 volt a una striscia da 12 volt, la striscia funzionerà comunque. Poiché la potenza erogata è più del doppio del normale, i LED appariranno più luminosi del normale. Il problema, tuttavia, è che questo aumenta il rischio di incendio e provoca gravi danni ai LED (di solito entro poche ore).
Se il problema è causato da un piccolo cortocircuito, anche i LED possono essere danneggiati e persino l'odore di bruciato può essere pericoloso. In genere, un cortocircuito positivo o negativo causato dal circuito della scheda o da una saldatura brucia immediatamente una o più sezioni del banco di LED sulla parte anteriore della striscia nel momento in cui viene attivata l'alimentazione.
Soluzione: Se si utilizza una striscia LED da 12 V, è necessario acquistare un Alimentazione a 12 V.
Indipendentemente dal fatto che si pensi a un "cortocircuito" o meno, è necessario controllare attentamente ogni striscia per vedere se c'è della saldatura nei collegamenti del cavo o nel contatto del filo. In tal caso, è possibile tagliare con un coltello la saldatura o il filo in modo che i terminali positivo e negativo non siano più in contatto, oppure è possibile saldare nuovamente.
2. La striscia LED ha un odore di bruciato quando viene arrotolata e accesa.
Causa e descrizione: Se la striscia LED si accende quando è ancora sulla bobina in dotazione o quando è ancora arrotolata, l'accumulo di calore la farà diventare molto calda e gradualmente bruciare o fondere la bobina.
Soluzione: Quando si testano le strisce LED, assicurarsi sempre che la striscia sia srotolata e non arrotolata in alcun modo.
3. Striscia LED troppo calda al tatto
Causa e descrizione: Quando si accende la striscia LED per un po' di tempo, i LED sono molto luminosi e si sentono più caldi quando si tocca la striscia con la mano. Alla fine la striscia LED diventa così calda che non è possibile toccarla. Ciò significa che i LED sono sovraccarichi di corrente o che non sono stati installati in una posizione che dissipa abbastanza calore. Le strisce LED economiche e di scarsa qualità sono solite utilizzare i LED alla massima corrente e alla massima potenza per ottenere un prezzo basso e una luminosità elevata.
Soluzione: Potrebbe non essere possibile identificare il problema senza effettuare un test. È una buona idea eseguire un test per verificare se ci sono problemi con l'impianto elettrico. Se si vuole scoprire perché i LED si surriscaldano, ecco come fare. Utilizzare Profili in alluminio a LED per dissipare il calore; un semplice profilo di alluminio farà al caso vostro. Questo perché il metallo assorbirà il calore e renderà la striscia LED più fredda. Se si conferma che il problema è la striscia luminosa, è necessario sostituirla con una di buona qualità.
4. L'adesivo della striscia LED perde potenza di adesione

Causa e descrizione: Se le strisce LED non sono ben aderenti alla superficie, col tempo potrebbero staccarsi o non rimanere in posizione. Questo può portare a una cattiva installazione, che a sua volta può causare problemi come un'illuminazione non uniforme. Questo problema è solitamente causato da un supporto adesivo inadeguato, dall'esposizione alla polvere o da una preparazione non corretta della superficie. Alcune superfici, come quelle bagnate o con texture irregolari, possono compromettere la capacità di adesione dell'adesivo.
Soluzione: Prima dell'installazione, accertarsi che la superficie sia pulita, asciutta e non danneggiata. Utilizzare un panno morbido e acqua saponata per rimuovere eventuali tracce di sporco o olio. Per una migliore adesione, è possibile utilizzare altre strisce LED con supporto adesivo o rinforzarle con nastro biadesivo di alta qualità. Se il legame adesivo si indebolisce con il tempo, si consiglia di riapplicare l'adesivo.
Si consiglia di utilizzare un nastro biadesivo di qualità superiore, come il 3M VHB. Per ulteriori informazioni su come scegliere un nastro biadesivo, consultate il nostro blog: Nastro adesivo di migliore qualità per luci a striscia LED.
Problemi di controllo e di effetti dinamici
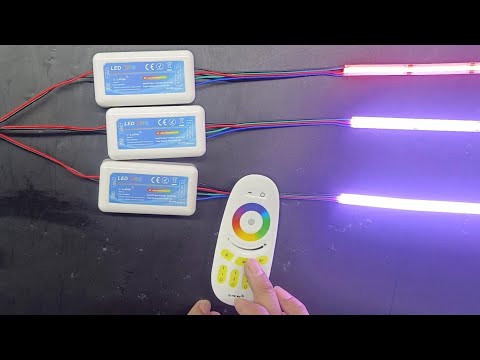
1. Il telecomando della striscia LED non funziona
Causa e descrizione: Quando si assembla e si prova la striscia LED e il telecomando in negozio, tutto funziona bene. Poi, quando questa striscia è stata portata a casa o sul posto di lavoro di qualcuno, non è successo nulla e il telecomando si è rotto. Inoltre, i colori non cambiano più. E quando si cerca di spegnerla, non si spegne; in breve, non importa quali pulsanti si premano, il telecomando non funziona.
Soluzione: Il telecomando a LED e il ricevitore hanno una distanza per ricevere il segnale (di solito entro 5-10 metri) e a volte è facile dimenticare la posizione o la distanza del ricevitore. È necessario provare a spostare il sensore per eliminare questo piccolo problema. Se il problema non è una batteria scarica, potrebbe essere necessario resettare il telecomando. Sarà quindi necessario riassemblarlo con la striscia luminosa.
Inoltre, è necessario assicurarsi che vi sia un buon collegamento tra il ricevitore, l'alimentatore e la striscia LED. D'altra parte, i telecomandi universali economici possono smettere di funzionare in qualsiasi momento. In tal caso, cercate e sostituite il telecomando con un modello di marca compatibile con la vostra striscia luminosa.
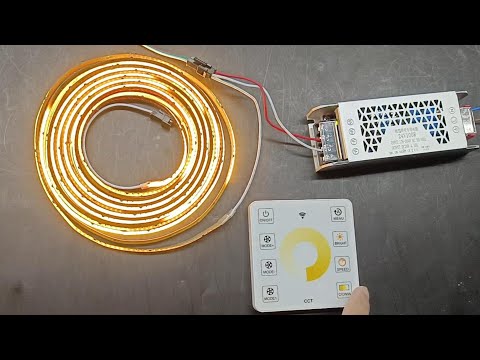
2. Le luci a LED non lampeggiano e non lampeggiano
Causa e descrizione: Le moderne strisce LED dispongono solitamente di applicazioni proprie per il loro controllo. A volte sono compatibili con sistemi operativi specifici, altre volte con applicazioni per tutti i sistemi. A volte, anche se si collega la striscia luminosa all'alimentazione e al WiFi, non è possibile controllarne il funzionamento. Pertanto, potrebbe essere necessario un notevole sforzo per risolvere l'intero problema passo dopo passo.
In teoria, ci sono due ragioni principali per cui una striscia LED chasing non lampeggia o non si sposta. Il primo motivo è l'uso di dimmer. Il secondo fattore ha a che fare con il software.
Soluzione: Se si utilizza un dimmer, rimuoverlo. Scollegandolo dalla scheda di alimentazione, il problema scomparirà. Questo perché le funzioni di inseguimento o lampeggio non si applicano ai dimmer.
Se non si utilizza un dimmer, è necessario ricollegare la striscia al WiFi. È necessario utilizzare un'applicazione o un programma online per trovare una rete. La striscia LED deve poi essere collegata al telefono cellulare per funzionare insieme. Una volta fatto questo, potrebbe essere necessario ricontrollare le impostazioni. Si noterà che le impostazioni di solito non mostrano alcuna informazione sull'accoppiamento. Pertanto, è necessario ricominciare da capo o chiedere aiuto.
Altri fenomeni anomali
1. Sfarfallamento del LED
Causa e descrizione: Se i LED lampeggiano in una sequenza regolare e coerente (ad esempio, si accendono per 1 secondo, si spengono per 1 secondo e si riaccendono per 1 secondo), l'alimentazione è sovraccarica. Ciò significa che sono state collegate troppe strisce di luci.
Ad esempio, se si dispone di una striscia LED lunga 10 metri con un consumo totale di 80 watt e questa striscia è alimentata da un alimentatore da 60 watt, l'alimentatore entrerà in modalità di protezione da sovraccarico. Ciò significa che l'alimentatore si accende, poi si accorge di essere sovraccarico, si spegne immediatamente e ripete il ciclo più volte.
Soluzione: È possibile acquistare un alimentatore più grande (ad esempio, 100 watt) per soddisfare la potenza totale richiesta, che è superiore alla potenza totale di tutte le strisce LED. È anche possibile dividere la striscia e collegarla a due alimentatori separati, identici a quello esistente. D'altra parte, il progetto potrebbe consentire di collegare un numero inferiore di strisce all'alimentatore.

2. Strisce luminose tremolanti nel video
Causa e descrizione: Quando si è finalmente terminata l'installazione delle strisce luminose a LED in tutta la casa e si inizia a registrare le riprese video, si può notare improvvisamente un significativo sfarfallio nel flusso video. Questo sfarfallio, che viene catturato dalla telecamera, è solitamente causato dallo schema delle onde luminose emesse dall'alimentatore CA che alimenta la sorgente luminosa. Se lo sfarfallio è visibile direttamente con gli occhi o con la vista, è causato da un'alimentazione di bassa qualità.
Soluzione: Lo sfarfallio catturato dalla fotocamera può essere risolto semplicemente utilizzando un alimentatore mobile. Questo perché la batteria è alimentata da corrente continua (DC). Naturalmente, anche questa non è una soluzione permanente, quindi è necessario acquistare strisce LED non sfarfallanti e un alimentatore LED non stroboscopico di alta qualità.
Se si nota uno sfarfallio, verificare se l'alimentatore è danneggiato o perde o se si utilizza un alimentatore economico. In tal caso, sostituitelo con un alimentatore di marca non sfarfallante.
3. Suono di ronzio della striscia luminosa a LED
Causa e descrizione: I LED funzionano utilizzando un principio chiamato elettroluminescenza per convertire l'energia elettrica in luce. Quando la corrente passa attraverso il chip LED all'interno della striscia, questo emette luce. Tuttavia, questa corrente può talvolta interagire con altri componenti elettronici o con fattori ambientali, causando vibrazioni o sibili, ronzii e rumori udibili. Le cause più comuni sono problemi di alimentazione o di compatibilità con i dimmer.
Soluzione: Innanzitutto, accertarsi che l'alimentatore o la presa di corrente siano stabili e funzionino correttamente. Un semplice test consiste nell'utilizzare un altro dispositivo nella stessa presa per verificare il corretto funzionamento.
Se si utilizza un alimentatore di bassa qualità o sottopotenziato, si consiglia di passare a un alimentatore di qualità superiore. La scelta di un alimentatore con regolatore di tensione incorporato consente di attenuare le fluttuazioni di tensione e di ridurre i livelli di rumore.
Scegliere un produttore di strisce LED per strisce LED di alta qualità
Noi di SignliteLED siamo orgogliosi del servizio clienti e dell'affidabilità. Qualità e affidabilità sono al centro di ogni nostro prodotto.
Luci a striscia LED prodotte da SignliteLED seguono rigorose specifiche di qualità e affidabilità per evitare i problemi comuni sopra menzionati. Purtroppo, questo non è il caso di molte altre strisce LED "economiche" presenti sul mercato. Anche se si seguono le fasi di risoluzione dei problemi fornite, alcuni problemi delle strisce LED possono essere più complessi e richiedere l'intervento di un professionista. SignliteLED è consapevole che i problemi possono sorgere in qualsiasi momento, soprattutto con le strisce LED economiche.
Se avete un problema con una striscia LED acquistata all'ingrosso da noi, contattateci immediatamente. Anche se avete acquistato le strisce LED altrove, saremo lieti di assistervi e di discutere le opzioni di sostituzione.
Post correlati