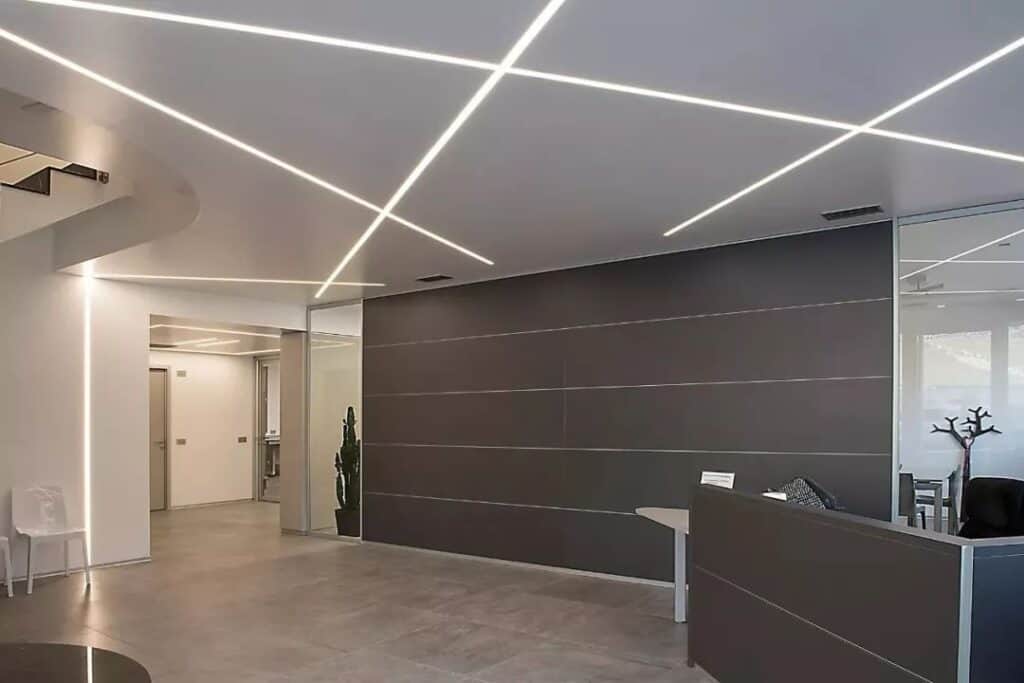
เมื่อเพดานมีสไตล์ที่หลากหลายมากขึ้นเรื่อยๆ โคมไฟประเภทต่างๆ ที่ติดตั้งในบ้านของเราก็เช่นกัน ตัวอย่างเช่น โคมไฟในบ้านเก่าเป็นโคมไฟระย้าหรือไฟเพดาน อย่างไรก็ตาม หากคุณดูตอนนี้ คุณจะเห็นว่ามีการติดตั้งแถบไฟ สปอตไลท์ และดาวน์ไลท์ โดยเฉพาะอย่างยิ่ง ร่องเพดานของบ้านเราทำให้แถบไฟมีความจำเป็นในขนาดใหญ่ ในทางกลับกัน แถบไฟที่วางอย่างไม่เหมาะสมจะเพิ่มโอกาสเกิดความล้มเหลวหรือปัญหาการกะพริบ ดังนั้น ทุกคนควรมีความเชี่ยวชาญในเทคนิคการติดตั้งเฉพาะสำหรับแถบไฟที่ติดตั้งระหว่างการตกแต่งบ้าน SignLiteled จะให้คำตอบสำหรับคำถามของคุณเกี่ยวกับวิธีการติดตั้งแถบไฟในบทความนี้
(1): การเชื่อมต่อของแถบแสง
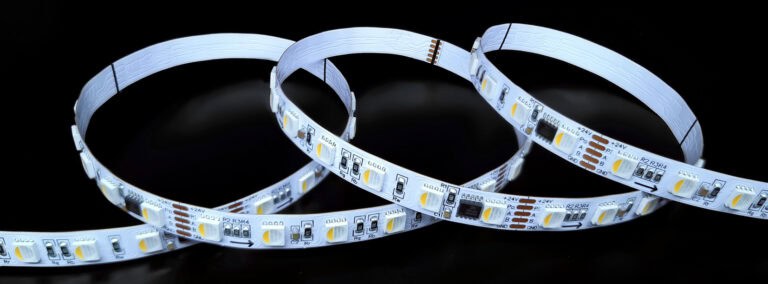
เกี่ยวกับแถบไฟ ฉันไม่แน่ใจว่าคุณสังเกตเห็นหรือไม่ แถบไฟมีให้เลือกหลายขนาดตามความต้องการของเรา ความยาวของชุดแถบแสงสามารถสูงได้หลายสิบเมตร แต่แถบที่สั้นกว่ามีเพียงหนึ่งหรือสองเมตร ดังนั้นแถบไฟที่ติดตั้งในบ้านของเราจะต้องระบุก่อนว่าแถบไฟแต่ละเส้นเชื่อมต่อกันอย่างไร การติดตั้งแถบไฟบนเพดานของเราประกอบด้วยแถบไฟแถวหลัก ด้วยเหตุนี้ หากต้องการค้นหาการเชื่อมต่อของแถบไฟ ให้ดำเนินการตามรายการด้านล่าง
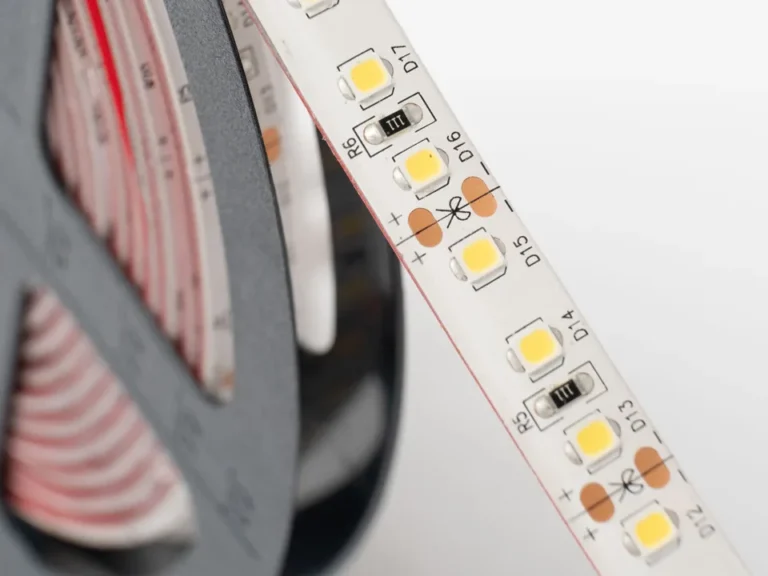
1. ตรวจสอบความยาวที่ต้องการของการติดตั้งแถบไฟ จากนั้นเลือกจำนวนเต็มเพื่อสกัดกั้นตามความยาวของการติดตั้ง แต่ละยูนิตมีความยาวประมาณ 1 เมตร คล้ายกับแถบไฟทั่วไปของเรา ดังนั้นเราจึงต้องแน่ใจว่าจะไม่ถูกทำลายในระหว่างการสกัดกั้น เพื่อป้องกันการรบกวนกับวงจรนี้จำเป็นต้องตัดจากรอยบาก เป็นไปได้ว่าลูกปัดโคมไฟบางเม็ดจะไม่สว่างขึ้นหากเราสกัดกั้นแบบสุ่ม เป็นผลให้การวัดความยาวมาก่อนตามด้วยการสกัดกั้น
2. แก้ไขแล้ว ขั้นตอนการติดตั้งค่อนข้างง่ายเนื่องจากแถบไฟของเราติดตั้งอยู่ในร่องเพดานของเราทั้งหมดและไม่คำนึงถึงการกันน้ำ ตัวอย่างเช่น แถบไฟ LED ที่ใช้กันอย่างแพร่หลายส่วนใหญ่ของเรามีเทปติดตัวเองติดอยู่ที่ด้านหลัง เราเพียงแค่วางลงในร่องโดยตรงโดยใช้เทปกาวในตัว
3. ขั้วต่อของแถบไฟ ถึงเวลาติดแถบไฟหลังจากที่เราใช้กาวแบบมีกาวในตัวเพื่อวางลงในร่องเพดาน หากเรากังวลเกี่ยวกับการเคลื่อนไหวของแถบไฟ เราสามารถใช้เทปสองหน้าเพื่อยึดให้แน่น สุดท้าย ให้แบนด้วยมือของคุณ ตอนนี้เราต้องติดแถบไฟ เราเพียงแค่แยกส่วนประกอบเหล่านี้เนื่องจากแถบไฟ LED มักประกอบด้วย LED สามดวงที่เชื่อมต่อกันแบบอนุกรมหรือแบบขนาน หากมีข้อต่ออยู่ตรงกลาง ต้องใช้เทคนิคการบัดกรีที่ไม่เหมือนใครเพื่อเชื่อมต่อ อย่างไรก็ตาม พยายามหลีกเลี่ยงสถานการณ์นี้และใช้ประโยชน์จากส่วนการติดตั้งสายพานแสงทั้งหมด
(2): การเชื่อมต่อทางไฟฟ้า
1. การติดตั้งแหล่งจ่ายไฟเป็นขั้นตอนที่สองในการติดตั้งแถบไฟที่บ้าน แหล่งพลังงานสำหรับแถบไฟของเรามักจะถูกเก็บไว้ที่แผ่นด้านบน และเราใช้งานผ่านสวิตช์ไฟภายใน การเชื่อมต่อแหล่งจ่ายไฟของแถบไฟเป็นขั้นตอนที่สองในกระบวนการนี้ โดยเฉพาะอย่างยิ่ง ขั้นตอนที่แสดงด้านล่างนี้สามารถใช้เพื่อทำให้เสร็จได้
2. เนื่องจากแถบไฟ LED มาตรฐานมีแรงดันไฟฟ้าประมาณ 12V จำเป็นต้องใช้แหล่งพลังงานเฉพาะ ในปัจจุบัน กำลังและความยาวของแถบไฟของเราจะถูกนำมาพิจารณาเมื่อเลือกขนาดแหล่งจ่ายไฟ ปัจจุบันสามารถใช้อุปกรณ์จ่ายไฟกับแถบไฟซึ่งเป็นแถบไฟแบบวนรอบ แน่นอนว่าสามารถใช้แหล่งพลังงานมาตรฐานเพื่อควบคุมได้ ในฐานะที่เป็นแหล่งจ่ายไฟทั่วไปในขณะนี้เราต้องซื้อแหล่งจ่ายไฟแบบสวิตชิ่งที่มีกำลังไฟค่อนข้างใหญ่และเชื่อมต่อไฟ LED ทั้งหมดควบคู่ไปกับกำลังไฟฟ้าเข้า ความสามารถในการรวมศูนย์นั้นเป็นประโยชน์สูงสุด วิธีหนึ่งคือการเปิดและปิดวงจรเดียว ตอนนี้ เราตัดสินใจตามสายพานไฟที่ติดตั้งไว้
(3): การเชื่อมโยงตัวควบคุม
1. คล้ายกับแถบไฟ LED ทั่วไป โดยทั่วไปแล้วจะมีตัวควบคุมหลายตัวติดตั้งอยู่เมื่อวางครั้งแรก คุณอาจได้รับเอฟเฟกต์การปรับเปลี่ยนสีที่หลากหลายโดยใช้คอนโทรลเลอร์นี้ คอนโทรลเลอร์แต่ละตัวมีระยะการควบคุมที่แตกต่างกันสำหรับแถบแสงต่างๆ คล้ายกับคอนโทรลเลอร์พื้นฐานที่ได้รับความนิยมมากที่สุดของเรา ระยะการควบคุมโดยทั่วไปจะอยู่ที่ 10–15 เมตร ในขณะที่ช่วงของรีโมทคอนโทรลอยู่ที่ประมาณ 15-20 เมตร โดยที่ยาวที่สุดคือ 30 เมตร ควรมีการตัดสินใจอย่างมีเหตุผลสำหรับตัวควบคุมแถบไฟที่ใช้ในครัวเรือน
2. เลือกคำแนะนำ โดยทั่วไปแล้ว ความยาวของแถบไฟคือสิ่งที่เราต้องพิจารณาเมื่อติดตั้งเพื่อตกแต่งบ้าน อันที่จริง โดยปกติแล้ว ครอบครัวจะอยู่ที่ 10-15 เมตร และยาวที่สุดคือ 15–20 เมตร ซึ่งไม่ยาวเกินไป เพียงซื้อคอนโทรลเลอร์การจับคู่มาตรฐาน ในการแยกแถบไฟที่ยาวมาก คุณจะต้องใช้เครื่องขยายเสียง
(4): สิ่งที่ต้องให้ความสนใจ
1. เราจำเป็นต้องตระหนักถึงปัญหาบางประการเกี่ยวกับแถบไฟที่ติดตั้งในบ้านของเรา แม้ว่าแถบไฟจะติดตั้งและแก้ไขได้ง่ายมาก แต่หากการติดตั้งไม่เป็นไปตามแนวทาง อาจส่งผลให้เกิดปัญหากับแสงของแถบทั้งหมด โดยเฉพาะอย่างยิ่งเนื่องจากความร้อนจากแถบไฟ LED จะเผาไหม้รูบนเพดานของเราในที่สุด ดังนั้นสิ่งเหล่านี้จึงเป็นรายการที่ต้องให้ความสนใจของเรา
2. การควบคุมระยะการเชื่อมต่อของแถบ LED อย่างสมเหตุสมผลเป็นสิ่งสำคัญ ตัวอย่างเช่น แถบไฟ LED ที่ได้รับความนิยมมากที่สุดจากซีรีส์ 3528 มีระยะเชื่อมต่อไม่เกิน 20 เมตร ระยะการเชื่อมต่อที่ยาวที่สุดสำหรับแถบไฟ LED ที่ทำในซีรีส์ 5050 ต้องไม่เกิน 15 เมตร ด้วยเหตุนี้ เราจึงควรจำกัดความยาวของแถบไฟที่เราวางไว้ในบ้านอย่างเหมาะสมตามประเภทของแถบไฟที่เราเลือก
3. แถบไฟทุกอันต้องมีปลั๊กเฉพาะ ตัวอย่างเช่น หม้อแปลงเป็นคุณสมบัติของปลั๊ก เพื่อให้เกิดการลัดวงจรได้ยากขึ้น เราสามารถถอดฝาครอบพลาสติกใสออกระหว่างการติดตั้ง เชื่อมต่อ และปิดฝาหลังจากนั้น ทุกคนต้องตระหนักว่าไม่ควรเชื่อมต่อกับฝาครอบโดยตรง เนื่องจากอาจส่งผลให้เกิดไฟฟ้าลัดวงจร
4. ระวังให้ความสนใจกับเครื่องหมายตัดเมื่อตัดแถบไฟ คุณสามารถตรวจสอบได้ เช่น แถบไฟที่ผ่านการรับรองมีเครื่องหมายตัดหรือไม่ เฉพาะป้ายเท่านั้นที่สามารถตัดได้ในขณะที่ตัดแถบไฟ เนื่องจากการตัดที่ไม่ถูกต้องหรือไม่สมบูรณ์สามารถป้องกันไม่ให้แถบไฟของแท้ภายในหนึ่งเมตรสว่างขึ้น ดังนั้น ตรวจสอบให้แน่ใจว่าคุณสามารถเห็นโลโก้ได้อย่างชัดเจนก่อนตัด นอกจากนี้ ให้พิจารณาว่าโลโก้อยู่ตรงกลางหรือไม่
การติดตั้งแถบไฟด้วยวิธีนี้ทำได้ง่ายมาก สามารถยึดเข้ากับร่องเพดานได้โดยตรง เช่นเดียวกับ DCOR บ้านของเรา ที่นี่การเชื่อมต่อของแถบไฟเป็นจุดสนใจของทุกคน เนื่องจากหลายครอบครัวจะประสบปัญหานี้ ซึ่งในที่สุดแถบไฟจะไหม้หลังจากกระพริบอยู่ครู่หนึ่ง นอกจากนี้ บางครัวเรือนพบว่าเพดานที่ถูกระงับของเรากลายเป็นสีเหลือง อันที่จริง การเลือกและการจัดวางแถบไฟที่ไม่ถูกต้องเป็นสาเหตุของปัญหา ด้วยเหตุนี้ Signliteled จึงเน้นที่การสรุปขั้นตอนในการติดตั้งแถบไฟรวมถึงปัญหาที่ต้องพิจารณาในโพสต์นี้ เข้าใจง่ายก่อนติดตั้งแถบไฟ
กระทู้ที่เกี่ยวข้อง