Actualización de accesorios antiguos con moderno Módulos lineales LED Ya no es solo una opción, es una necesidad de eficiencia energética y rendimiento confiable. Los sistemas LED fluorescentes o anticuados a menudo sufren de un alto consumo de energía, mantenimiento frecuente e iluminación desigual. Al reemplazar estos accesorios con módulos lineales LED avanzados, las empresas y los propietarios pueden lograr una mejor iluminación, una mayor vida útil y reducir los costos. Este artículo proporciona una guía práctica paso a paso sobre cómo reemplazar los módulos lineales LED en accesorios antiguos, junto con soluciones a los desafíos de modernización comunes.

Preparación antes de la sustitución
1. Comprobar la compatibilidad de los accesorios
Antes de reemplazar la iluminación antigua por módulos lineales LED, es importante evaluar si el dispositivo es estructuralmente adecuado. La carcasa debe tener suficiente espacio para el nuevo módulo y permitir un posicionamiento adecuado para una distribución uniforme de la luz. La gestión del calor es otro factor clave: los módulos lineales LED requieren una disipación térmica efectiva para mantener el rendimiento y la vida útil. Si el dispositivo tiene una ventilación deficiente o carece de una base metálica para la transferencia de calor, es posible que sea necesario realizar ajustes adicionales o un kit de reacondicionamiento para garantizar un funcionamiento seguro.
2. Identificar la fuente de luz existente
El tipo de fuente de luz en su antiguo dispositivo determina cómo procederá la actualización. Si el dispositivo utiliza tubos fluorescentes, el balasto debe ser omitido o retirado, y se debe instalar un controlador LED compatible. Para los módulos LED más antiguos, es posible que deba confirmar si el controlador existente puede admitir los requisitos de voltaje y corriente del nuevo módulo. En muchos casos, reemplazar o actualizar la fuente de alimentación LED garantiza un rendimiento óptimo y evita problemas como parpadeo o brillo reducido.
3. Reúna las herramientas requeridas
Tener las herramientas adecuadas listas hace que el proceso de reemplazo del módulo lineal LED sea más suave y seguro. Como mínimo, necesitará un destornillador, alicates, cortadores de alambre y cinta aislante. Se recomienda encarecidamente un probador de voltaje para confirmar que la energía está completamente desconectada antes de arrancar. Para instalaciones que involucran múltiples accesorios, también es una buena práctica usar guantes aislados y gafas protectoras. La preparación adecuada garantiza que el proceso de reemplazo no solo ahorre tiempo sino que también reduce el riesgo de errores de cableado o peligros de seguridad.

Proceso de reemplazo paso a paso
1. Apague la energía y asegúrese de que la seguridadsu
El primer paso y más crítico al reemplazar los módulos lineales LED es cortar completamente la fuente de alimentación. Apague siempre el interruptor automático o el interruptor de pared que controla el dispositivo y confirme con un probador de voltaje que no fluye corriente. La seguridad no puede ser exagerada: trabajar con cables vivos plantea graves riesgos de descarga eléctrica. El uso de guantes aislados y gafas de seguridad proporciona una capa adicional de protección durante el proceso.
2. Retire la fuente de luz y el controlador antiguos
Una vez que el accesorio sea seguro de manejar, retire con cuidado la tapa o el difusor y exponga los componentes internos. Si el dispositivo antiguo es fluorescente, desconecte y retire el tubo y el lastre. Para los accesorios que ya usan un módulo lineal LED, consulte las especificaciones del controlador existente. Si el voltaje de salida y la corriente del conductor coinciden con el nuevo módulo, puede reutilizarse para ahorrar tiempo y costo. De lo contrario, es mejor reemplazarlo con un controlador LED compatible para garantizar un rendimiento estable y una fiabilidad a largo plazo.
3. Instale el nuevo módulo lineal LED y el controlador
Después de limpiar los componentes antiguos, coloque el nuevo módulo lineal LED dentro del dispositivo. Asegúrelo firmemente con tornillos o clips de montaje, asegurándose de que esté alineado para una iluminación uniforme. A continuación, conecte los cables del módulo al controlador LED, siguiendo el diagrama de cableado y polaridad correcto proporcionado por el fabricante. Tenga cuidado de aislar las conexiones con cinta aislante o conectores para evitar cortocircuitos. Si se instala un nuevo controlador, montelo en un lugar con el flujo de aire adecuado para soportar la disipación de calor y la durabilidad.
4. Restaurar la potencia y probar el dispositivo
Cuando todas las conexiones estén completas, vuelva a montar el dispositivo poniendo la tapa o el difusor de nuevo en su lugar. Restaure la energía en el interruptor o interruptor y encienda la luz para probar la instalación. El nuevo módulo lineal LED debería iluminarse instantáneamente con brillo constante y sin parpadeo. Si surgen problemas, como atenuación o salida de luz irregular, verifique la compatibilidad del cableado y del controlador. Probar con éxito el dispositivo garantiza que el reemplazo se realice correctamente y que el sistema de iluminación actualizado brindará el ahorro de energía y el rendimiento esperados.

Resolución de problemas comunes
1. Tamaño o conector incorrecto del módulo
Uno de los problemas más comunes durante el reemplazo de módulos lineales LED es encontrar que el nuevo módulo no coincide con el tamaño o el tipo de conector. Si las dimensiones o interfaces no se alinean, forzar la instalación puede dañar tanto el módulo como la carcasa. La mejor solución es ponerse en contacto con su proveedor de LED para reordenar el tamaño correcto o solicitar un módulo lineal LED personalizado diseñado para su accesorio. Trabajar con un proveedor de reacondicionamiento de LED fiable garantiza un proceso de actualización más suave.
2. No hay luz después de encender
Si el módulo lineal LED no se enciende después de la instalación, comience por verificar el cableado entre el módulo y el controlador. La polaridad incorrecta o una conexión suelta a menudo causa el problema. Asegúrese de que los cables positivos y negativos estén conectados correctamente y confirme que el controlador del LED esté conectado correctamente a la red eléctrica. El uso de un probador de voltaje puede determinar rápidamente si la potencia está llegando al conductor y al módulo.
3. Parpadeo durante la operación
Las luces parpadeantes pueden ser frustrantes y, por lo general, indican problemas de cableado o del conductor. Compruebe si hay malas conexiones que pueden interrumpir el flujo de corriente. Otra posibilidad es que el voltaje de salida del conductor del LED no coincida con los requisitos de entrada del módulo. Si el conductor es incompatible, reemplazarlo con una fuente de alimentación LED debidamente clasificada eliminará el parpadeo y protegerá el módulo de daños a largo plazo.
4. Problemas de sobrecalentamiento
El calor excesivo acorta la vida útil de los módulos lineales LED y puede indicar una instalación incorrecta. Asegúrese de que el módulo esté completamente conectado al disipador de calor o a la carcasa de metal del dispositivo para permitir una transferencia térmica efectiva. La mala ventilación en el dispositivo también puede causar acumulación de calor. En algunos casos, el problema es un controlador de gran tamaño que entrega más corriente de lo que se clasifica el módulo. El cambio a un controlador de menor potencia con la salida correcta evita el sobrecalentamiento y protege el sistema LED.

Beneficios clave de la actualización a módulos lineales LED
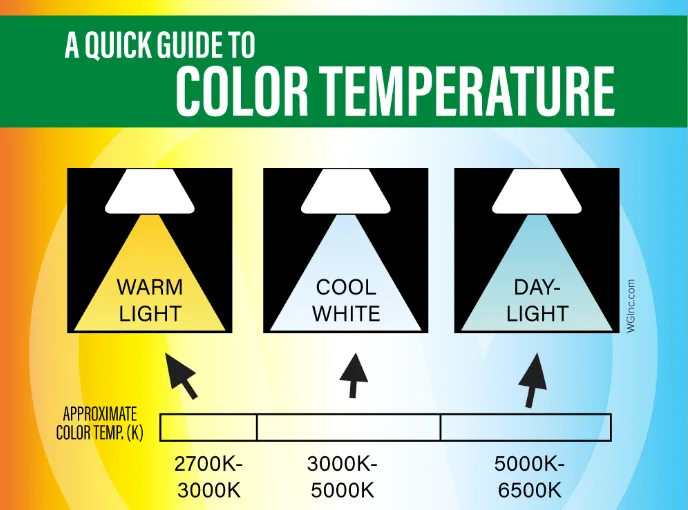
Reemplazar los accesorios antiguos con módulos lineales LED trae ventajas claras. La eficiencia energética es la más significativa, ya que los LED consumen hasta 60% menos potencia que la iluminación tradicional, al tiempo que proporcionan una iluminación más brillante y uniforme. La vida útil más larga también reduce la frecuencia de mantenimiento, reduciendo los costos operativos generales. Además, los módulos lineales LED ofrecen flexibilidad en la temperatura de color, opciones de atenuación y compatibilidad con Smart Control, lo que los hace adecuados tanto para aplicaciones comerciales como residenciales.
En SignLiteled, nos especializamos en personalizar módulos lineales LED adaptados a los requisitos de su proyecto. Desde el diseño de PCB y de motores ligeros hasta pruebas de rendimiento y garantía de calidad, nuestro equipo ofrece soluciones que garantizan la fiabilidad y la eficiencia. Con años de experiencia y un sólido historial en los mercados globales, SignLiteled es el socio de confianza para pedidos a granel y soluciones de reacondicionamiento LED personalizados. Contáctenos hoy para discutir cómo podemos apoyar sus actualizaciones de iluminación. Si está interesado en obtener más información sobre el módulo lineal LED, consulte este artículo: Guía completa del módulo lineal LED: estructura, controladores y aplicaciones
Publicaciones relacionadas