Choosing the right cove lighting fixtures for your ceiling involves a systematic evaluation of three core components: the LED strip for light quality, the aluminum profile for structure and diffusion, and the integration of both for a flawless final effect, ensuring your cove provides seamless, professional-grade illumination.
Cove lighting looks simple once installed, but the decisions behind it are not. Poor choices lead to visible LED dots, uneven brightness, glare, premature failure, or a cove that simply does not match the design intent of the space. The right system avoids hot spots, delivers the exact mood you want, lasts for years, and installs cleanly without constant troubleshooting.
This guide walks you through the process in a practical way. You will learn what actually makes up a modern cove lighting system, how to choose each component based on your ceiling and design goals, and how to combine everything into a clean, professional installation that looks intentional, not improvised.
Anatomy of a Cove Lighting System: The Three Pillars

Modern cove lighting is not a single fixture. It is a system made of three interdependent parts. Treating it as one “light” is the most common mistake people make.
| Pillar | What It Is | Primary Function |
| The Light Source | LED Strip (for example, COB) | Generates the light and determines brightness, color, and visual smoothness |
| The Fixture / Structure | Aluminum Profile (LED strip channel) | Holds the strip, dissipates heat, protects it, and defines the mounting method |
| The Finishing Layer | Diffuser Cover (milky PC or PMMA) | Softens light, removes glare, and blends LEDs into a uniform glow |
Each pillar matters on its own, but real success comes from compatibility. A high-quality LED strip inside the wrong profile will still look bad. A good profile with the wrong diffuser will still show dots. Cove lighting only looks premium when all three are chosen together.
Choosing Your Light Source – The Heart of Cove Lighting
Why COB LED Strips Are the Superior Choice for Coves
For ceiling coves, dotless light is not optional. It is the standard.
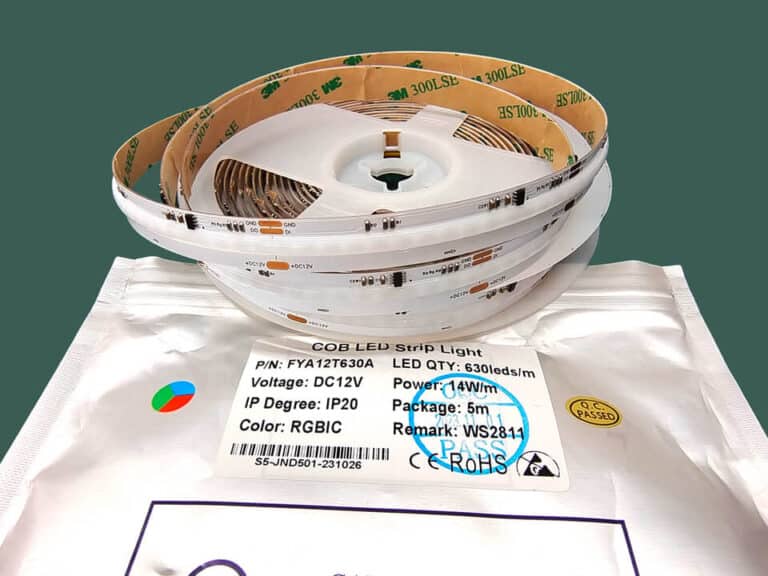
COB, or Chip-on-Board, LED strips mount hundreds of tiny LED chips directly onto a single substrate and coat them with a continuous phosphor layer. The result is a smooth, uninterrupted line of light. You do not see individual points, even when the strip is close to the diffuser.
Traditional SMD strips space individual LEDs apart. Even with a diffuser, those points often show up as bright spots or shadows. In direct or indirect cove applications, this ruins the effect and immediately looks low-end.
COB strips solve this problem by design. They are especially well suited for indirect ceiling lighting where the light reflects off walls or ceilings and any inconsistency becomes obvious.
Key advantages that matter in real projects include:
- Truly continuous light output with no visible dots
- High color rendering, commonly CRI 90 or higher, so colors in the room look natural
- Consistent brightness along the strip
- Availability in multiple color temperatures from warm to cool white
- Options in both 12V and 24V systems
For professional ceiling coves, COB is no longer an upgrade. It is the baseline.
Critical Light Source Specifications for Cove Design
Brightness (Lumens per Meter)
Brightness should match the role of the cove. Soft ambient coves typically use lower power strips, around 8 to 10 watts per meter. These provide a gentle ceiling wash that complements main lighting. Accent or architectural coves often need more punch, closer to 12 to 14 watts per meter, especially in rooms with high ceilings or dark surfaces.
More power is not always better. Overly bright coves create glare and flatten the space. Start with the lighting purpose, not the maximum output.
Color Quality and Temperature
CRI measures how accurately colors appear under the light. For residential and hospitality spaces, CRI 90+ is strongly recommended. Lower CRI lighting can make furnishings look dull or off-tone.
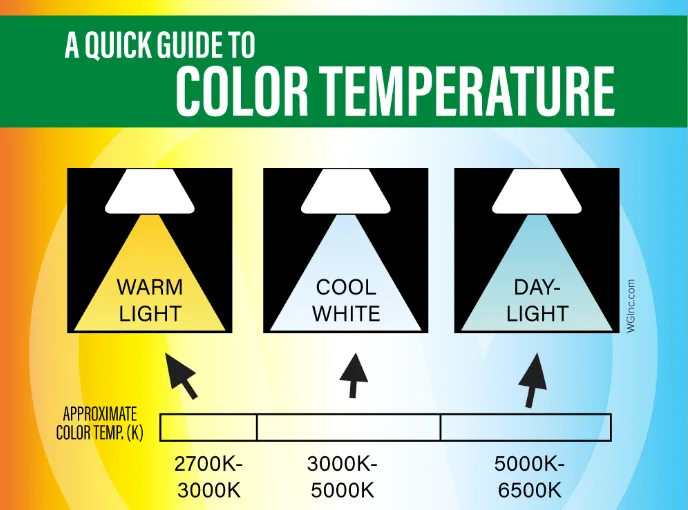
Color temperature sets the mood:
- 2700K to 3000K feels warm and relaxed, ideal for living rooms, bedrooms, and hotels
- 3500K to 4000K is neutral and balanced, often used in offices or modern homes
- 5000K to 6000K feels cool and crisp, typically reserved for commercial or task-focused spaces
Cove lighting usually works best on the warmer side, since it is indirect and atmospheric.
Voltage and Control
12V systems work well for short runs but are limited by voltage drop. 24V strips allow longer continuous runs, often up to 10 meters, with more consistent brightness. For ceiling coves, 24V is usually the safer and cleaner choice.
If you want flexibility, consider tunable white or RGB options. These allow you to shift mood throughout the day or create scenes without changing the physical installation.
Choosing Your Aluminum Profile – The Skeleton of Your Cove

Think of the aluminum profile as the ceiling light fixture cover that everything depends on. It is not just a holder. It defines the shape, manages heat, protects the strip, and controls how the light exits the cove.
Profile Type and Function: Matching Shape to Your Cove
Different ceiling designs demand different profile shapes. Using the wrong one forces compromises that show later.
| Profile Type (Example Model) | Best For | Key Feature |
| Universal / Recessed (UN1509B, UN2010B) | Standard ceiling coves, dropped bulkheads | Clean, flush installation with multiple size options |
| Corner (CN1616X, CN2020X) | Wall to ceiling corners | 45-degree angle directs light evenly across surfaces |
| Wall Skirting Line | Low-level or baseboard coves | Designed for wall-floor junction lighting |
| Mini (MN1010B) | Tight spaces and subtle details | Compact size for discreet installations |
Recessed universal profiles are the most common choice for ceiling coves. They sit flush and disappear into the architecture. Corner profiles are ideal when the cove wraps a sharp angle and you want controlled light direction rather than scatter.
Mini profiles are useful when space is limited, but they demand careful LED selection to avoid overheating or uneven diffusion.
Sizing and Diffuser Selection
Profile dimensions are usually listed as width by height. The critical measurement is internal width. This must be greater than the PCB width of your LED strip. For example, an 8mm COB strip needs a profile with at least slightly more than 8mm internal clearance.
Height affects diffusion. Taller profiles give the light more room to spread before hitting the diffuser, which improves uniformity. Shallow profiles can work, but only with dotless COB strips and the right diffuser.
Diffuser choice matters more than many people realize:
- Clear diffusers maximize brightness but show LED structure
- Opal diffusers soften light somewhat but may still reveal dots
- Milky white diffusers provide the best blending and glare control
For ceiling coves, a milky PC or PMMA diffuser is almost always the right choice. It hides the internal components and turns raw LED output into a smooth architectural glow.
Design Integration – Putting It All Together for Your Ceiling
Step-by-Step Cove Design Decision Guide
1. Define the Desired Effect
Decide what the cove should do. Soft ambient fill creates comfort and depth. Dramatic grazing highlights textures and edges. This decision guides every other choice.
2. Measure Your Cove Space
Measure the available width, depth, and height. Know exactly how much room you have for the profile and diffuser.
3. Select the Profile
Choose the profile type and size that physically fits the space and matches the lighting direction you want.
4. Choose the LED Strip
Select a COB strip that fits the profile, delivers the required brightness, and matches the desired color temperature.
5. Plan the Installation
Decide where drivers will sit, how power will be injected, and how controls will be accessed. This avoids visible wiring and uneven light later.
Common Ceiling Cove Scenarios and Solutions
Scenario A: Standard Living Room Crown Molding Cove
A recessed universal profile like UN2010B paired with a mid-power COB strip around 10W per meter and a milky diffuser delivers a calm, even ceiling glow that complements primary lighting.
Scenario B: Modern Minimalist Ceiling Drop with Sharp Corners
A corner profile such as CN2020X combined with a higher density COB strip provides clean lines and strong architectural definition without visible hotspots.
Scenario C: Small Cove in a Bedroom or Hallway
A compact mini recessed profile like MN1010B with a standard COB strip creates subtle illumination without overwhelming the space.
Professional Installation Tips for a Flawless Finish

Thermal Management
The aluminum profile acts as a heat sink. Ensure it is firmly mounted to allow heat to dissipate. Poor thermal contact shortens LED lifespan.
Electrical Planning
Use the correct wire gauge and plan power injection points for long runs. Dimming at the far end of a cove is almost always a voltage drop issue.
Mechanical Installation
Use proper mounting clips or channels. A straight, secure profile is essential for even light output. Clean and level surfaces before installation.
Diffuser Installation
Always test the system before snapping in the diffuser. Once installed, the diffuser should be the final step, not the first.
Why Choose SignliteLED for Your Cove Lighting Project?
Achieving the perfect cove light requires perfectly matched components. SignliteLED provides the complete ecosystem, from industry-leading COB LED strips that guarantee a dotless glow to a comprehensive range of LED aluminum profiles designed to house them professionally.
| Component | SignliteLED Solution | Key Benefit for Cove Lighting |
| Dotless Light Source | COB LED Strip Lights | Eliminates hotspots and dots for a smooth, continuous light band |
| Structural Profile | LED Aluminum Profiles | Over 200 profile options ensure the right fit for any ceiling design |
| Expert Support | Factory Direct Consultation | Guidance on pairing strips, profiles, and drivers correctly |
Key advantages include dotless COB technology, a complete profile ecosystem, high-CRI and tunable options, and factory-direct quality that delivers professional results without unnecessary markup.
Conclusion
Great cove lighting follows a simple framework. Start with a dotless COB LED strip for quality light. Choose an aluminum profile that fits your ceiling structure and manages heat. Finish with a milky diffuser to blend everything into a seamless glow.
The most practical advice is to start with the profile. Your ceiling’s physical constraints narrow the choices quickly. Once the structure is defined, selecting the right COB strip becomes straightforward and predictable.
If you want a faster path, download a free cove lighting design guide or consult with a technical team that can spec your entire system, from profile to driver, with confidence.
FAQs
Related Posts