ไฟ LED tri-proof หรือที่เรียกว่าโคมไฟ LED กันน้ำ ไฟที่แน่นหนา ไฟ LED กันฝุ่น หรือไฟแบตเตอรี ใช้กันอย่างแพร่หลายในสภาพแวดล้อมที่มีความต้องการสูง เช่น โรงงาน โกดัง โรงจอดรถ และสถานีรถไฟใต้ดิน ชื่อของพวกเขา “Tri-proof” หมายถึงการป้องกันน้ำ ฝุ่น และการกัดกร่อน ทำให้เป็นตัวเลือกที่เชื่อถือได้สำหรับไฟส่องสว่างทางอุตสาหกรรมและเชิงพาณิชย์ อย่างไรก็ตาม แม้แต่อุปกรณ์ติดตั้งที่ทนทานที่สุดก็อาจล้มเหลวได้หากติดตั้งไม่ถูกต้อง การติดตั้งที่ไม่เหมาะสม การเดินสายไฟแบบหลวม หรือการปิดผนึกกันน้ำที่ไม่ดีอาจนำไปสู่อันตรายด้านความปลอดภัย ประสิทธิภาพแสงที่ลดลง และการบำรุงรักษาที่มีราคาแพง นั่นคือเหตุผลที่การปฏิบัติตามคู่มือการติดตั้งไฟ LED แบบสามชั้นที่ชัดเจนเป็นสิ่งสำคัญ ในบทความนี้ เราจะอธิบายคำแนะนำในการติดตั้งทีละขั้นตอนและเคล็ดลับในการแก้ไขปัญหา ช่วยให้คุณบรรลุระบบไฟส่องสว่างที่ปลอดภัย ใช้งานได้ยาวนาน และประหยัดพลังงาน

การเตรียมการก่อนการติดตั้ง
1. ตรวจสอบสิ่งแวดล้อม
ก่อนติดตั้ง an ไฟ LED แบบ Tri-proof, ตรวจสอบสภาพแวดล้อมอย่างระมัดระวัง ตรวจสอบให้แน่ใจว่าพื้นผิวมีความเสถียร แห้ง และปราศจากฝุ่นหรือน้ำมันมากเกินไป ตรวจสอบระดับความชื้นและอุณหภูมิเพื่อยืนยันว่าเป็นไปตามข้อกำหนดของฟิกซ์เจอร์ ซึ่งช่วยรักษาประสิทธิภาพการกันน้ำและกันฝุ่น
2. การเตรียมวัสดุและเครื่องมือ
รวบรวมรายการที่จำเป็นทั้งหมดก่อนเริ่ม ซึ่งรวมถึงโคมไฟแบบสามชั้นแบบ LED ตัวยึดยึด สกรู ขั้วต่อกันน้ำ และฝาปิดท้าย เครื่องมือสำคัญมักรวมถึงสว่าน ไขควง คีม และเทปฉนวน การมีทุกอย่างพร้อมช่วยให้กระบวนการติดตั้งราบรื่นและมีประสิทธิภาพ

3. ข้อควรระวังด้านความปลอดภัย
ตัดแหล่งจ่ายไฟหลักก่อนเดินสายไฟเสมอ ใช้เครื่องมือหุ้มฉนวนและสวมถุงมือป้องกันเพื่อป้องกันอุบัติเหตุ ตรวจสอบอีกครั้งว่าการเชื่อมต่อทางไฟฟ้าทั้งหมดเป็นไปตามมาตรฐานท้องถิ่น การจัดลำดับความสำคัญด้านความปลอดภัยในขั้นตอนการเตรียมการรับประกันการติดตั้งไฟ LED แบบสามชั้นที่เชื่อถือได้และใช้งานได้ยาวนาน
วิธีการติดตั้งแบบทีละขั้นตอน
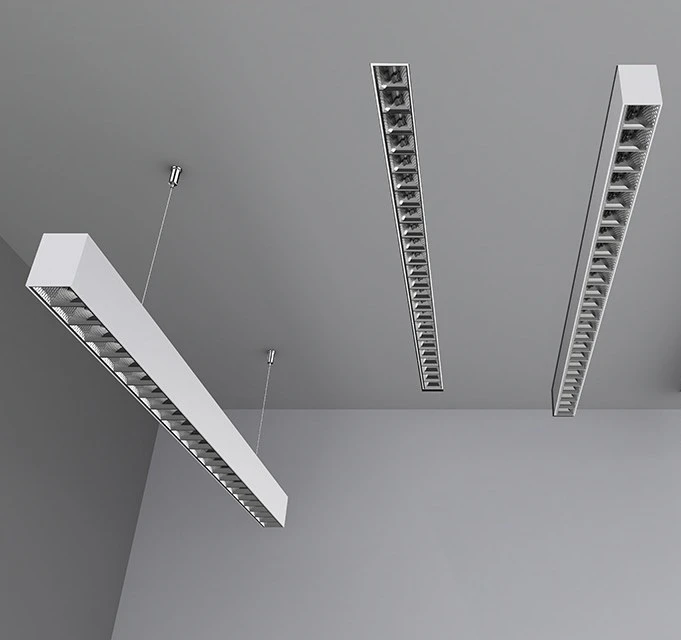
การติดตั้งแบบติดตั้งบนพื้นผิว
- วัดความยาวของไฟ LED tri-proof และทำเครื่องหมายตำแหน่งการเจาะบนเพดานหรือผนัง
- เจาะรูที่จุดที่ทำเครื่องหมายไว้ ตรวจสอบให้แน่ใจว่าความลึกตรงกับปลั๊กขยาย
- เสียบปลั๊กขยายเข้าไปในรูที่เจาะ
- ยึดตัวยึดโลหะด้วยสกรู ขันให้แน่นเพื่อหลีกเลี่ยงการเคลื่อนไหว
- จัดตำแหน่งโคมไฟให้ตรงกับขายึดที่ติดตั้ง
- ค่อยๆ กดฟิกซ์เจอร์ลงในวงเล็บจนกระทั่งคลิกเข้าที่อย่างแน่นหนา
- ต่อสายไฟกันน้ำตามแผนภาพการเดินสายไฟ
- ตรวจสอบความเสถียรและการจัดตำแหน่งอีกครั้งก่อนที่จะไปยังขั้นตอนต่อไป
การติดตั้งแบบระงับ
- ทำเครื่องหมายจุดแขวนสองจุดบนเพดานเพื่อให้แน่ใจว่าตรงกับความยาวของฟิกซ์เจอร์
- เจาะรูและเสียบปลั๊กขยายที่ตำแหน่งที่ทำเครื่องหมายไว้
- ขันสกรูยึดในตะขอแขวนหรือติดตั้งพุกลวดเหล็กให้แน่น
- ปรับความยาวของโซ่แขวนหรือสายเหล็กให้ได้ความสูงในการติดตั้งที่ต้องการ
- ติดปลายทั้งสองด้านของชุดกันสะเทือนเข้ากับคลิปยึดของฟิกซ์เจอร์
- ยึดแสงเพื่อป้องกันการทรงตัวหรือทรงตัวที่ไม่สม่ำเสมอ
- ทดสอบความเสถียรโดยค่อยๆ ดึงฟิกซ์เจอร์ก่อนเปิดเครื่อง
- เชื่อมต่อสายไฟกันน้ำอย่างระมัดระวัง ตรวจสอบให้แน่ใจว่าแหวนปิดผนึกแน่นอย่างเหมาะสม

เคล็ดลับการติดตั้ง
รักษาระดับของฟิกซ์เจอร์ระหว่างการติดตั้งเพื่อให้มีแสงสว่างสม่ำเสมอ
หลีกเลี่ยงสกรูหรือขายึดที่ยึดแน่นเพื่อป้องกันความเสียหายต่อตัวเรือน
อย่าวางอุปกรณ์ติดตั้งโดยตรงภายใต้ไอพ่นน้ำที่แรง เว้นแต่จะมีพิกัด IP66 หรือสูงกว่า
ยืนยันเสมอว่าตัวเชื่อมต่อและซีลทั้งหมดถูกล็อคไว้อย่างสมบูรณ์เพื่อรักษาการกันน้ำ
| ประเภทการติดตั้ง | ขั้นตอนสำคัญ | การใช้งานทั่วไป |
| ติดที่พื้นผิว | สว่าน → แก้ไขขายึด → สแน็ปอิน → ต่อสายไฟ | โรงจอดรถทางเดิน |
| ที่ได้ถูกระงับ | เจาะ → ติดตั้งตะขอ → ปรับโซ่ → แขวน ติดตั้ง → ต่อสายไฟ | โกดัง โรงงาน ห้องโถง |
การเชื่อมต่อสายไฟและกันน้ำ
วิธีการเดินสาย
เมื่อติดตั้งไฟ LED tri-proof การเดินสายไฟสามารถทำได้ผ่านอินพุตแบบปลายเดียวหรืออินพุตแบบปลายคู่ขึ้นอยู่กับข้อกำหนดของโครงการ อินพุตแบบปลายเดียวเป็นเรื่องปกติในการติดตั้งที่มีขนาดเล็กกว่า ในขณะที่อินพุตแบบปลายคู่เหมาะสำหรับการวิ่งที่ยาวขึ้นหรือการเชื่อมต่อแบบเดซี่เชน ตรวจสอบระดับแรงดันไฟฟ้าของฟิกซ์เจอร์เสมอ ไม่ว่าจะเป็น AC220V, AC277V หรือมาตรฐานอุตสาหกรรมที่สูงกว่า เช่น AC347V หรือ AC480V เพื่อหลีกเลี่ยงปัญหาแหล่งจ่ายไฟที่ไม่ตรงกัน
การเชื่อมต่อกันน้ำ
ปัจจัยสำคัญในการรักษาการป้องกัน IP65 หรือ IP66 อยู่ในตัวเชื่อมต่อ ใช้ต่อมสายเคเบิลกันน้ำคุณภาพสูงและตรวจสอบให้แน่ใจว่าแหวนปิดผนึกแน่นอย่างถูกต้อง การใช้เทปฉนวนหรือวงแหวนซิลิโคนรอบบริเวณที่มีช่องโหว่สามารถให้การป้องกันรองได้ การต่อสายดินที่เหมาะสมเป็นสิ่งจำเป็นเพื่อความปลอดภัยและความมั่นคงทางไฟฟ้า
ข้อกังวลเรื่องสายไฟทั่วไป
การเชื่อมต่อแบบหลวมเป็นสาเหตุที่พบบ่อยที่สุดของความล้มเหลว เช่น การกะพริบ การลัดวงจร หรือแม้แต่การซึมผ่านของน้ำ เพื่อป้องกันปัญหาเหล่านี้ ให้ตรวจสอบอีกครั้งว่าสายไฟถูกถอดออกตามความยาวที่เหมาะสม ใส่จนสุด และยึดอย่างแน่นหนา การดูแลเป็นพิเศษในขั้นตอนนี้รับประกันการติดตั้งไฟ LED tri-proof ที่เชื่อถือได้และใช้งานได้ยาวนาน

การตรวจสอบและทดสอบและแก้ไขปัญหา
การว่ากลาว
ก่อนเปิดเครื่อง ให้ดำเนินการตรวจสอบอย่างรอบคอบเพื่อให้แน่ใจว่ามีการติดตั้งที่ปลอดภัยและปลอดภัย ยืนยันว่าสายไฟทั้งหมดเชื่อมต่ออย่างแน่นหนาและใช้ฉนวนอย่างเหมาะสมเพื่อป้องกันการลัดวงจร ตรวจสอบว่าไฟ LED tri-proof ติดแน่นบนโครงยึดหรือชุดกันสะเทือน โดยไม่มีข้อต่อหลวม สำหรับการติดตั้งแบบระงับ ให้ตรวจสอบว่าความสูงที่แขวนอยู่นั้นยังคงรักษาแสงสว่างไว้สม่ำเสมอ สุดท้าย ตรวจสอบให้แน่ใจว่าฝาครอบกระจายแสงของพีซีถูกล็อคเข้าที่อย่างเต็มที่เพื่อรับประกันประสิทธิภาพการกันน้ำและกันฝุ่น
การทดสอบ
หลังจากตรวจสอบแล้วให้เปิดเครื่องเพื่อทดสอบอุปกรณ์ ยืนยันว่าไฟ LED tri-proof เปิดขึ้นทันทีและให้ความสว่างที่สม่ำเสมอ สังเกตอย่างใกล้ชิดเพื่อหาเสียงที่กะพริบ หรี่แสง หรือผิดปกติจากผู้ขับขี่ ขั้นตอนนี้ช่วยให้มั่นใจได้ว่าการเชื่อมต่อทางไฟฟ้าและทางกลนั้นถูกต้องก่อนที่จะนำไฟมาใช้งานทุกวัน
การแก้ไขปัญหา
หากเกิดปัญหาขึ้นระหว่างการทดสอบ ให้พิจารณากรณีทั่วไปต่อไปนี้:
ไฟไม่เปิด → ตรวจสอบว่าสายไฟเชื่อมต่ออย่างถูกต้องหรือไฟเสียหรือไม่
ปัญหาการกะพริบ → ตรวจสอบว่าผู้ขับขี่มีการสัมผัสกับบอร์ด LED ไม่ดี หรือยืนยันว่าแรงดันไฟขาออกของผู้ขับขี่ตรงกับข้อกำหนดของโมดูล LED
การควบแน่นหรือความชื้นภายใน → ตรวจสอบให้แน่ใจว่าฝาครอบกระจายสัญญาณถูกล็อคอย่างแน่นหนาและรายการสายเคเบิลถูกปิดผนึกอย่างสมบูรณ์ด้วยขั้วต่อกันน้ำ
การตรวจสอบ การทดสอบ และการแก้ไขปัญหาที่เหมาะสมจะเพิ่มความปลอดภัยและอายุการใช้งานของการติดตั้งไฟ LED tri-proof ของคุณให้สูงสุด


บทสรุป
การติดตั้งที่เหมาะสม การเดินสายอย่างระมัดระวัง และการทดสอบอย่างละเอียดเป็นกุญแจสำคัญเพื่อให้แน่ใจว่าไฟ LED แบบสามชั้นจะให้ประสิทธิภาพที่เชื่อถือได้ในสภาพแวดล้อมที่มีความต้องการสูง โดยการทำตามขั้นตอนที่แนะนำและใช้วิธีการแก้ไขปัญหาเมื่อจำเป็น ผู้ใช้สามารถหลีกเลี่ยงปัญหาทั่วไป เช่น การกะพริบ ไฟฟ้าขัดข้อง หรือน้ำเข้า ระบบที่ติดตั้งมาอย่างดีไม่เพียงแต่ช่วยเพิ่มความปลอดภัย แต่ยังช่วยลดค่าบำรุงรักษาในระยะยาวอีกด้วย
ที่ Signliteled ทุกแสงสามชั้นที่เราผลิตขึ้นผ่านการตรวจสอบและทดสอบอย่างเข้มงวดเพื่อให้แน่ใจว่าไม่มีไฟฟ้าขัดข้องหรือปัญหาการกันซึม ผลิตภัณฑ์ของเราได้รับการออกแบบโดยคำนึงถึงความยืดหยุ่น โดยสนับสนุนการเชื่อมต่อแบบเดซี่-เชนสำหรับโครงการขนาดใหญ่ และยังสามารถจับคู่กับโซลูชันแหล่งจ่ายไฟฉุกเฉินเพื่อเพิ่มความปลอดภัย ไม่ว่าคุณต้องการอุปกรณ์ที่ทนทานสำหรับโรงงาน โกดัง หรือโรงจอดรถ Signlited ให้ไฟ LED แบบสามชั้นแบบมืออาชีพ เชื่อถือได้ และปรับแต่งได้เพื่อตอบสนองความต้องการโครงการของคุณ หากคุณมีโคมไฟแบบ Tri-proof แบบส่วนตัวคุณก็สามารถปรับแต่งได้ โมดูลเชิงเส้น LED จากเรา ติดต่อเราวันนี้สำหรับอุปทานจำนวนมากและการสนับสนุนด้านเทคนิคที่ปรับแต่งมาโดยเฉพาะ
กระทู้ที่เกี่ยวข้อง