Português
  English
  简体中文
简体中文  Deutsch
  Español
  Français
  Italiano
  日本語
日本語  한국어
한국어  Polski
  Русский
  Türkçe
  Nederlands
  Tiếng Việt
  ไทย
ไทย 
Sinais de néon de LED externos são construídos para lidar com o clima, mas apenas se a instalação atrás deles for feita corretamente. O sinal em si é geralmente a última coisa que falha. O que dá errado primeiro é sempre a junção da fiação selada com o conector errado, o motorista sentado em uma caixa sem junta ou a placa montada contra uma parede sem folga de drenagem.
Este guia cobre o completo Sinal de néon com LED externo Processo de instalação, desde ferramentas e pré-verificações, até montagem, impermeabilização, colocação do motorista, drenagem, manutenção de UV e os erros que causam falhas precoces. Siga-o em ordem e o sinal sobreviverá à garantia por anos.
Planeje sua instalação de letreiros de néon ao ar livre antes de qualquer outra coisa
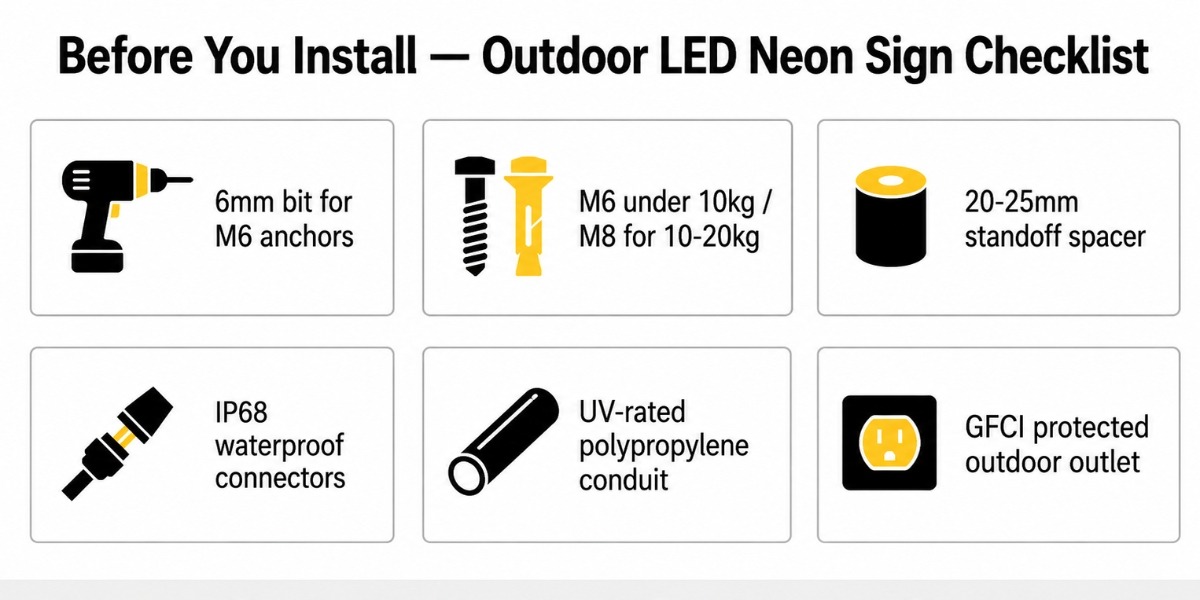
Quinze minutos de pré-verificações antes da perfuração economiza horas de retrabalho. Confirme sua superfície, fonte de energia, peso de sinal e classificações de IP antes que algo saia na parede. A maioria das falhas de instalação remonta a verificações ignoradas, não ao sinal em si.
Ferramentas e hardware que você precisa primeiro
Esses são os itens que a maioria das pessoas esquece ou substitui pela alternativa errada. Usando a especificação correta em cada um é importante ao ar livre.
| Ferramenta/Item | especificação ou tipo | Porque é que é importante |
| Broca + broca de alvenaria | 6mm para M6 — 8mm para âncoras M8 | Furos subdimensionados reduzem a resistência ao arrancamento da âncora na alvenaria |
| âncoras de parafusos RAWL | M6 abaixo de 10kg — M8 por 10–20kg | Grau incorreto afrouxa a vibração do vento sustentada |
| Espaçadores de afastamento de barril | Comprimento de 20–25 mm | Sem impasse = sem folga de drenagem = condensação presa atrás da placa |
| Conectores à prova d'água IP68 | Tipo de gel ou termorretrátil | Todo ponto de emenda ao ar livre sem vedação IP68 é uma falha futura |
| Conduíte ondulado com classificação UV | Polipropileno - não PVC padrão | Rachaduras padrão de PVC preto em UV dentro de 2 a 3 anos |
| Saída externa protegida por GFCI | Tomada externa com classificação climática | Necessário para qualquer circuito elétrico de área úmida - não opcional |
Também necessário, mas direto: nível de destilação (600 mm), decapante de arame (12–24 AWG), fita auto-amalgamada, selante de silicone externo transparente.
Lista de verificação de pré-instalação
| O que verificar | O que procurar | Risco se ignorado |
| Classificação de IP da tira | Flex de neon com revestimento de silicone IP67 mínimo | A água atinge juntas de solda internas - falha do LED |
| Classificação IP dos conectores | IP68 em cada junção ao ar livre | Conectores com classificação mais baixa corroem em uma estação chuvosa |
| potência total | Tira com m × metros totais + 20% Headroom | Driver de pequeno porte superaquece e falha antes que o sinal o faça |
| Superfície de montagem | Tijolo, alvenaria, pino de metal com suporte, madeira estrutural | Tipo de âncora incorreto afrouxa sob carga |
| Proximidade de saída GFCI | Dentro do cabo de conduíte planejado | Longas corridas desprotegidas criam risco de choque e queda de tensão |
| Requisito de licença local | Regras de sinalização de fachada comercial ou de loja | Sinais comerciais não permitidos podem ser ordenados |
| Teste de sinal antes da montagem | Corra por 15 a 20 minutos no nível do solo | Falha encontrada após a montagem significa uma reinstalação completa |
Conheça as especificações do seu signo
Verifique esses quatro números antes de tocar em uma broca, eles determinam todas as decisões de hardware e fiação a seguir.
- Classificação mínima da faixa ao ar livre: SMD2835, SMD2835, 120 LEDs/m
- Tensão de entrada: DC 12V ou DC 24V — Nunca conecte as tiras de LED diretamente na rede elétrica CA
- Desenho de poder: ~10W por metro (figurinha de neon de silicone de 8 × 16 mm)
- Encosto: Acrílico pré-perfurado - não adicione novos orifícios próximos aos canais de LED
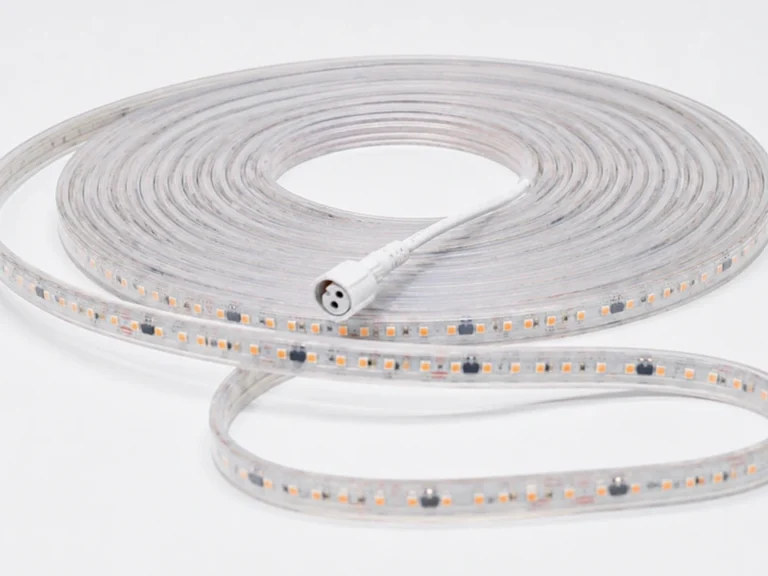
Antes da instalação, também ajuda a entender como as tiras de néon com LED de silicone de alta qualidade são realmente feitas - o processo de extrusão e vedação afeta diretamente o desempenho à prova d'água e a durabilidade externa a longo prazo.

Montagem na parede versus montagem pendurada: qual método funciona para sua configuração
A montagem na parede se adapta a instalações comerciais permanentes em superfícies sólidas, especialmente para Sinais de neon ao ar livre comerciais para restaurantes, bares, fachadas Onde a estabilidade do vento e o acesso à manutenção são importantes. O enforcamento funciona para pátios cobertos, pérgulas e configurações temporárias ou semipermanentes. A escolha afeta o hardware, o roteamento de cabos e o comportamento do vento – escolha com base na sua superfície e no peso do sinal, não na estética.
| Fator | montagem na parede | Montaria para enforca |
| Melhor tipo de superfície | Tijolo, alvenaria renderizada, concreto, pino de metal com placa de apoio | Viga do teto estrutural, viga de pérgula, estrutura de aço coberta |
| Hardware necessário | âncoras M6/M8 Rawl, dispersões de barril, parafusos de inox | Cabo de aço inoxidável de 3 mm, ferrolhos frisados, parafusos de olhos nominais |
| Peso do sinal máximo | Até 20kg com âncoras de alvenaria corretas | Melhor menos de 15 kg sem o Sign-Off do Engenheiro Estrutural na capacidade do feixe |
| resistência ao vento | Alto — o sinal se move com a parede, não independentemente | Inferior — Balanço lateral aumenta o estresse do cabo e da conexão em rajadas |
| Gerenciamento de cabos | Conduto na parede ou na rota da superfície | Conduíte empacotado preso ao longo do cabo de suspensão |
| Acesso de manutenção | Remova os abismo para alcançar o motorista ou a tira | Os cabos devem ser abaixados para qualquer inspeção |
| Melhor para | Sinalização da vitrine, bar exterior ou paredes de café, instalações permanentes | Pátios cobertos, pérgulas, esplanadas, espaços para eventos ao ar livre |
Antes da montagem, é útil ver como um letreiro de néon LED personalizado é montado e preparado. Compreender como o Backboard Acrílico, o Neon Flex e o Routing Cable se unem, facilitam o seguimento das etapas de instalação.

Passo a passo: montagem na parede
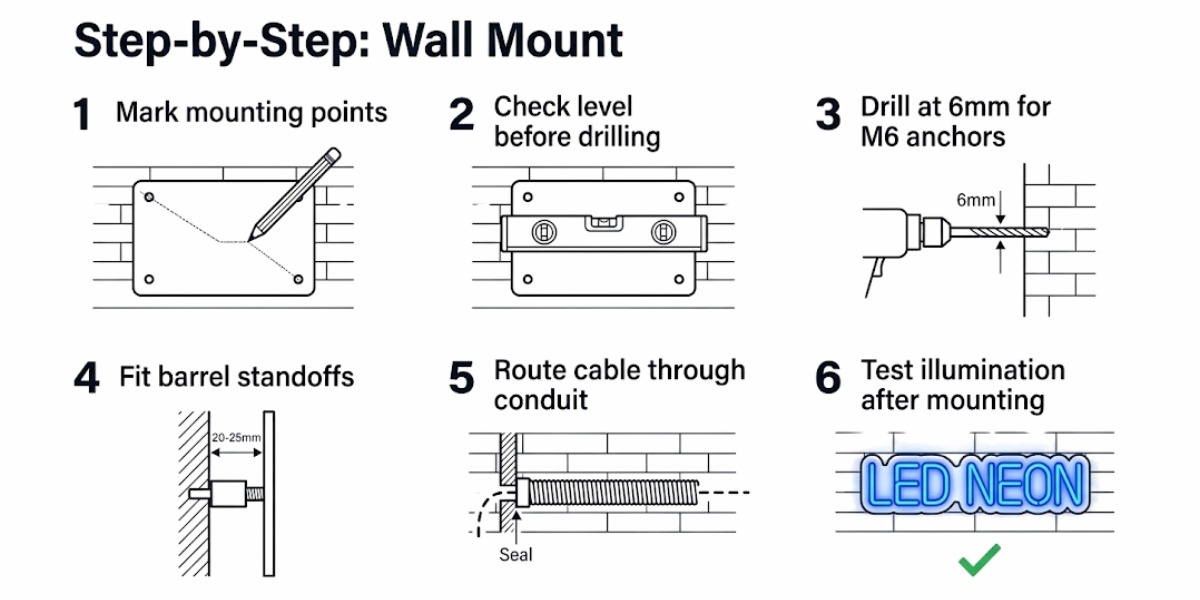
- Marque os pontos de montagem através dos orifícios da placa pré-perfurados — O peso distribui corretamente pelo acrílico e as fissuras sob tensão são evitadas.
- Verifique o nível antes da perfuração — Um sinal iluminado fora do nível lê imediatamente para qualquer pessoa que o olhe à distância.
- Perfuração a 6 mm para âncoras M6 — Furos subdimensionados fazem com que a âncora se prenda; orifícios de grandes dimensões reduzem a resistência ao arranque na alvenaria.
- Ajuste os afastamentos do barril antes de apertar totalmente — Este é o passo que a maioria das pessoas pula, e é a que causa problemas de condensação no primeiro ano.
- Cabo de alimentação de rota através do conduíte de polipropileno com classificação UV — O cabo exposto em uma parede externa sem conduíte se degradará. Esta etapa não é negociável para pendurar os sinais de néon permanentemente.
- Teste a iluminação após a montagem — A vibração da instalação ocasionalmente afrouxa um terminal ou conector que estava bem durante o teste de solo.

Passo a passo: suporte para pendurar
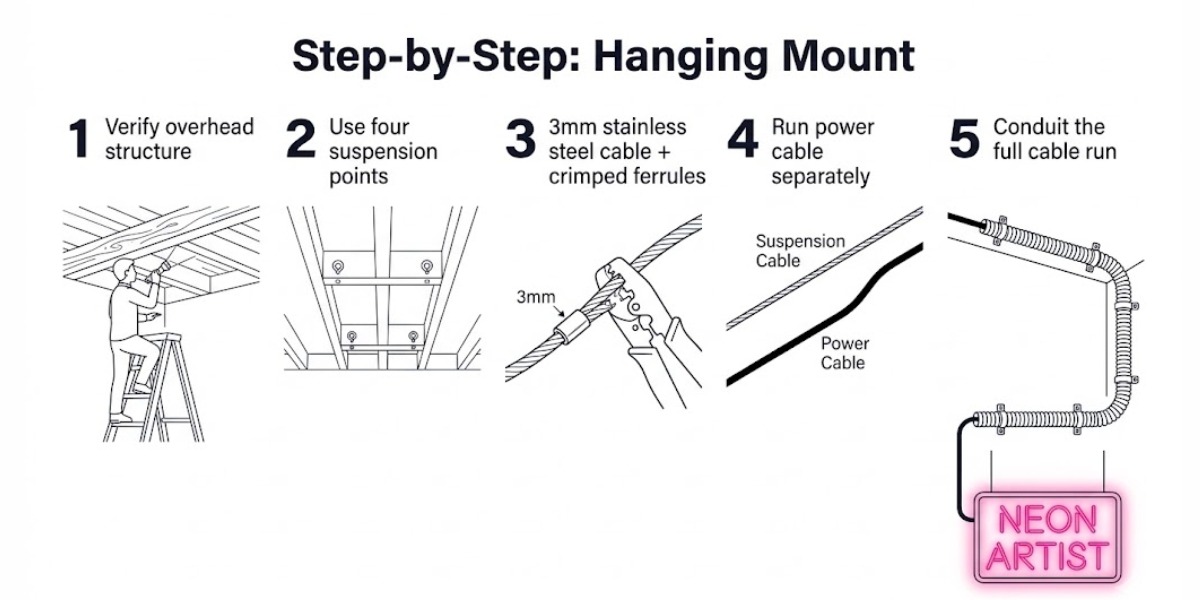
- Verifique se a estrutura aérea está carregando — Vigas de pergola decorativas geralmente não são classificadas para cargas suspensas permanentes.
- Use quatro pontos de suspensão para sinais com mais de 60 cm — Pendurar dois pontos em uma placa larga cria um estresse de torção que racha o acrílico ao longo do tempo.
- Especifique o cabo de aço inoxidável de 3 mm com arruelas frisadas — Os ganchos de fio padrão ou correntes de uma loja de ferragens enferrujam em duas estações ao ar livre.
- Execute o cabo de alimentação separadamente dos cabos da suspensão — O cabo elétrico não é um suporte mecânico; combinando-os corre o risco de puxar os terminais soltos sob carga.
- Conduta o cabo de alimentação total — O movimento do vento em um sinal de suspensão transfere a vibração ao longo do cabo não seguro e trabalha as conexões soltas ao longo do tempo.
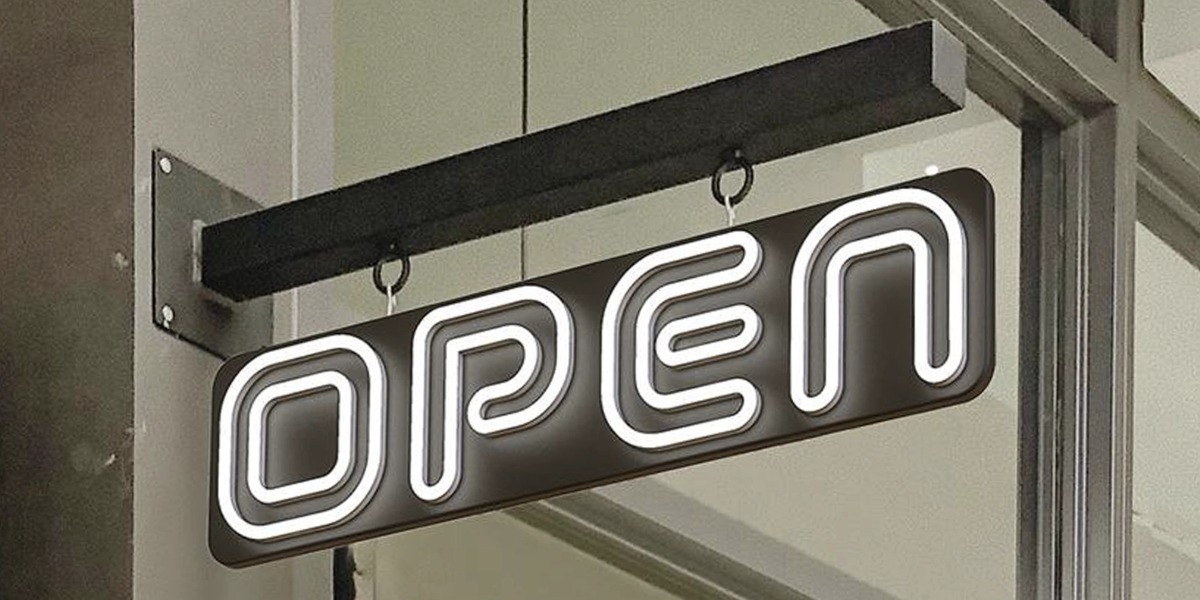
Um sinal de montagem pendurado na prática suspendido em um suporte de parede por meio de anéis de aço. Observe que o suporte é estruturado acima, o sinal em si não carrega nenhum contato com a parede.
Se você ainda está decidindo o tamanho do sinal, tensão, estilo acrílico ou opções de montagem, nosso Guia de letreiros de néon personalizados Explica as diferenças antes do início da instalação.
Impermeabilização da fiação: o passo que a maioria das pessoas erra
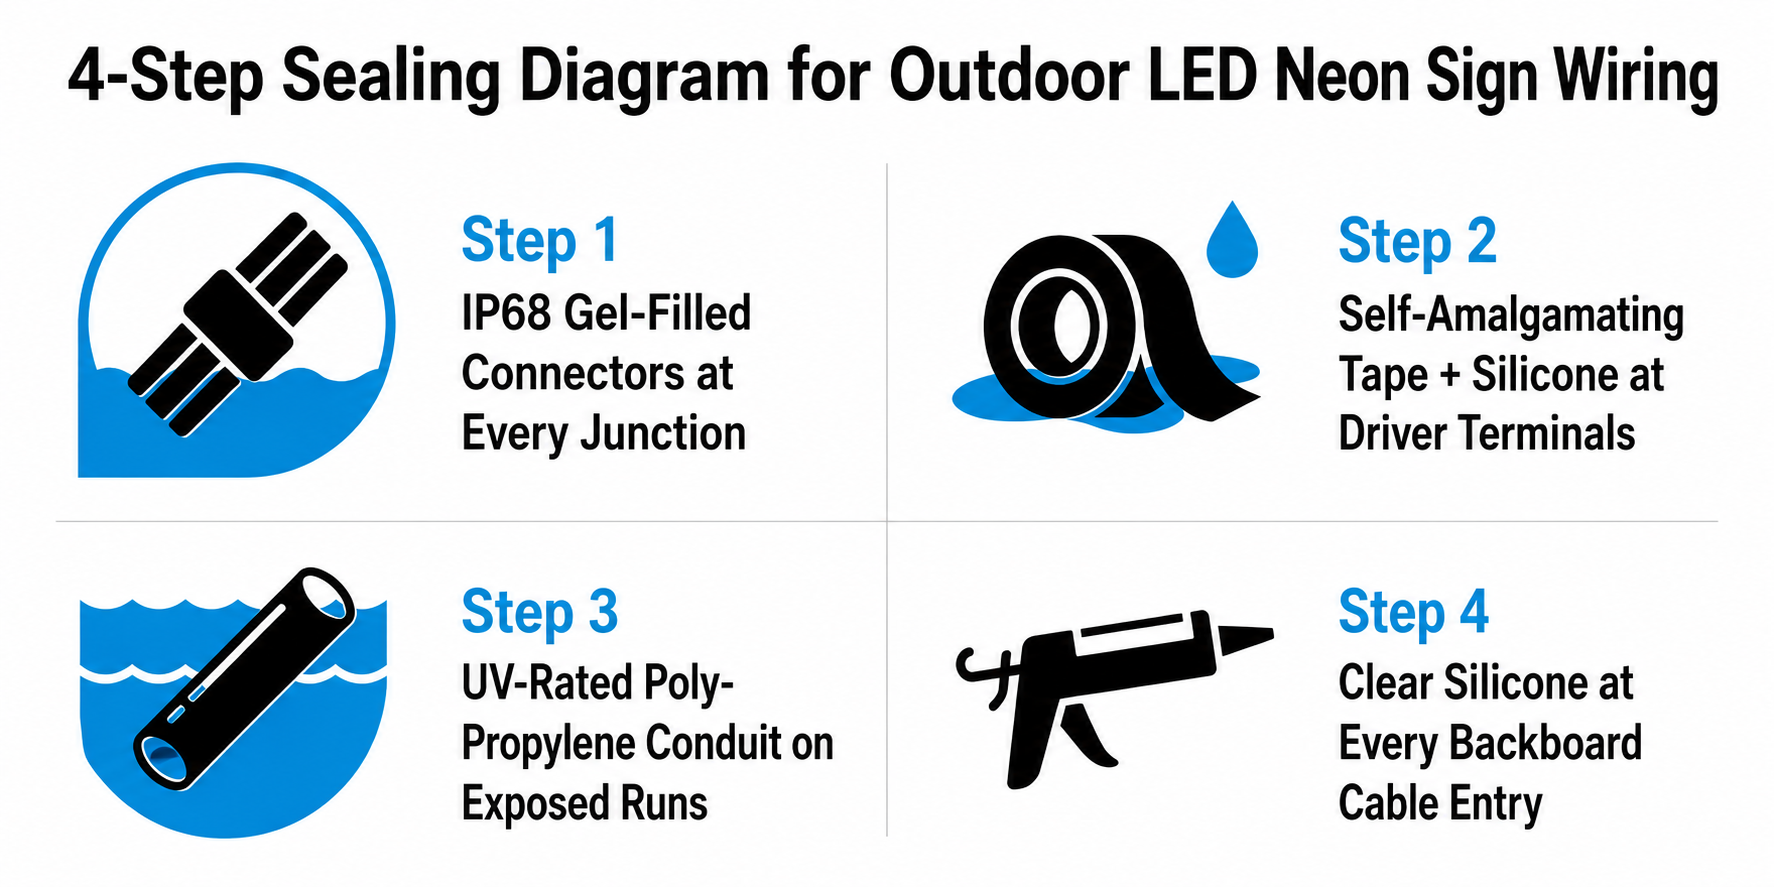
A tira de neon de silicone lida com o clima. Cada junção, conector e ponto de terminal na fiação não - a menos que você sele cada um corretamente. É aqui que a maioria das instalações externas falham no primeiro ano.
Se você está se perguntando como os sinais ao ar livre realmente funcionam em climas pesados, leia: Os leds leds de néon são seguros na chuva e na neve?
Referência rápida de classificação de IP
| Classificação IP | O que ele lida | Adequado para neon ao ar livre? |
| IP20 | Proteção básica contra poeira, sem resistência à umidade | Somente em ambientes internos - falha em qualquer posição externa |
| IP44 | À prova de respingos de qualquer direção | Não classificado para sinalização externa exposta ou chuva |
| IP65 | Proteção contra jatos de água à prova de poeira e de baixa pressão | Apenas áreas externas cobertas - não chuva direta |
| IP67 | Submersão temporária e à prova de poeira para 1m/30 min | Padrão mínimo para tiras de letreiros de néon ao ar livre |
| IP68 | Contato com água, contínuo, com classificação de poeira, classificado | Melhor escolha para todos os conectores e junções externas |
Regra chave: Seu circuito é tão à prova d'água quanto seu componente de classificação mais baixa. Uma faixa IP67 conectada com conectores de emenda IP20 é uma instalação IP20.
Ainda comparando as classificações? Nossa quebra de letreiros de néon LED ao ar livre IP65 vs IP67 vs IP68 explica Onde cada classificação funciona e onde falha ao ar livre.
Como selar todos os pontos de conexão
Conectores IP68 em cada junção Não é um requisito um requisito. Cada ponto de emenda aberto ao ar livre se torna um ponto de entrada de água na primeira chuva forte. Conectores com gel ou termorretrátil são os únicos tipos classificados para junções externas permanentes.
Fita auto-amalgamada + silicone nos terminais do motorista Esses dois trabalham juntos, não separadamente. A fita cria uma camada fundida à prova d'água sobre o bloco de terminais. O silicone cobre as bordas de transição com as quais a fita não pode se adaptar totalmente. Usando apenas um deixa lacunas.
Conduíte de polipropileno com classificação UV em todos os cabos expostos O conduíte preto padrão de PVC endurece e desenvolve rachaduras na superfície após 2 a 3 anos de exposição direta aos raios UV. Uma vez rachado, não protege nada. O polipropileno mantém sua flexibilidade e integridade significativamente mais tempo ao ar livre.
Silicone ao ar livre transparente em cada entrada do cabo da tabela A água rastreia o revestimento do cabo por meio da ação capilar - não precisa de uma lacuna para entrar. Selar todos os pontos em que um cabo passa pela tabela de acrílico impede a umidade de atingir os canais de LED.
Onde colocar o driver de LED (fonte de alimentação)
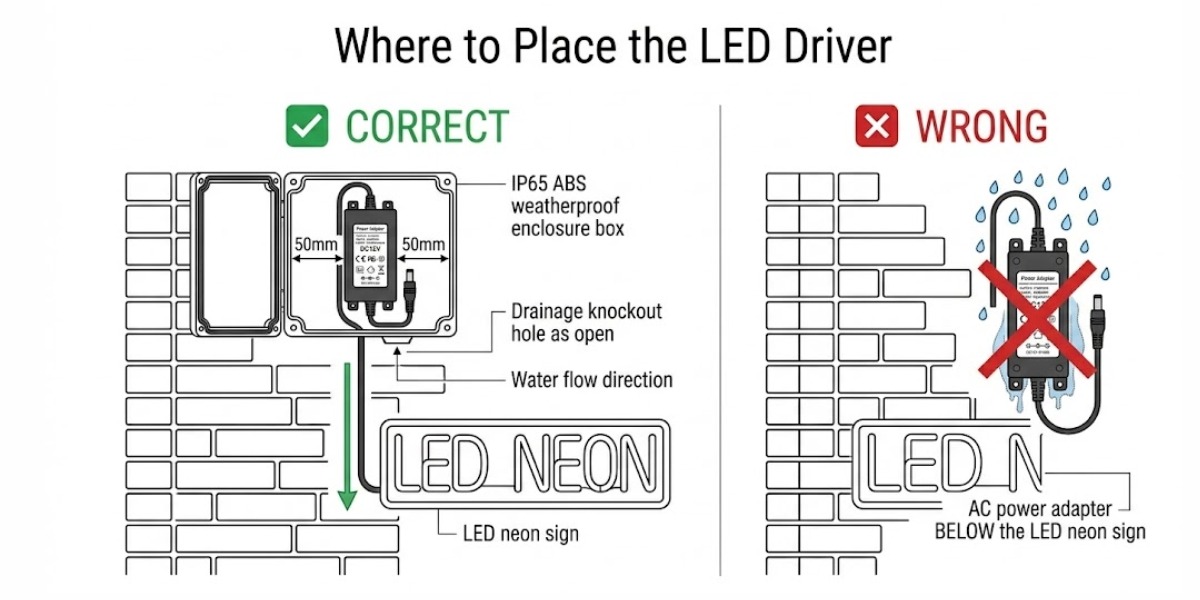
A maioria dos drivers de LED são IP20 – eles não têm proteção alguma com umidade. Um motorista sentado em uma caixa sem gás em uma parede externa falhará apenas com a condensação dentro de um ano, mesmo que nunca chova diretamente.
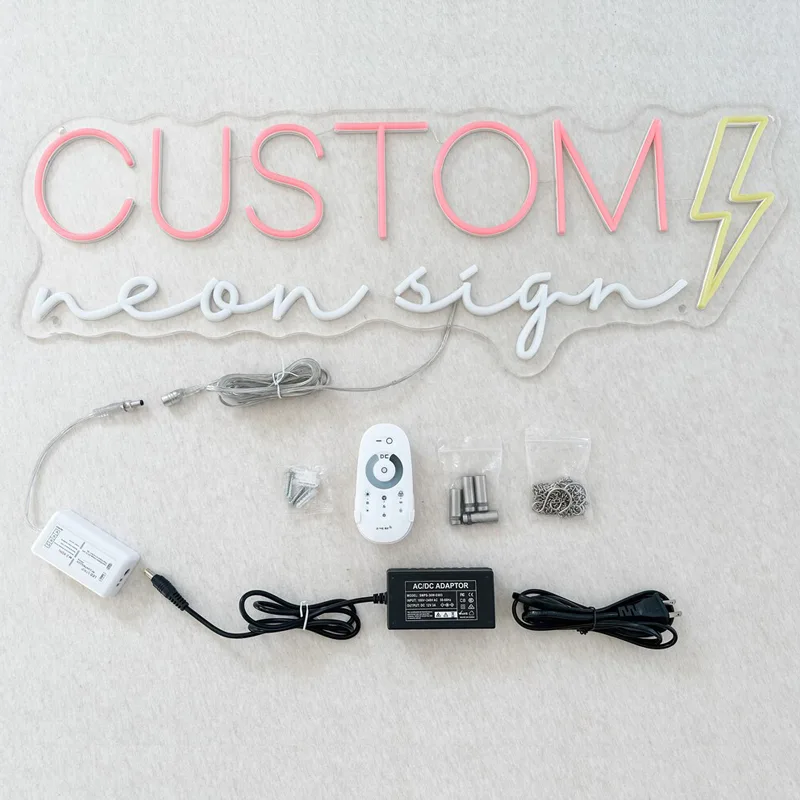
Adaptador LED/Fonte de alimentação LED com porta DC (DC12V/24V)
- Tensão de entrada: AC100-240V
- Tensão de saída: DC12V/DC24V
- Corrente de saída: 3A/4A/5A/6A/8A/10A
- Watt: 72W/96W/120W
- Dimensões: 120x55x30mm
- Certificação: EUA CE ROHS AU
- Grau IP: IP20
- Garantia: 2 anos
Colocação de drivers: fazer e não fazer
| fazer | não |
| Motorista da casa em um gabinete IP65+ ABS com tampa de junta de borracha | Deixe o motorista em uma parede externa aberta sem qualquer recinto |
| Posicione o motorista acima do sinal para que a água flua para baixo e para baixo | Monte o motorista diretamente abaixo do sinal onde o escoamento da chuva se acumula |
| Deixe 50 mm de folga ao redor do motorista dentro do gabinete para fluxo de ar | Pacote de caixa com excesso de cabo — o calor aprisionado reduz a vida útil do motorista |
| Taxa de motorista em 120–150% de potência total de sinais | Execute o driver em sua carga máxima nominal continuamente |
| Mantenha o nocaute de drenagem da base do gabinete aberto | Orifícios de drenagem de vedação — Formulários de condensação dentro, independentemente da qualidade da vedação da tampa |
| Etiquete o gabinete com potência total de carga para manutenção futura | Leave Enclosure Unducumented — cria problemas durante qualquer visita de manutenção |
A que distância o motorista pode sentar-se do sinal?
É aqui que a maioria das pessoas adivinha errado. A lógica é simples:
Maior potência = mais corrente desenhada = mais queda de tensão por metro de cabo = distância de funcionamento seguro mais curta.
A maioria das pessoas assume que um driver maior pode acionar um cabo mais longo. É o oposto. Um driver de 30W a 12V pode funcionar com segurança 5 metros. Um driver de 100 W com a mesma tensão não deve exceder 2 metros no fio padrão de 1,5 mm.
| potência do motorista | Max Run a 12 V (fio de 1,5 mm²) | Max Run a 24 V (fio de 1,5 mm²) |
| 30w | 5m | 10m |
| 60W | 3m | 6m |
| 100W | 2m | 4m |
| 150+ | 1,5m — mude para um fio de 2,5 mm² | 3m |
Se a localização do driver for fixada e o cabo for excedido por essas distâncias, mude para um sistema de 24 V. Ele corta metade da corrente pela mesma potência e corta a queda de tensão proporcionalmente.
Drenagem e ventilação: por que a montagem embutida mata os sinais mais cedo
Montar uma placa diretamente contra uma parede externa cria uma bolsa de ar selada. A temperatura cai à noite, causa umidade na bolsa para condensar na parte de trás do acrílico e no hardware de montagem. Ao longo de meses, isso corroe os parafusos, enfraquece os pontos de ancoragem e encontra seu caminho nas vedações de entrada de cabos. A montagem do afastamento com drenagem aberta resolve isso completamente.
Gap de distância e especificações de drenagem por tamanho do sinal
Menos de 50 cm Isentoff: 15 mm — drenagem inferior: 8 mm aberto - abertura superior: 8 mm aberta
50 cm – 100 cm Issolamento: 20 mm — drenagem inferior: 10 mm aberta ou um furo de 10 mm por 30 cm - ventilação superior: 10 mm aberto
100 cm – 150 cm Staff: 25 mm — drenagem inferior: dois orifícios de 10 mm, espaçados uniformemente - ventilação superior: 15 mm abertos
Mais de 150 cm IMPRESSO: 30 mm + — drenagem inferior: três ou mais orifícios de choro ou canal de fundo aberto completo — ventilação superior: 20 mm aberto + aberturas laterais
Nunca silicone a borda inferior da tabela para a parede. Essa lacuna é o dreno de condensação. Sele apenas os pontos de entrada da borda superior e do cabo - nunca no fundo.
dimensionamento de hardware de afastamento
Os suportes de barril M6 em 20–25 mm cobrem a maioria dos sinais externos corretamente e se alinham com as posições padrão de orifício de acrílico pré-perfurado. Sinais acima de 10 kg em superfícies de alvenaria Precisam de espaçamentos M8 com âncoras de parafuso M8 Rawl — o diâmetro aumentado de âncora oferece uma resistência significativamente melhor sob carga de vento sustentada.
Proteção UV e manutenção externa a longo prazo
IP67 lida com água. Ele não impede que o silicone se degrade sob exposição sustentada aos raios UV. Nas paredes voltadas para o sul ou posições totalmente sem sombra, a luz direta do sol quebra lentamente a camada de impermeabilização e o adesivo abaixo dela - criando microfissuras que permitem que a umidade entre em uma faixa que ainda parece selada do lado de fora. O dano é invisível até que a água chegue aos LEDs.
Risco UV pela posição de instalação
parede voltada para o norte Exposição mínima para raios UV. O padrão IP67 é suficiente - nenhuma ação adicional necessária.
Sob o pátio coberto ou toldo Sol pouco ou nenhum. O padrão IP67 lida com essa posição sem medidas extras.
Nível do solo ou próximo à drenagem Baixo UV, mas contato com umidade elevada. Use conectores IP68 por toda parte e verifique as lacunas de drenagem a cada 6 meses.
Parede virada a sul - sem sombra 6–8 Horas de sol direto diariamente. Instale um dossel ou pendurado protetor UV acima do sinal e inspecione a camada de silicone anualmente para rachaduras precoces.
Sinalização de telhado totalmente exposta posição de risco mais alto. Especifique o revestimento de silicone resistente a UV diretamente do fabricante em estágio de pedido — o retrofit não é eficaz. A inspeção profissional anual não é negociável aqui.
Cronograma de manutenção anual
Agrupe suas verificações com a frequência com que elas precisam acontecer – nem tudo precisa da mesma atenção.
A cada 3 meses
- Teste a tomada GFCI — pressione o botão de teste, ele deve trip e reiniciar de forma limpa todas as vezes.
A cada 6 meses
- Verifique os parafusos de ferrugem — Rust Surface significa substituir o hardware; a ferrugem estrutural significa uma remontagem total.
- Limpe a superfície do tabuleiro com um pano macio e um sabonete suave – o acúmulo de sujeira bloqueia a abertura de ventilação atrás da placa.
A cada 12 meses
- Inspecione a condição de silicone da tira – procure amarelecimento, rachaduras na superfície ou fragilidade nos pontos de dobra.
- Verifique os vedantes de conduítes e entradas de cabos — o corpo do conduíte rachado ou uma conta de silicone encolhida precisa de selamento imediato.
- Verifique a junta do gabinete do motorista - uma junta comprimida ou rachada deve ser substituída antes da próxima estação chuvosa, não depois.
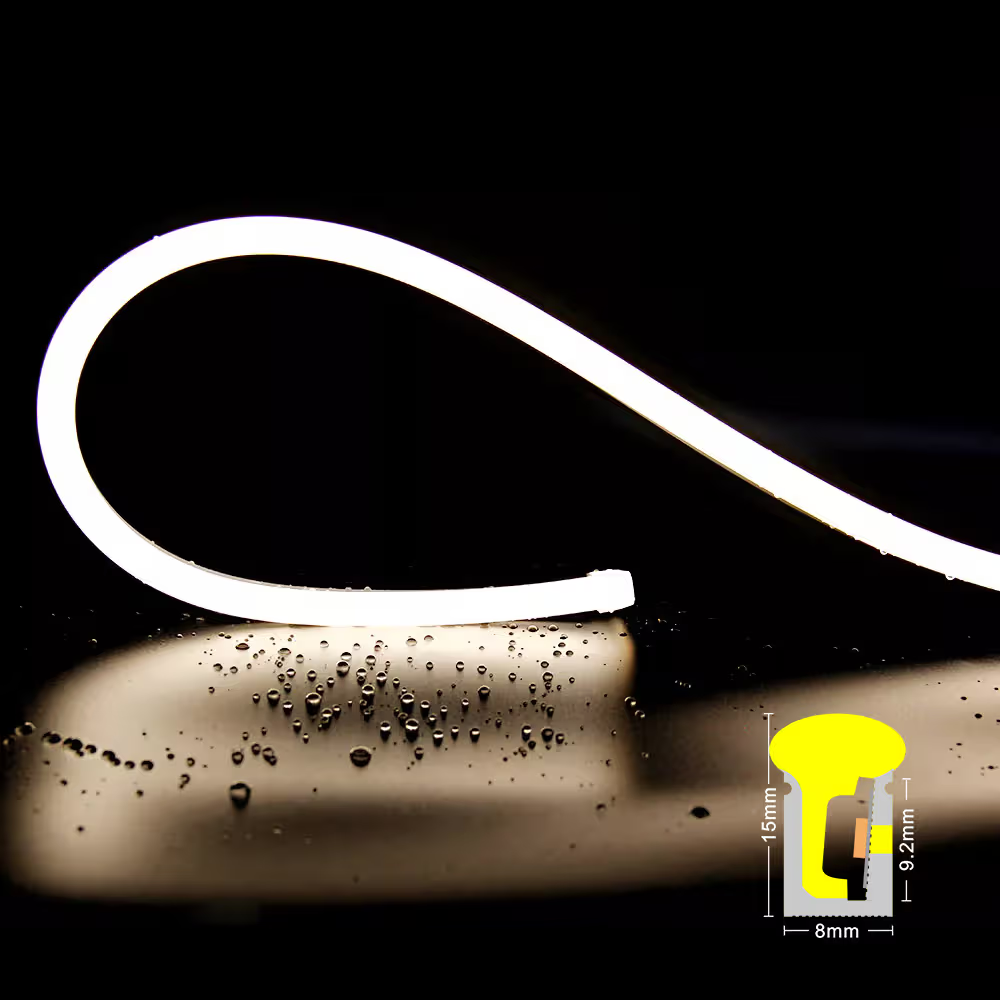
Side Bend S0815 Silicone LED Neon Flex Light
- Tensão de entrada: CC 24 V
- Watt: 9,6 W/m
- LED QTY: SMD2835 120LEDs/m
- Temperatura de cor: 2700K/3000K/4000K/5000K/6500K/customizable
- IRC: >80
- Lúmen: >330lm/m
- Grau IP: IP65/IP67
- Entrada de cabos: Frente/Lado/Fundo para opcional
- Diâmetro mínimo de dobragem: 100 mm
- Comprimento cortável: 50mm
- Comprimento: 5 metros/rolo
Erros comuns de instalação e como corrigi-los
A maioria das falhas de sinais de néon de LED externo não são falhas no produto — são falhas na instalação. Esses são os nove mais comuns.
- Conectores IP20 em junções externas A água entra em todos os pontos de emenda não selados na primeira estação chuvosa - os sinais de turbulência ou seções morrem. → Corrigir: Substitua por conectores com gel ou termorretrátil IP68 em todos os cruzamentos externos.
- Driver em um gabinete sem gás A condensação corrói os terminais de dentro — geralmente dentro de 6 a 12 meses após a instalação. → Corrigir: Mova para um gabinete IP65+ ABS com uma tampa de junta de borracha e abra o nocaute de drenagem.
- cabo funciona muito longo em 12v A tensão cai sobre a distância — o escurecimento visível aparece na extremidade do sinal desde o primeiro dia. → Corrigir: Encurte a execução ou mude a configuração completa para um driver de 24 V e uma tira.
- Flush montado na tabela - sem impasses Nenhum fluxo de ar atrás da placa significa que a condensação permanece presa e o hardware corroe ao longo de meses. → Corrigir: Reinstale com disposições de barril de 20 a 25 mm e deixe a borda inferior completamente aberta.
- Saída externa não GFCI Sem proteção contra falhas à terra em condições de molhamento — o vazamento de corrente não possui corte automático. → Corrigir: Substitua por uma tomada GFCI com classificação intempérie projetada para uso externo.
- Não testar antes da montagem Um terminal solto encontrado após a instalação completa significa que o sinal volta a cair. → Corrigir: Funcione no nível do solo por 15 a 20 minutos antes do início de qualquer trabalho de montagem.
- Borda inferior da tabela selada com silicone Bloqueia o único dreno de condensação — poças de umidade permanentemente atrás do acrílico. → Corrigir: Remova a vedação inferior. Apenas os pontos de entrada da borda superior e do cabo devem ser selados.
- Conduíte de PVC preto padrão em corridas expostas UV quebra o PVC ao ar livre — as fissuras superficiais aparecem dentro de 2 a 3 anos e a fiação fica exposta. → Corrigir: Substitua por um conduíte de polipropileno corrugado com classificação UV em cada corrida exposta.
- Sinal alimentado por um cabo de extensão compartilhado A carga sustentada em um cabo sem classificação causa acúmulo de calor nos conectores ou faz o circuito. → Corrigir: Dedique uma tomada externa protegida contra o tempo devidamente avaliada ao sinal.
A vida útil de 30.000 horas em um letreiro de LED externo de qualidade só é possível se a instalação sob a sua manutenção. A faixa de LED raramente falha primeiro - o gabinete do motorista, as junções dos cabos e as lacunas de drenagem fazem. Acerte os três e o sinal cuida de si mesmo.
FAQs
Postagens relacionadas