Polski
  English
  简体中文
简体中文  Deutsch
  Español
  Français
  Italiano
  日本語
日本語  한국어
한국어  Português
  Русский
  Türkçe
  Nederlands
  Tiếng Việt
  ไทย
ไทย 
Na zewnątrz LED neonowe znaki są zbudowane tak, aby radzić sobie z pogodą, ale tylko wtedy, gdy instalacja za nimi jest wykonana prawidłowo. Sam znak jest zwykle ostatnią rzeczą, która zawodzi. To, co idzie nie tak, to zawsze złącze przewodów uszczelnione niewłaściwym złączem, kierowca siedzący w pudełku bez uszczelki lub tablica zamontowana równo przy ścianie bez szczeliny odpływowej.
Ten przewodnik obejmuje pełne Znak neonowy LED na zewnątrz Proces instalacji z narzędzi i wstępnych kontroli, poprzez montaż, hydroizolację, rozmieszczenie kierowcy, odwodnienie, konserwację UV i błędy, które powodują wczesne awarie. Postępuj zgodnie z nim w kolejności, a znak przetrwa gwarancję o lata.
Zaplanuj instalację neonów na zewnątrz, zanim cokolwiek innego
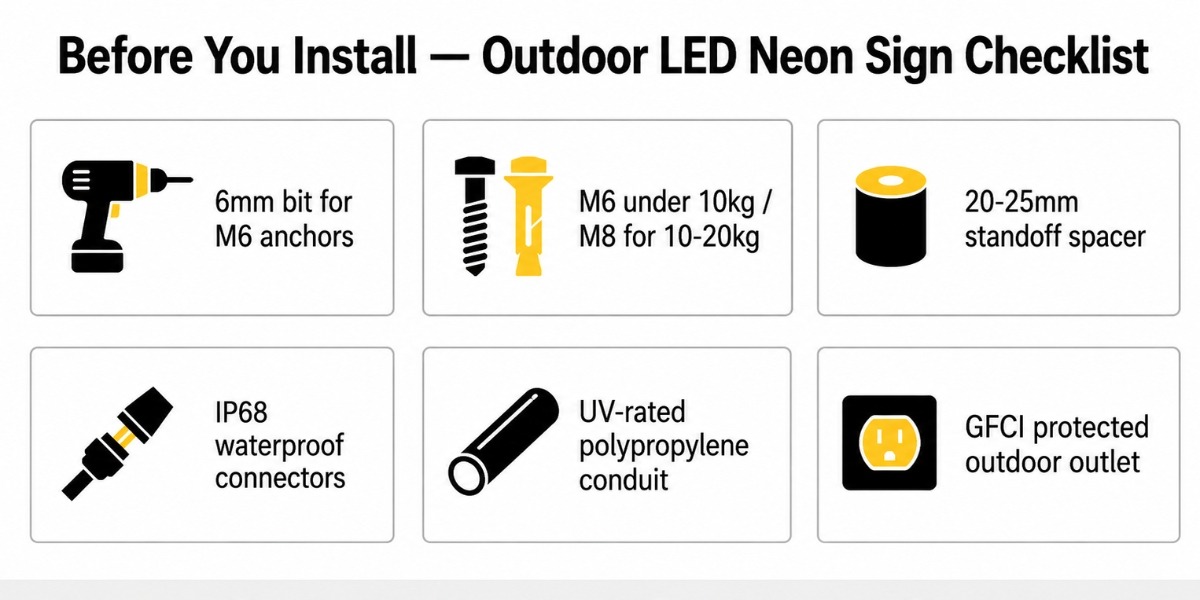
Piętnaście minut wstępnych kontroli przed wierceniem oszczędza wiele godzin przeróbek. Potwierdź swoje powierzchnie, źródło zasilania, wagę znaku i oceny IP, zanim cokolwiek pójdzie na ścianę. Większość błędów instalacji sięga wstecz do pominiętych kontroli, a nie samego znaku.
Narzędzia i sprzęt, którego potrzebujesz najpierw
Są to przedmioty, które większość ludzi zapomina lub zastępuje niewłaściwą alternatywą. Używanie poprawnej specyfikacji na każdym z nich ma znaczenie na zewnątrz.
| Narzędzie / przedmiot | specyfikacja lub typ | Dlaczego to ma znaczenie |
| Wiertło + murowanie | 6mm dla M6 — 8mm dla kotew M8 | Niewymiarowe otwory zmniejszają wytrzymałość na wysuwanie kotwicy w murze |
| Kotwy śrubowe Rawl | M6 poniżej 10 kg — M8 na 10–20 kg | Niewłaściwa klasa poluzowuje się pod trwałymi wibracjami wiatr |
| dystansowe lufy dystansowe | Długość 20-25 mm | Brak odstępu = brak szczeliny drenażowej = kondensacja uwięziona za płytą |
| Wodoodporne złącza IP68 | Rodzaj wypełniony żelem lub termokurczliwy | Każdy punkt splotu zewnętrznego bez uszczelnienia IP68 jest usterką w przyszłości |
| Przewód falisty z cegłą UV | Polipropylen — nie standardowe PVC | Standardowe czarne pęknięcia PVC pod wpływem promieniowania UV w ciągu 2-3 lat |
| Wyjście zewnętrzne chronione GFCI | Gniazdo zewnętrzne z oceną pogod | Wymagane dla każdego obwodu elektrycznego w mokrym obwodzie — nie opcjonalnie |
Potrzebne, ale proste: poziomicy (600mm+), ściągacz do przewodów (12–24 AWG), taśma samoobsługowa, przezroczysty uszczelniacz silikonowy zewnętrzny.
Lista kontrolna przed instalacją
| Co sprawdzić | Czego szukać | Ryzyko, jeśli pominie |
| Ocena IP paska | Minimum IP67 z silikonową kurtką neonową flex | Woda dociera do wewnętrznych połączeń lutowanych — awaria LED |
| Ocena IP złączy | IP68 na każdym skrzyżowaniu zewnętrznym | Złącza o niższej wartości znamionowej korodują w ciągu jednej pory deszczowej |
| Całkowita moc | Pasek z m × metry ogółem + 20% Headroom | Niewymiarowy sterownik przegrzewa się i nie działa, zanim znak to zrobi |
| Powierzchnia montażowa | Cegła, mur, metalowy kołek z podłożem, drewno konstrukcyjne | Niewłaściwy typ kotwicy poluzuje się pod obciążeniem |
| Bliskość wylotu GFCI | W ramach planowanego przebiegu kabla kanałowego | Niezabezpieczone długie przebiegi powodują ryzyko wstrząsu i spadek napięcia |
| Wymóg lokalnego pozwolenia | Zasady oznakowania elewacji sklepowej lub handlowej | Niedozwolone znaki handlowe można zamówić w dół |
| Test znaku przed montażem | Biegnij przez 15-20 minut na poziomie gruntu | Usterka znaleziona po zamontowaniu oznacza pełną ponowną instalację |
Poznaj specyfikacje swojego znaku
Sprawdź te cztery liczby przed dotknięciem wiertarki, określają każdą decyzję dotyczącą sprzętu i okablowania, która następuje.
- Minimalna ocena taśmy zewnętrznej: IP67 z silikonowym kurtki SMD2835, 120 diod/m
- Napięcie wejściowe: DC 12V lub DC 24V — nigdy nie podłączaj listew LED bezpośrednio do sieci prądu przemiennego
- Pobór mocy: ~10 W na metr (silikonowy pasek neonowy 8×16 mm)
- Tablica: Wstępnie wywiercony akryl — nie dodawaj nowych otworów w pobliżu kanałów LED
Przed instalacją pomaga również zrozumieć, jak faktycznie wykonane są wysokiej jakości silikonowe paski neonowe LED — proces wytłaczania i uszczelniania bezpośrednio wpływa na wodoodporność i długotrwałą trwałość na zewnątrz.

Uchwyt ścienny a uchwyt wiszący: która metoda działa w Twojej konfiguracji
Komody do montażu naściennego Stałe komercyjne instalacje na litych powierzchniach, szczególnie dla Komercyjne neony na zewnątrz dla restauracji, barów, fasad gdzie stabilność wiatru i dostęp do konserwacji mają znaczenie. Prace wiszące na zadaszone patio, pergole i tymczasowe lub półtrwałe konfiguracje. Wybór wpływa na sprzęt, prowadzenie kabli i zachowanie wiatru — wybieraj na podstawie Twojej powierzchni i wagi znaku, a nie na estetykę.
| Czynnik | do montażu na ścianie | wiszące mocowanie |
| Najlepszy typ powierzchni | Cegła, murowana, beton, metalowy kołek z płytą podkładową | Belka sufitowa konstrukcyjna, belka pergola, rama ze stali zakrytej |
| Potrzebny sprzęt | Kotwy M6/M8 Rawl, wtyczki lufowe, śruby ze stali nierdzewnej | Kabel ze stali nierdzewnej 3 mm, zaciskane okucia, znamionowe śruby oczkowe |
| Maksymalna waga znaku | Do 20 kg z odpowiednimi kotwicami murowymi | Najlepiej poniżej 15 kg bez znaku inżyniera budowlanego na pojemność wiązki |
| Odporność na wiatr | Wysoki - znak porusza się ze ścianą, nie niezależnie | Dolny — huśtawka boczna zwiększa naprężenie kabla i połączenia w podmuchach |
| Zarządzanie kablami | przewód do ściany lub zgrabnej trasy powierzchniowej | W pakiecie przewód zabezpieczony wzdłuż przebiegu kabla zawieszenia |
| Dostęp do konserwacji | Usuń wzorce, aby dotrzeć do kierowcy lub paska | Kable muszą być opuszczane do każdej kontroli |
| Najlepsze dla | Oznakowanie sklepowe, zewnętrzne ściany barowe lub kawiarnie, stałe instalacje | Zadaszone patio, pergole, ogródki piwne, przestrzenie na imprezy na świeżym powietrzu |
Przed zamontowaniem warto zobaczyć, jak zmontowany i przygotowany jest niestandardowy znak neonowy LED. Zrozumienie, w jaki sposób akrylowa tablica, neonowa elastyczna i przewody kablowe łączą się ze sobą, ułatwia wykonanie poniższych kroków instalacji.

Krok po kroku: Uchwyt ścienny
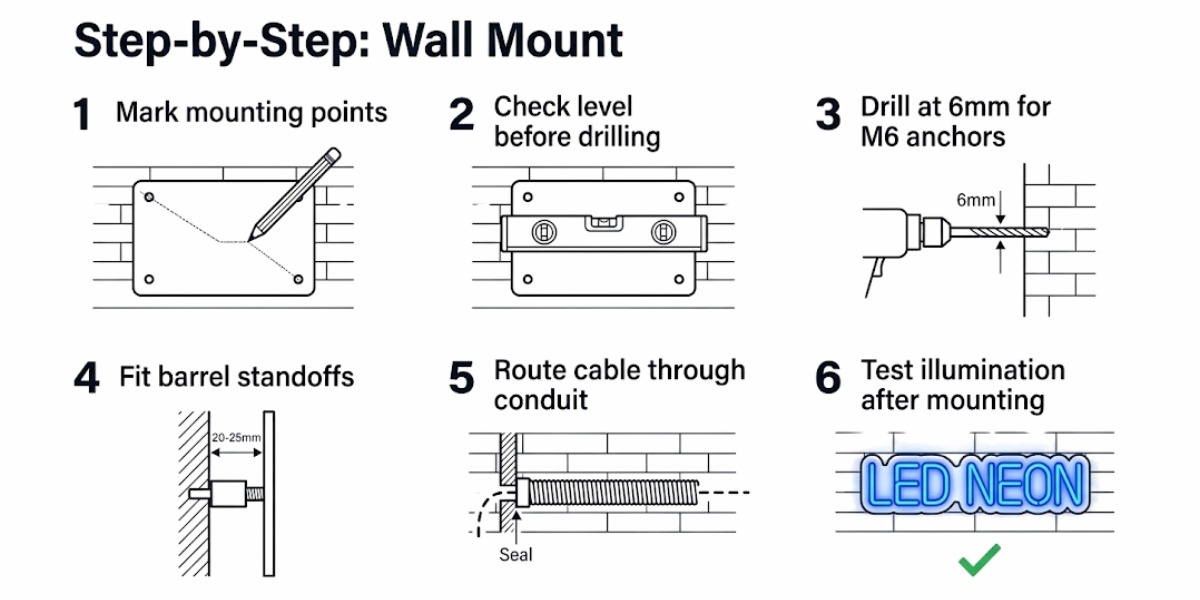
- Zaznacz punkty mocowania przez wstępnie nawiercone otwory na tablicę — Waga rozprowadza się prawidłowo na akrylu i unika się pęknięć naprężonych.
- Sprawdź poziom przed wierceniem — Podświetlany znak natychmiast odczytuje każdemu, kto patrzy na niego z daleka.
- Wiertło na 6mm dla kotew M6 — Niewymiarowe otwory powodują wiązanie kotwicy; otwory nadwymiarowe zmniejszają wytrzymałość na wyrywanie w murze.
- Dopasuj stempy lufy przed całkowitym dokręceniem — To krok, który większość ludzi pomija, i to ten, który powoduje problemy z kondensacją w ciągu pierwszego roku.
- Przewód zasilający przez kanał polipropylenowy o stopniu ochrony UV — Odsłonięty kabel na ścianie zewnętrznej bez przewodu ulega degradacji. Ten krok nie podlega negocjacjom, aby na stałe zawiesić neony na zewnątrz.
- Testowanie oświetlenia po zamontowaniu — Wibracje montażowe czasami poluzowują zacisk lub złącze, które było w porządku podczas testu uziemienia.

Krok po kroku: wiszące mocowanie
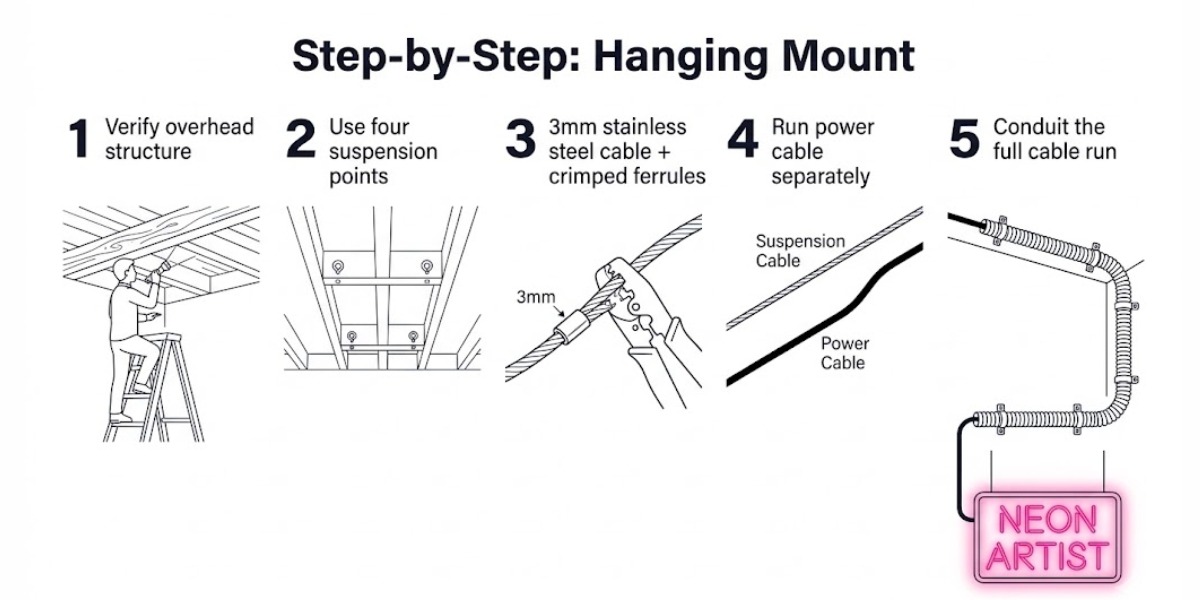
- Sprawdź, czy narzuta jest nośna — Dekoracyjne belki pergoli często nie są oceniane na stałe ładunki zawieszone.
- Użyj czterech punktów zawieszenia dla znaków szerszych niż 60 cm — Dwupunktowe zawieszenie na szerokim znaku tworzy skręcający się naprężenie, które z czasem pęka akryl.
- Określ kabel ze stali nierdzewnej 3 mm z zaciskanymi okuciami — Standardowe haki lub łańcuch ze sklepu z narzędziami będą rdzy w ciągu dwóch sezonów na zewnątrz.
- Uruchom kabel zasilający oddzielnie od kabli zawieszenia — Kabel elektryczny nie jest podporą mechaniczną; łączenie ich może spowodować wyrywanie zacisków pod obciążeniem.
- Przewód Pełny kabel zasilający — Ruch wiatru na wiszącym znaku przenosi wibracje wzdłuż niezabezpieczonego kabla i działa luźno połączenia z czasem.
Wiszące mocowanie w praktyce znak zawieszony na wsporniku ściennym za pomocą stalowych pierścieni. Uwaga Wspornik jest konstrukcyjnie zamocowany powyżej; sam znak nie ma kontaktu ze ścianą.
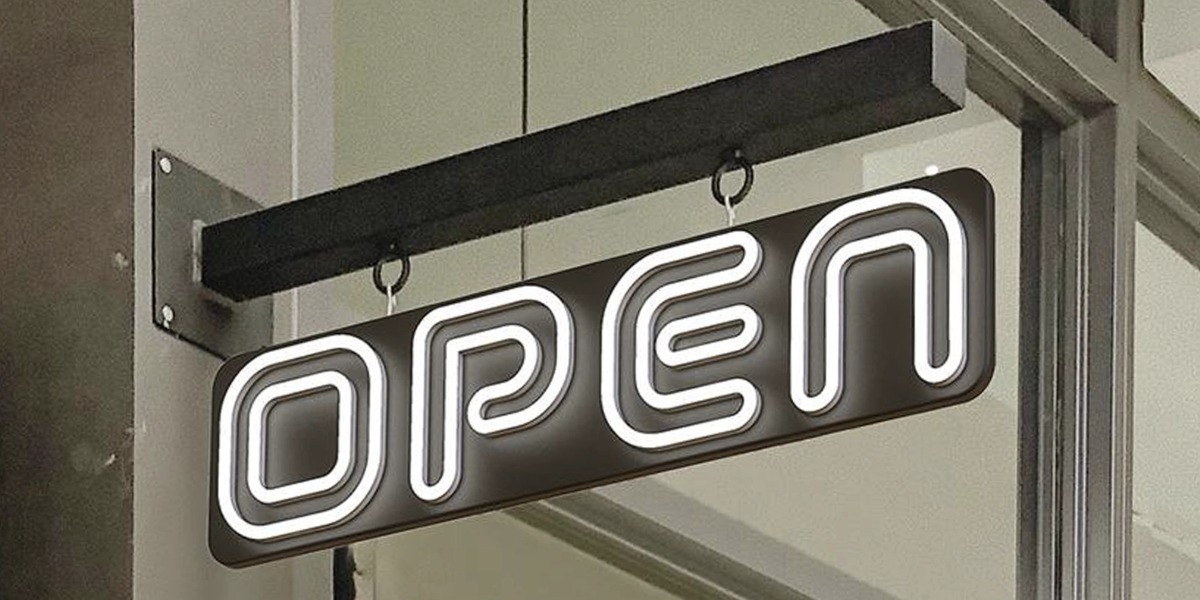
Jeśli nadal decydujesz o rozmiarze znaku, napięciu, stylu akrylowym lub opcjach montażu, nasz Niestandardowy przewodnik po znakach neonowych LED Wyjaśnia różnice przed rozpoczęciem instalacji.
Hydroizolacja okablowania: krok, który większość ludzi się myli
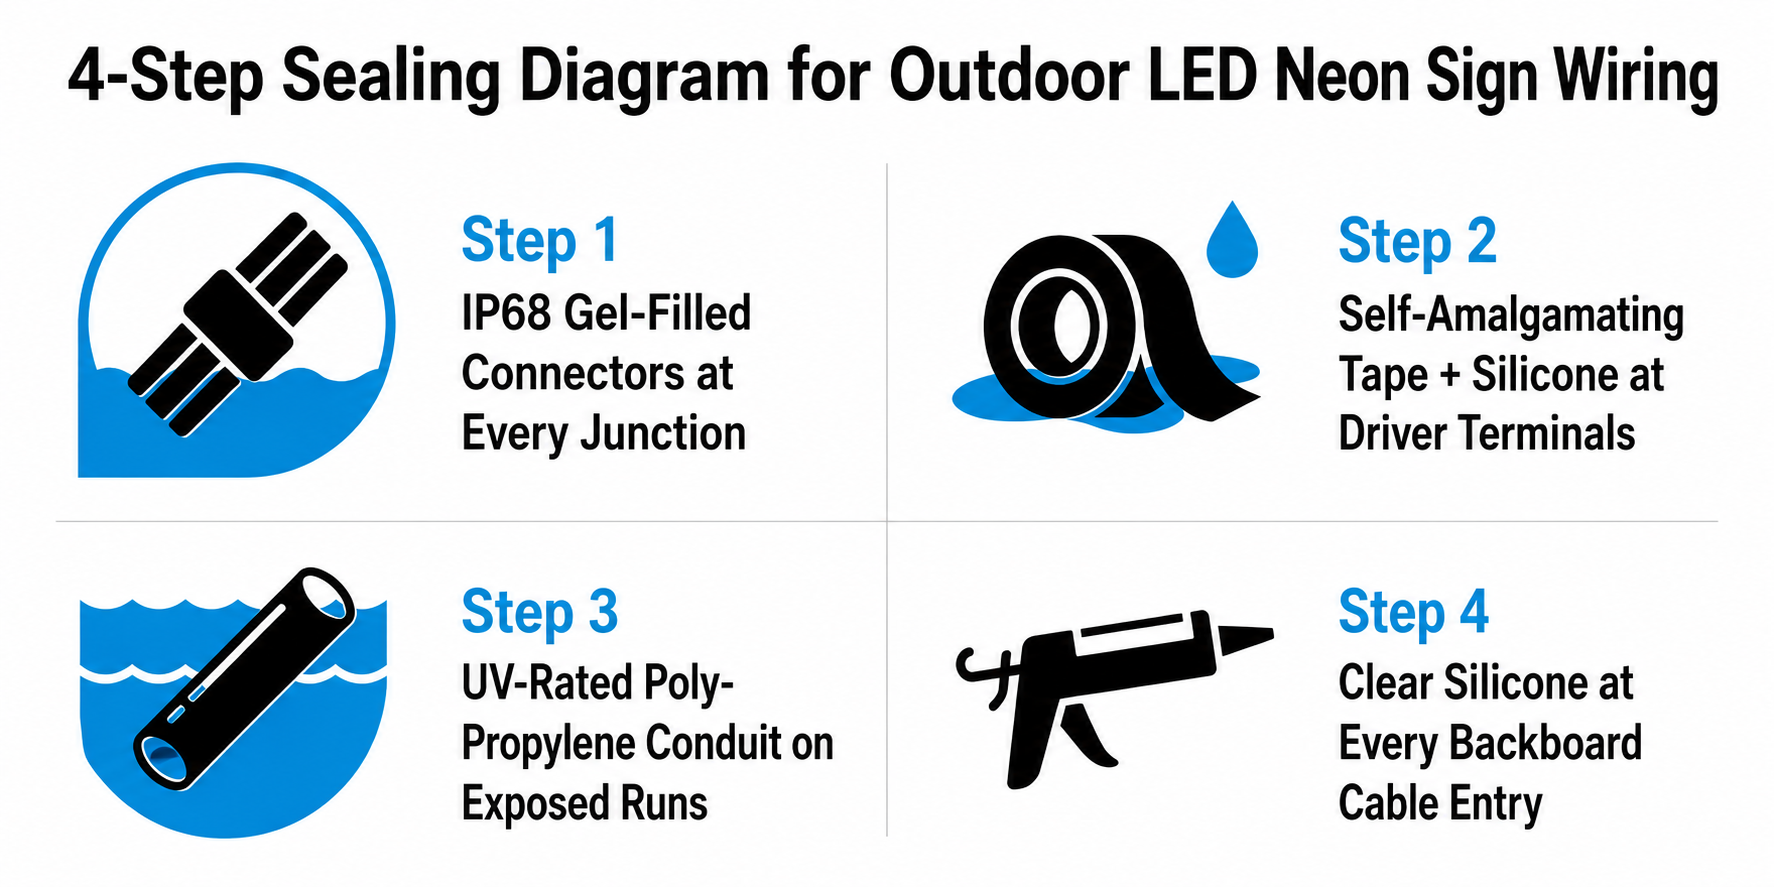
Silikonowa neonowa listwa obsługuje pogodę. Każde złącze, złącze i punkt zaciskowy w okablowaniu nie działają — chyba że każde z nich prawidłowo uszczelnisz. To właśnie tam większość instalacji zewnętrznych zawodzi w ciągu pierwszego roku.
Jeśli zastanawiasz się, jak znaki zewnętrzne faktycznie działają w trudnych warunkach pogodowych, przeczytaj: Czy neony LED są bezpieczne w deszczu i śniegu?
Ocena IP Krótkie odniesienie
| Stopień ochrony IP | co to obsługuje | Nadaje się do neonu na zewnątrz? |
| IP20 | Podstawowa ochrona przed kurzem, brak odporności na wil | Tylko w pomieszczeniach — nie działa w dowolnej pozycji na zewnątrz |
| IP44 | Odporny na zachlapanie z dowolnego kierunku | Nie oceniono na odsłonięte oznakowanie zewnętrzne lub deszcz |
| IP65 | Pyłowe, niskie ciśnienie wody ochrona przed strumieniem wody | Zadaszone tylko obszary zewnętrzne — nie bezpośredni deszcz |
| IP67 | Pyłowe, tymczasowe zanurzenie do 1m/30 min | Minimalny standard dla pasków z neonowym neonowym na zewnątrz |
| IP68 | Pyłowy, ciągły kontakt z wodą | Najlepszy wybór dla wszystkich złączy i złączy zewnętrznych |
Kluczowa zasada: Twój obwód jest tak samo wodoodporny, jak jego najniższy poziom komponentu. Pasek IP67 połączony ze złączami IP20 Splice to instalacja IP20.
Nadal porównujesz oceny? Nasz podział neonów LED na zewnątrz IP65 vs IP67 vs IP68 wyjaśnia gdzie każda ocena działa, a gdzie zawodzi na zewnątrz.
Jak uszczelnić każdy punkt połączenia
Złącza IP68 na każdym złączu nie jest to wymóg aktualizacji. Każdy otwarty punkt splicingowy na zewnątrz staje się punktem wejścia wody w pierwszym ulewnym deszczu. Złącza wypełnione żelem lub termokurczliwe są jedynymi typami przeznaczonymi do stałych połączeń zewnętrznych.
Taśma samozamczająca + silikon na terminalach kierowcy Te dwie rzeczy pracują razem, a nie osobno. Taśma tworzy wodoszczelną warstwę stopioną nad listwą zaciskową. Silikon następnie zakrywa krawędzie przejściowe, do których taśma nie może w pełni dopasować się do siebie. Użycie tylko jednego pozostawia luki.
Przewód polipropylenowy z oceną UV na wszystkich odsłoniętych przewodach kablowych Standardowy czarny przewód PCV twardnieje i rozwija pęknięcia powierzchniowe po 2-3 latach bezpośredniej ekspozycji na promieniowanie UV. Po złamaniu niczego nie chroni. Polipropylen utrzymuje swoją elastyczność i integralność znacznie dłużej na zewnątrz.
Przezroczysty silikon na zewnątrz przy każdym wejściu do kabla tablicy Woda śledzi poszycie kablowe poprzez działanie kapilarne — nie potrzebuje przerwy, aby wejść. Uszczelnienie każdego punktu, w którym kabel przechodzi przez akrylową tablicę, zatrzymuje wilgoć przed dotarciem do kanałów LED.
Gdzie umieścić sterownik LED (zasilanie)
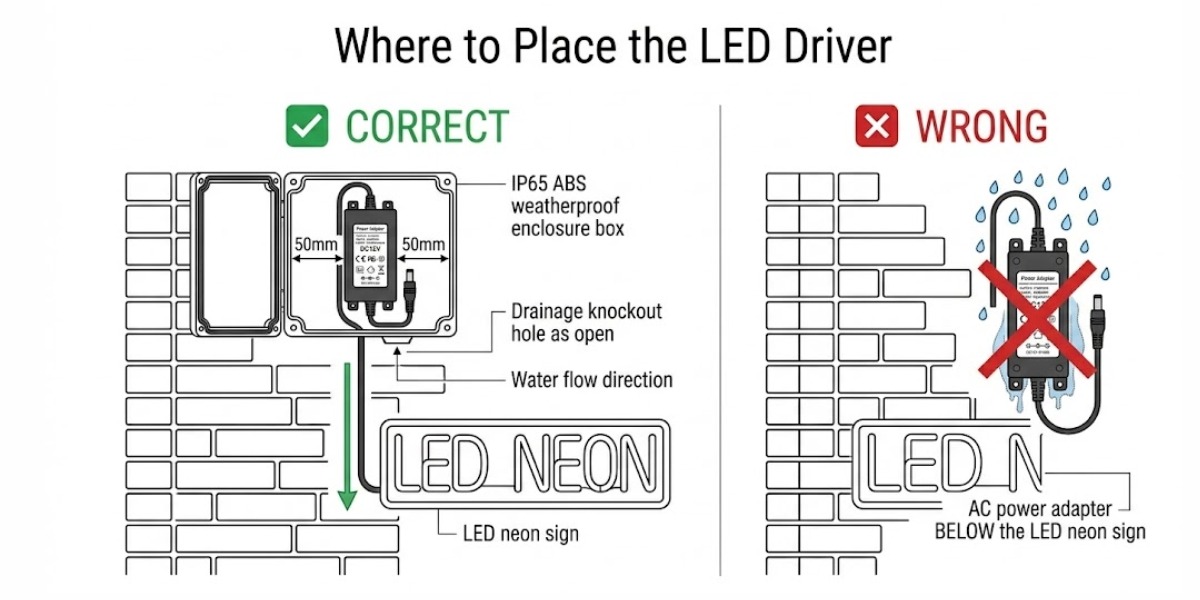
Większość sterowników LED to IP20 — nie mają w ogóle ochrony przed wilgocią. Kierowca siedzący w nieobjętej pudełku na zewnętrznej ścianie zawiedzie w ciągu roku, nawet jeśli w ciągu roku nie będzie padać bezpośrednio.
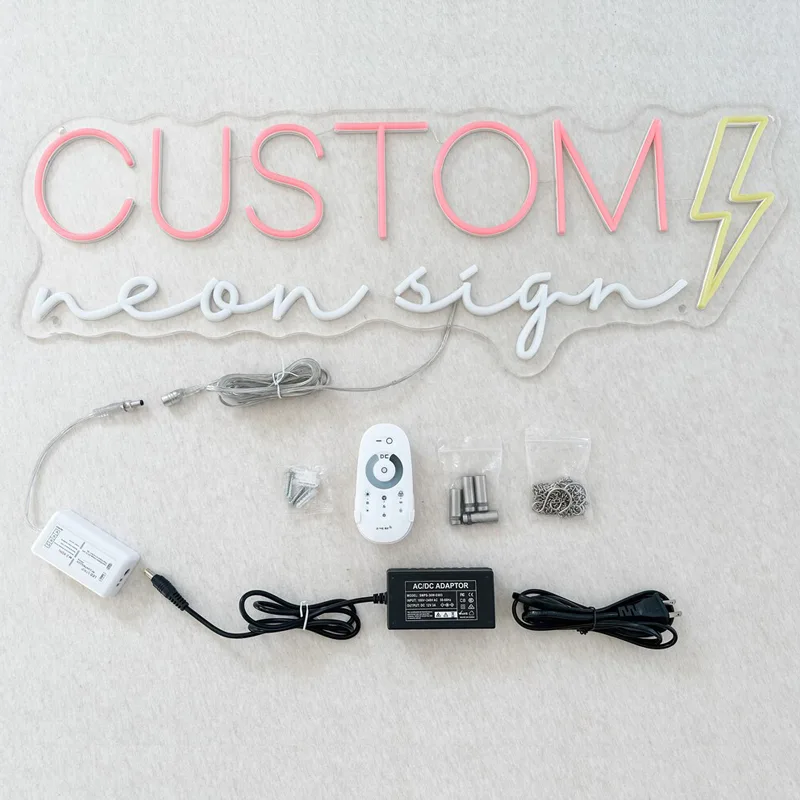
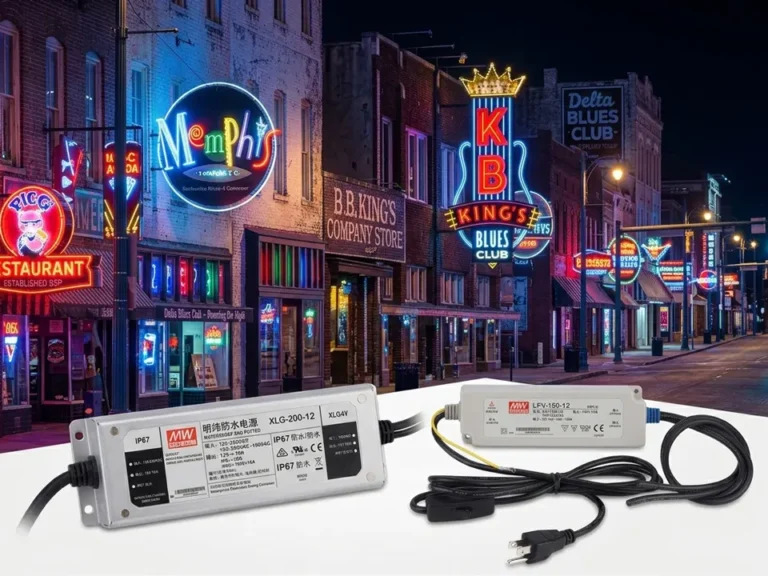
Zasilacz LED/Zasilacz LED z portem DC (DC12V/24V)
- Napięcie wejściowe: AC100-240V
- Napięcie wyjściowe: DC12V/DC24V
- Prąd wyjściowy: 3A/4A/5A/6A/8A/10A
- Watt: 72W/96W/120W
- Wymiary: 120x55x30mm
- Certyfikacja: US CE ROHS AU
- Stopień ochrony IP: IP20
- Gwarancja: 2 lata
Umieszczenie kierowcy — nakazy i zakazy
| wykonać | nie |
| Sterownik domu w obudowie ABS IP65+ z gumową pokrywą uszczelki | Zostaw kierowcę na otwartej ścianie zewnętrznej bez żadnej obudowy |
| Ustaw kierowcę nad znakiem, aby woda spływała i odchodziła | Zamontuj sterownik bezpośrednio pod znakiem, w którym zbiera się spływ deszczu |
| Pozostaw 50 mm luz wokół sterownika wewnątrz obudowy dla przepływu powietrza | Obudowa opakowania z nadmiarem kabla — uwięzione ciepło skraca żywotność kierowcy |
| Sterownik szybkości przy 120–150% całkowitej mocy znaku | Uruchom sterownik przy maksymalnym obciążeniu znamionowym w sposób ciągły |
| Utrzymuj otwartą podstawę obudowy drenażu | Uszczelnienie otworów drenażowych — wewnątrz tworzy się kondensacja niezależnie od jakości uszczelnienia pokrywy |
| Oznacz obudowę z całkowitą mocą obciążenia dla przyszłego serwisowania | Pozostaw obudowa bez udokumentowania — stwarza problemy podczas każdej wizyty konserwacyjnej |
Jak daleko kierowca może siedzieć od znaku?
To tutaj większość ludzi zgaduje źle. Logika jest prosta:
Wyższa moc = więcej prądu pobieranego = większy spadek napięcia na metr kabla = krótsza bezpieczna odległość pracy.
Większość ludzi zakłada, że większy sterownik może prowadzić dłuższy kabel. Jest odwrotnie. Sterownik 30 W przy 12V może bezpiecznie przejechać 5 metrów. Sterownik 100 W przy tym samym napięciu nie powinien przekraczać 2 metrów na standardowym przewodzie 1,5 mm².
| Moc sterownika | Max Run przy 12V (przewody 1,5 mm²) | Max działa przy 24 V (przewody 1,5 mm²) |
| 30W | 5m | 10m |
| 60W | 3m | 6m |
| 100W | 2m | 4m |
| 150W+ | 1,5 m — przełącz na drut 2,5 mm² | 3m |
Jeśli lokalizacja sterownika jest ustalona, a przebieg kabla przekracza te odległości, przełącz się na system 24V. Zmniejsza o połowę prąd o tej samej mocy i proporcjonalnie zmniejsza spadek napięcia.
Odwodnienie i wentylacja: dlaczego montaż podtynkowy zabija znaki wcześnie
Montaż podtynkowy tablicy bezpośrednio przy ścianie zewnętrznej tworzy zamkniętą kieszeń powietrzną. Spadek temperatury w nocy powoduje, że wilgoć w tej kieszeni skrapla się z tyłu akrylu i okucia montażowego. W ciągu miesięcy ta koroduje śruby, osłabia punkty kotwiczenia i trafia do uszczelnień wejściowych kabli. Montaż oddzielający z otwartym drenażem rozwiązuje to całkowicie.
Specyfikacje szczeliny i drenażu według rozmiaru znaku
poniżej 50 cm Wzdób: 15 mm — Odpływ dolny: 8 mm Otwarta szczelina — Górny otwór wentylacyjny: 8 mm Otwarty
50cm – 100cm Wstój: 20 mm — drenaż dolny: otwarty 10 mm lub jeden otwór 10 mm na 30 cm — górny otwór wentylacyjny: 10 mm otwarty
100cm – 150cm Wzdób: 25 mm — Dół odpływu: Dwa otwory 10 mm, równomiernie rozmieszczone — górny otwór wentylacyjny: 15 mm otwarty
Ponad 150 cm Wstawanie: 30 mm+ — Odpływ dolny: trzy lub więcej otworów weepowych lub pełny otwarty dolny kanał — górny otwór wentylacyjny: 20 mm otwarty + boczne otwory wentylacyjne
Nigdy nie silikonu dolnej krawędzi tablicy do ściany. Ta luka to odpływ kondensacyjny. Uszczelnij tylko górną krawędź i punkty wejścia kabla — nigdy dolną.
Rozmiar sprzętu odpornego na
Wstążki lufy M6 przy 20–25 mm pokrywają większość znaków zewnętrznych prawidłowo i dopasowują się do standardowych wstępnie nawierconych akrylowych pozycji otworów. Znaki powyżej 10 kg na powierzchniach murowanych wymagają odstępów M8 z kotwiami śrubowymi M8 Rawl — zwiększona średnica kotwicy zapewnia znacznie lepszą odporność na wyrywanie pod ciągłym obciążeniem wiatrem.
Ochrona przed promieniowaniem UV i długotrwała konserwacja na zewnątrz
IP67 obsługuje wodę. Nie zatrzymuje degradacji silikonu pod długotrwałą ekspozycją na promieniowanie UV. Na ścianach skierowanych na południe lub całkowicie niezacienionych pozycjach bezpośrednie światło słoneczne powoli rozbija warstwę hydroizolacyjną i klej pod nią – tworząc mikropęknięcia, które wpuszczają wilgoć do paska, który nadal wygląda na uszczelniony z zewnątrz. Uszkodzenie jest niewidoczne, dopóki woda nie dotrze do diod LED.
Ryzyko UV według pozycji montażowej
Ściana z widokiem na północ Minimalna ekspozycja na promieniowanie UV. Standardowy IP67 jest wystarczający — nie wymaga dodatkowych działań.
pod zadaszonym patio lub markizą Mało lub nie bezpośrednie słońce. Standardowe IP67 obsługuje tę pozycję bez dodatkowych środków.
drenaż na poziomie gruntu lub w pobliżu Niski UV, ale podwyższony kontakt wilgoci. Używaj złączy IP68 w całym tekście i sprawdzaj szczeliny drenażowe co 6 miesięcy.
Ściana skierowana na południe — bezcieniowana 6–8 Godziny bezpośredniego słońca codziennie. Zamontuj baldachim chroniący przed promieniowaniem UV lub zwis nad znakiem i corocznie sprawdzaj warstwę silikonową pod kątem wczesnego pękania.
W pełni odsłonięte oznakowanie dachu Najwyższa pozycja ryzyka. Określić silikonową powłokę odporną na promieniowanie UV bezpośrednio od producenta na etapie zamówienia — modernizacja nie jest skuteczna. Coroczna inspekcja zawodowa nie podlega tutaj negocjacji.
Harmonogram roczny konserwacji
Pogrupuj swoje czeki według tego, jak często muszą się zdarzać — nie wszystko wymaga tej samej uwagi.
Co 3 miesiące
- Przetestuj gniazdo GFCI — naciśnij przycisk testowy, powinien on za każdym razem wyzwalać i resetować się czysto.
Co 6 miesięcy
- Sprawdź śruby odpinające pod kątem rdzy — rdza powierzchniowa oznacza wymianę sprzętu; rdza strukturalna oznacza pełne zamontowanie.
- Wyczyść powierzchnię tablicy miękką szmatką i łagodnym mydłem — gromadzenie się brudu blokuje szczelinę wentylacyjną za płytą.
Co 12 miesięcy
- Sprawdź stan silikonowy paska — poszukaj żółknięcia, pęknięć powierzchni lub kruchości w punktach gięcia.
- Sprawdź uszczelki przewodów i kabli — pęknięty korpus przewodu lub kurczący się silikonowy kula wymaga natychmiastowego ponownego uszczelnienia.
- Sprawdź uszczelkę obudowy kierowcy — skompresowaną lub pękniętą uszczelkę należy wymienić przed następną porą deszczową, a nie po niej.
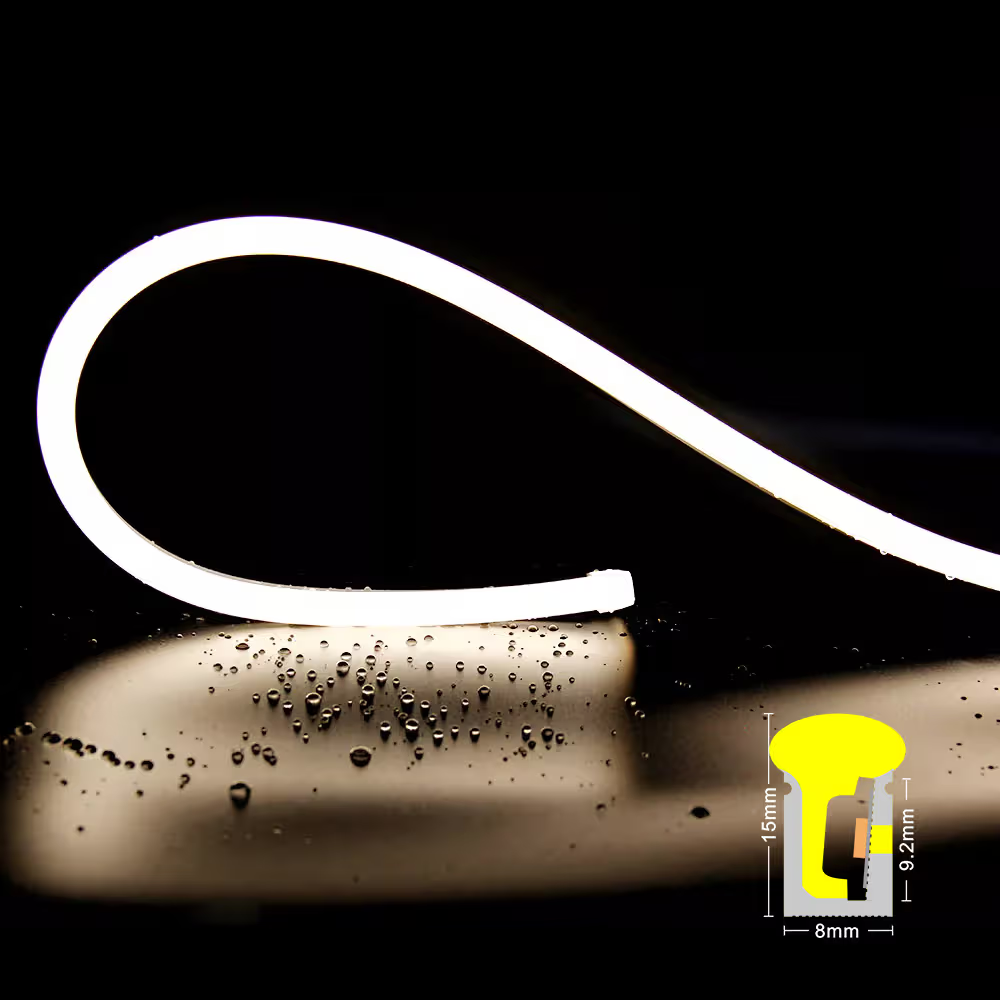
Side Bend S0815 Silikonowe światło LED Neon Flex
- Napięcie wejściowe: Prąd stały 24 V
- Watt: 9,6 W/m
- LED QTY: SMD2835 120 diod LED/m
- Temperatura barwowa: 2700K/3000K/4000K/5000K/6500K/customizable
- Wskaźnik oddawania barw: >80
- Lumen: >330lm/m
- Stopień ochrony IP: IP65/IP67
- Wejście kablowe: Przód/boki/dół dla opcji
- Min. średnica gięcia: 100 mm
- Długość możliwa do przecięcia: 50 mm
- Długość: 5 metrów/rolka
Typowe błędy instalacyjne i jak je naprawić
Większość awarii znaków neonowych LED na zewnątrz nie jest awariami produktu — są to awarie instalacji. Oto dziewięć najpopularniejszych.
- Złącza IP20 na złączach zewnętrznych Woda wchodzi do każdego nieuszczelnionego punktu splicingu w pierwszej porze deszczowej — znak migotanie lub sekcje umierają. Poprawka: Wymień na złącza wypełnione żelem lub termokurczliwe IP68 na każdym złączu zewnętrznym.
- Sterownik w nieobjętej obudowie Kondensacja koroduje zaciski od wewnątrz — zwykle w ciągu 6–12 miesięcy od instalacji. Poprawka: Przejdź do obudowy ABS IP65+ z gumową pokrywką uszczelki i otwartym wybijaniem drenażu.
- Przebieg kabla zbyt długi przy 12V Napięcie spada w stosunku do odległości — widoczne ściemnianie pojawia się na drugim końcu znaku od pierwszego dnia. → Poprawka: Skróć bieg lub przełącz pełną konfigurację na sterownik 24 V i pasek.
- Płyn do montażu na tablicy — bez przestojów Brak przepływu powietrza za płytą oznacza, że kondensacja pozostaje uwięziona, a sprzęt koroduje przez miesiące. Poprawka: Zainstaluj ponownie z 20-25 mm lufami wtykowymi i pozostaw dolną krawędź całkowicie otwartą.
- Outdoor zewnętrzny bez GFCI Brak ochrony przed uziemieniem w warunkach mokrych — prąd upływu prądu nie ma automatycznego odcięcia. → Poprawka: Wymień na gniazdko GFCI o stopniu pogodowym przeznaczone do użytku na zewnątrz.
- Nie testuje przed montażem Luźny terminal znaleziony po pełnej instalacji oznacza, że znak ponownie się opuszcza. → Poprawka: Biegaj na poziomie gruntu przez 15-20 minut przed rozpoczęciem jakichkolwiek prac montażowych.
- Dolna krawędź tablicy uszczelniona silikonem Blokuje jedyny odpływ kondensacyjny — kałuże wilgoci trwale za akrylem. Poprawka: Usuń dolną uszczelkę. Tylko górna krawędź i punkty wejścia kabla powinny być uszczelnione.
- Standardowy czarny przewód PCV na odsłoniętych biegach UV rozbija PVC na zewnątrz — pęknięcia powierzchniowe pojawiają się w ciągu 2-3 lat, a okablowanie pozostaje odsłonięte. Poprawka: Wymień na przewód z falistego polipropylenu o stopniu ochrony UV podczas każdego odsłoniętego przebiegu.
- Podpisz zasilany ze wspólnego przedłużacza Trwałe obciążenie nieocenionej kabla powoduje nagrzewanie się przy złączach lub wyłączanie obwodu. Poprawka: Poświęć znakowi odpowiednio ocenione, chronione przed warunkami atmosferycznymi gniazdko zewnętrzne.
Żywotność 30 000 godzin na znaku neonowego znaku LED na zewnątrz jest osiągalna tylko wtedy, gdy instalacja pod nim jest utrzymywana. Taśma LED rzadko najpierw zawodzi — obudowa kierowcy, złącza kabli i szczeliny drenażowe. Zrób te trzy dobrze, a znak sam o siebie zadba.
Najczęstsze pytania
Powiązane posty