Nederlands
  English
  简体中文
简体中文  Deutsch
  Español
  Français
  Italiano
  日本語
日本語  한국어
한국어  Polski
  Português
  Русский
  Türkçe
  Tiếng Việt
  ไทย
ไทย 
Buiten LED-neonborden zijn gebouwd om het weer aan te kunnen, maar alleen als de installatie erachter correct is uitgevoerd. Het teken zelf is meestal het laatste dat faalt. Wat eerst misgaat, is altijd de bedradingsverbinding die is afgedicht met de verkeerde connector, de bestuurder zit in een doos zonder pakking of het bord dat vlak tegen een muur is gemonteerd zonder afvoerspleet.
Deze gids behandelt de volledige Buiten LED Neon-teken Installatieproces van gereedschappen en pre-checks, via montage, waterdichting, plaatsing van de bestuurder, drainage, UV-onderhoud en de fouten die vroege storingen veroorzaken. Volg het in volgorde en het bord zal de garantie met jaren overtreffen.
Plan uw installatie voor uw buitenneonbord voor alles
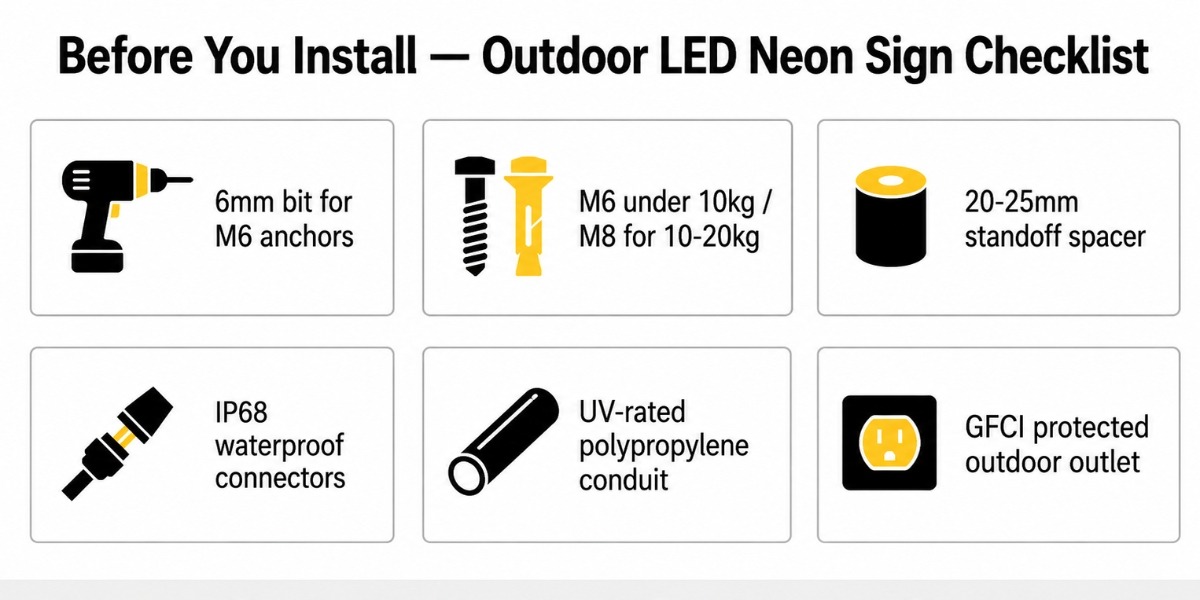
Vijftien minuten pre-checks voordat u gaat boren, bespaart uren aan nabewerking. Bevestig uw Surface, Power Source, Sign Weight en IP-beoordelingen voordat er iets aan de muur gebeurt. De meeste installatiefouten gaan terug naar overgeslagen cheques, niet het teken zelf.
Hulpmiddelen en hardware die u eerst nodig heeft
Dit zijn de items die de meeste mensen vergeten of vervangen door het verkeerde alternatief. Het gebruik van de juiste specificaties op elk van belang buitenshuis.
| Gereedschap / item | Spec of type | Waarom het belangrijk is |
| Boor + metselwerk | 6mm voor M6 — 8mm voor M8-ankers | Ondermaatse gaten verminderen de uittrekkracht van het anker in metselwerk |
| Rawl Bolt-ankers | M6 onder 10 kg - M8 voor 10-20 kg | Verkeerde graad lost onder aanhoudende windtrillingen |
| Vat Standoff Spacers | 20-25 mm lengte | Geen stomp = geen drainageopening = condensatie achter de plank |
| IP68 waterdichte connectoren | Gel-gevulde of hitte-krimpende type | Elk buitensplitsingspunt zonder IP68-afdichting is een toekomstige fout |
| UV-geclassificeerde gegolfde leiding | Polypropyleen — niet standaard PVC | Standaard zwarte PVC-scheuren onder UV binnen 2-3 jaar |
| GFCI-beschermde buitenoutlet | Weergewaardeerde buitenbus | Vereist voor elk elektrisch circuit nat gebied - niet optioneel |
Ook nodig maar rechttoe rechtaan: waterpas (600 mm+), draadstripper (12-24 AWG), zelfverzachtende tape, heldere buitensiliconenkit.
Checklist voor installatie
| Wat te controleren? | Waar moet je op letten? | Risico als overgeslagen |
| IP-classificatie van strip | Minimum IP67 siliconen-gestreepte Neon Flex | Water bereikt interne soldeerverbindingen - LED-storing |
| IP-classificatie van connectoren | IP68 bij elke outdoor-splitsing | Lagere connectoren roesten binnen één nat seizoen |
| Totaal wattage | Strip w/m × totaal meters + 20% hoofdruimte | Ondermaatse bestuurder oververhit en faalt voordat het bord dat doet |
| Montage oppervlak | Baksteen, metselwerk, metalen stud met rug, structureel hout | Verkeerd ankertype lost onder belasting |
| GFCI-uitlaat Proximity | Binnen geplande kabeldoorvoerkabel | Onbeschermde lange runs zorgen voor schokrisico en spanningsval |
| Lokale vergunningsverei | Winkelvoorraad of commerciële gevelbewegwijzering regels | Ongeoorloofde commerciële borden kunnen naar beneden worden besteld |
| Tekentest voor montage | Ren 15-20 minuten op maaiveld | Fout gevonden na montage betekent een volledige herinstallatie |
Ken de specificaties van uw teken
Controleer deze vier nummers voordat u een boormachine aanraakt, ze bepalen elke hardware- en bedradingsbeslissing die volgt.
- Minimale outdoor stripscore: IP67 Siliconen-gestreepte SMD2835, 120 LED's/m
- Ingangsspanning: DC 12V of DC 24V — Sluit nooit LED-strips rechtstreeks aan op AC-net
- stroomverbruik: ~ 10 W per meter (8 × 16 mm siliconen neonstrip)
- Achterwand: Voorgeboord acryl - Voeg geen nieuwe gaten toe in de buurt van de LED-kanalen
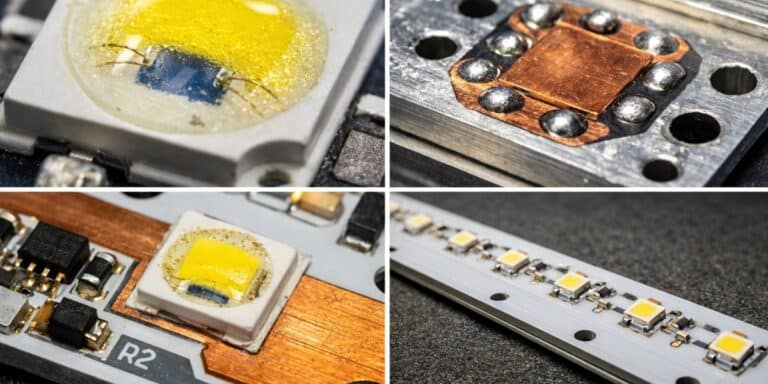
Voor de installatie helpt het ook om te begrijpen hoe hoogwaardige siliconen LED-neonstrips daadwerkelijk worden gemaakt - het extrusie- en afdichtingsproces heeft een directe invloed op de waterdichte prestaties en duurzaamheid op lange termijn.

Wandmontage versus hangende mount: welke methode werkt voor uw setup
Wandmontage past bij permanente commerciële installaties op vaste oppervlakken, vooral voor Commerciële outdoor neon borden voor restaurants, bars, gevels Waar windstabiliteit en onderhoud van belang zijn. Hangende werken voor overdekte terrassen, pergola's en tijdelijke of semi-permanente opstellingen. De keuze is van invloed op hardware, kabelgeleiding en windgedrag - kies op basis van uw oppervlak en tekengewicht, niet op esthetiek.
| Factor | wandmontage | hangende berg |
| Beste oppervlaktetype | Baksteen, gesmolten metselwerk, beton, metalen stud met steunplaat | Structurele plafondbalk, pergolabalk, bedekt stalen frame |
| Hardware nodig | M6/M8 Rawl ankers, vatstandoffs, roestvrijstalen schroeven | 3mm roestvrijstalen kabel, geplooide ferrules, nominale oogbouten |
| Max teken gewicht | Tot 20 kg met correcte gemetselde ankers | Beste onder de 15 kg zonder ondertekening van de bouwkundige op de balkcapaciteit |
| Windweerstand | Hoog - bord beweegt met de muur, niet onafhankelijk | Lager - zijdelingse swing verhoogt de kabel- en verbindingsspanning bij windstoten |
| kabelbeheer | leiding in muur of nette oppervlakteroute | Gebundelde leiding beveiligd langs de ophangkabel |
| Toegang tot onderhoud | Verwijder afstandsbedieningen om de bestuurder of strip te bereiken | Kabels moeten worden verlaagd voor elke inspectie |
| Geschikt voor | Bewegwijzering in de winkel, bar of cafémuren, permanente installaties | Overdekte patio's, pergola's, biertuinen, evenementenruimtes in de buitenlucht |
Voordat u wordt gemonteerd, helpt het om te zien hoe een aangepast LED-neonbord wordt geassembleerd en voorbereid. Begrijpen hoe het acrylbord, neonflex en kabelgeleiding samenkomen, maakt de onderstaande installatiestappen gemakkelijker te volgen.

Stap voor stap: wandmontage
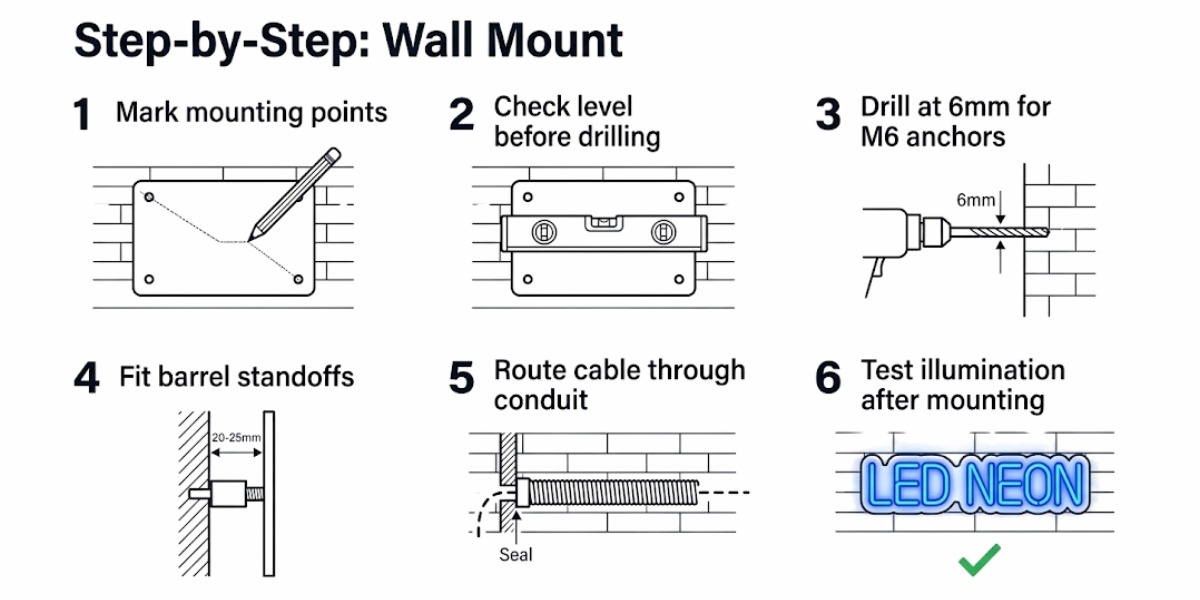
- Markeer bevestigingspunten door de voorgeboorde bordgaten — Gewicht verdeelt correct over de acryl en spanningsscheuren worden vermeden.
- Controleer het niveau voordat u gaat boren — Een verlicht bord op off-level leest onmiddellijk aan iedereen die er van een afstand naar kijkt.
- Boor op 6mm voor M6-ankers — Ondermaatse gaten zorgen ervoor dat het anker bindt; overmaatse gaten verminderen de uittreksterkte in metselwerk.
- Monteer de vatafstanden voordat u volledig vastdraait — Dit is de stap die de meeste mensen overslaan, en het is degene die condensatieproblemen veroorzaakt in het eerste jaar.
- Leid de stroomkabel door UV-geclassificeerde polypropyleenleiding — Blootgestelde kabel op een buitenmuur zonder leiding zal afbreken. Deze stap is niet onderhandelbaar voor het permanent buiten hangen van neonborden.
- Testverlichting na montage — Installatietrillingen maakt af en toe een klem of connector los die in orde was tijdens de grondtest.

Stap voor stap: hangbeugel
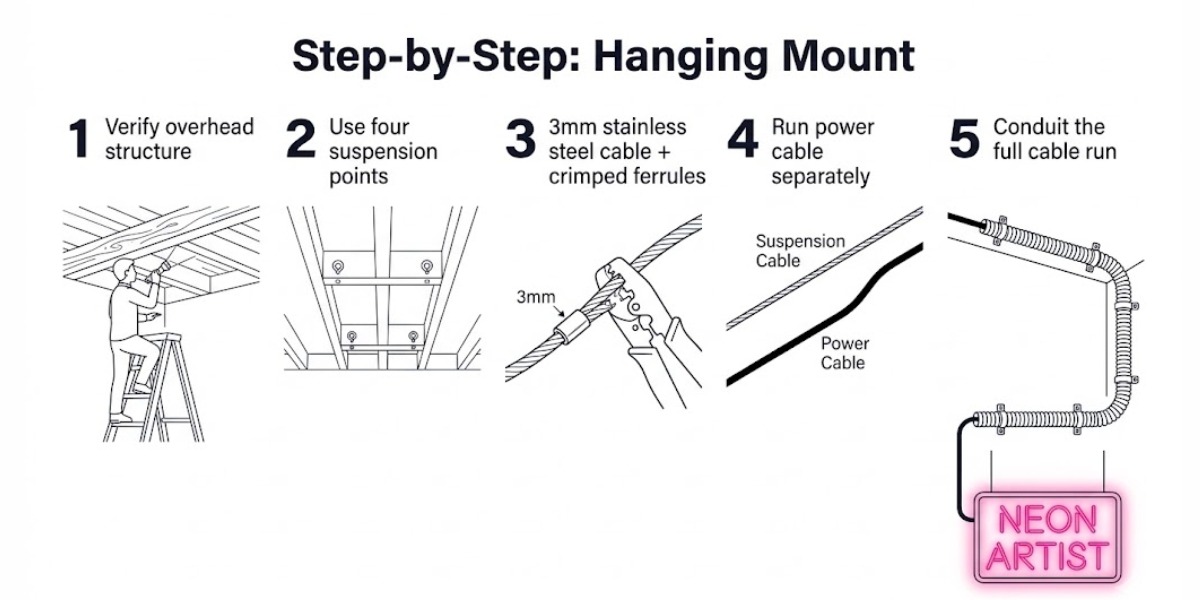
- Controleer of de bovengrondse structuur lastdragend is — Decoratieve pergola-balken worden vaak niet beoordeeld voor permanente zwevende lasten.
- Gebruik vier ophangpunten voor borden breder dan 60 cm — Tweepunts dat aan een breed bord hangt, zorgt voor draaiende spanning die acryl na verloop van tijd scheurt.
- Specificeer 3mm roestvrijstalen kabel met geplooide ferrules — Standaard draadhaken of ketting van een ijzerhandel zal binnen twee seizoenen buitenshuis aan de oppervlakte roesten.
- Voer de stroomkabel apart van de ophangkabels — Elektrische kabel is geen mechanische ondersteuning; door ze te combineren, loopt u het risico dat klemmen onder belasting lostrekken.
- Leiding de volledige stroomkabel lopen — Windbeweging op een hangend bord brengt trillingen over langs onbeveiligde kabel en werkt verbindingen na verloop van tijd los.
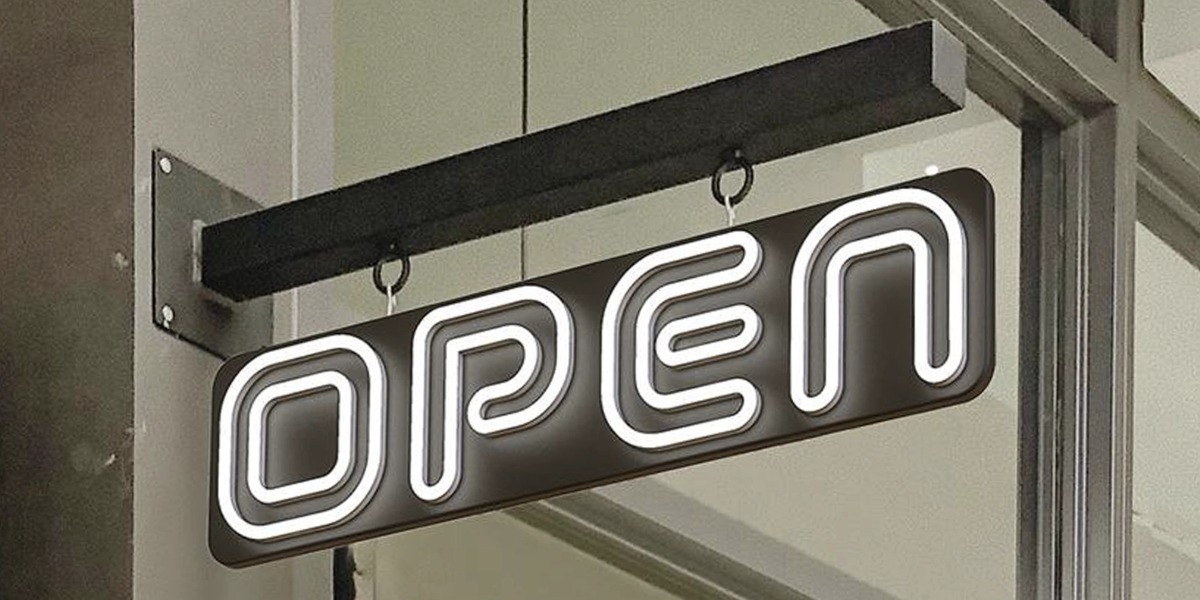
Een hangend mount in de praktijk bord dat via stalen ringen aan een muurbeugel hangt. Let op de beugel is structureel boven vast; het bord zelf draagt geen wandcontact.
Als u nog steeds beslist over de tekengrootte, spanning, acrylstijl of montageopties, onze Aangepaste LED neonreclamegids Verklaart de verschillen voordat de installatie begint.
De bedrading waterdicht maken: de stap die de meeste mensen verkeerd doen
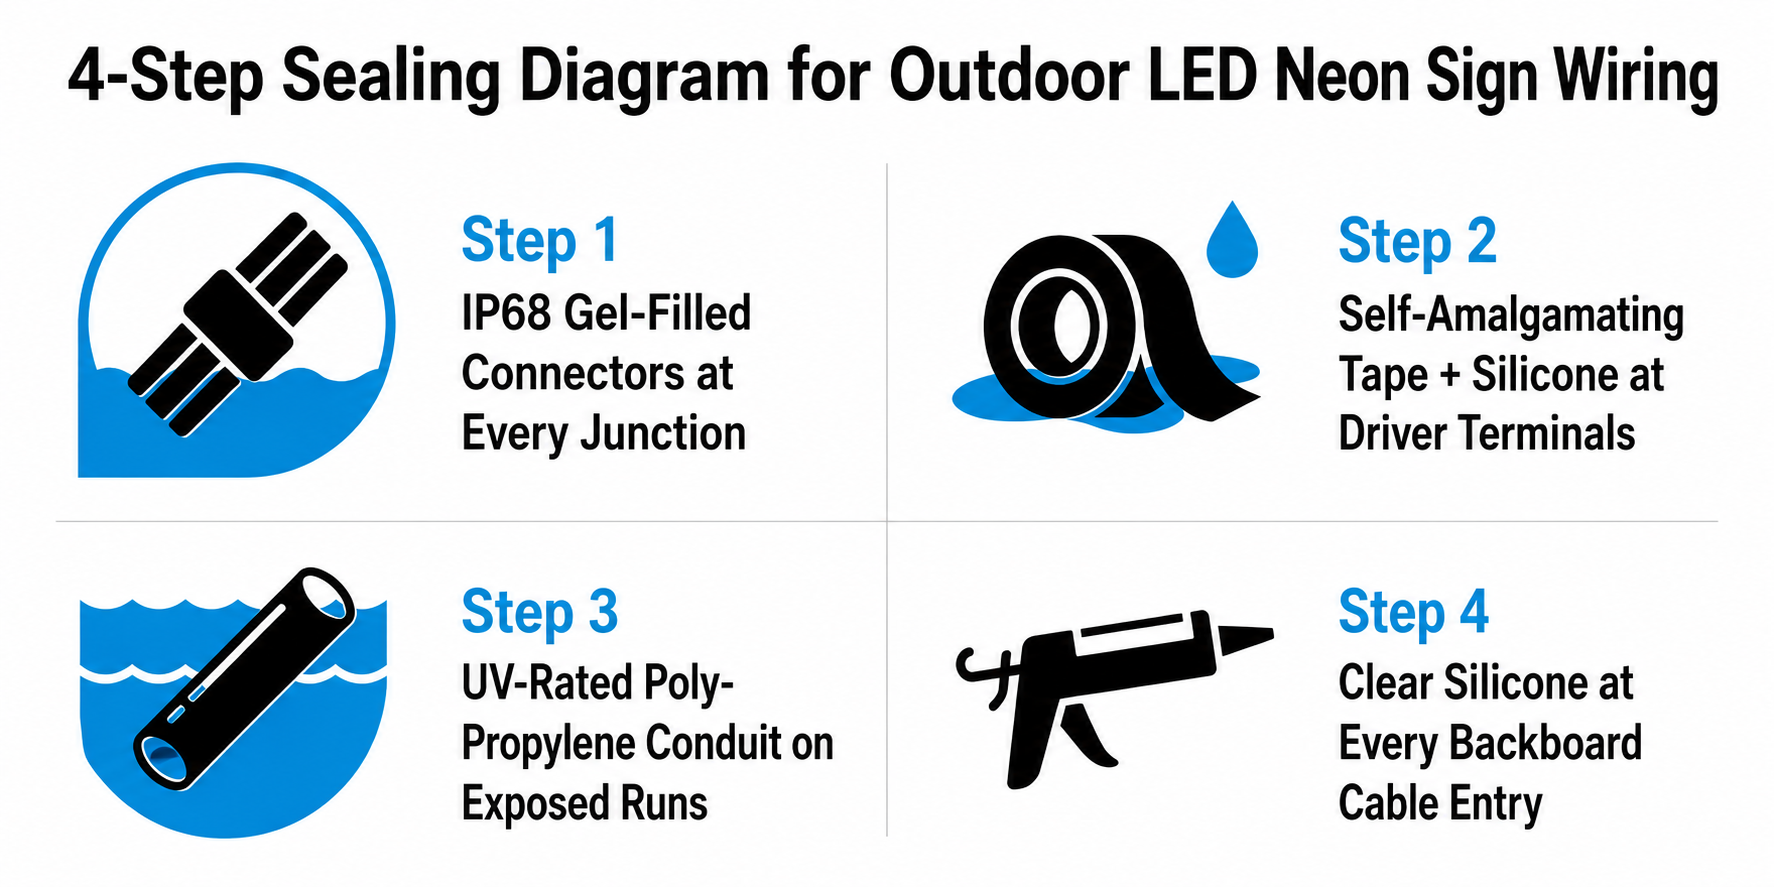
De siliconen neonstrip gaat weer aan. Elke verbinding, connector en klempunt in de bedrading doet dat niet - tenzij u elke verbinding correct afdicht. Dit is waar de meeste buiteninstallaties binnen het eerste jaar mislukken.
Als je je afvraagt hoe buitenborden daadwerkelijk presteren bij zwaar weer, lees dan: Zijn LED-neonborden veilig in regen en sneeuw?
IP-classificatie Snelle referentie
| IP-classificatie | Wat het aangaat | Geschikt voor buiten neon? |
| IP20 | Basis stofbescherming, geen vochtbestendigheid | Alleen binnenshuis - faalt in elke buitenpositie |
| IP44 | Spatwaterbestendig vanuit elke richting | Niet beoordeeld voor zichtbare bewegwijzering of regenbuien |
| IP65 | Stofdichte, lagedrukwaterstraalbescherming | Alleen overdekte buitenruimtes - geen directe regen |
| IP67 | Stofdicht, tijdelijke onderdompeling tot 1m/30 min | Minimum standaard voor buitenreclamestrips |
| IP68 | Stofdicht, continu watercontact | Beste keuze voor alle buitenconnectoren en knooppunten |
Belangrijkste regel: Uw circuit is slechts zo waterdicht als het laagst gewaardeerde component. Een IP67-strip die is verbonden met IP20-verbindingsconnectoren is een IP20-installatie.
Nog steeds beoordelingen vergelijken? Onze verdeling van buiten LED-neonborden IP65 versus IP67 versus IP68 legt uit waar elke beoordeling werkt en waar deze buiten faalt.
Hoe elk verbindingspunt af te dichten
IP68-connectoren bij elke kruising Geen upgrade een vereiste. Elk open splitsingspunt buiten wordt een waterinvoerpunt in de eerste zware regenval. Met gel gevulde of krimpkousen zijn de enige typen die geschikt zijn voor permanente buitenknooppunten.
Zelfverzwarende tape + siliconen bij driverterminals Deze twee werken samen, niet afzonderlijk. Tape creëert een waterdichte gesmolten laag over het klemmenblok. Siliconen bedekt dan de overgangsranden waaraan tape zich niet volledig kan aanpassen. Het gebruik van slechts één laat gaten.
UV-geclassificeerd polypropyleenbuis op alle zichtbare kabels Standaard zwart PVC-leiding verhardt en ontwikkelt oppervlaktescheuren na 2-3 jaar directe UV-blootstelling. Eenmaal gebarsten, beschermt het niets. Polypropyleen houdt zijn flexibiliteit en integriteit aanzienlijk langer buiten.
Helder siliconen voor buiten bij elke kabelinvoer voor borden Water leidt kabelmantel door middel van capillaire werking - het heeft geen opening nodig om binnen te komen. Door elk punt af te dichten waar een kabel door het acrylbord gaat, wordt voorkomen dat vocht de LED-kanalen bereikt.
Waar de LED-driver (voeding) te plaatsen
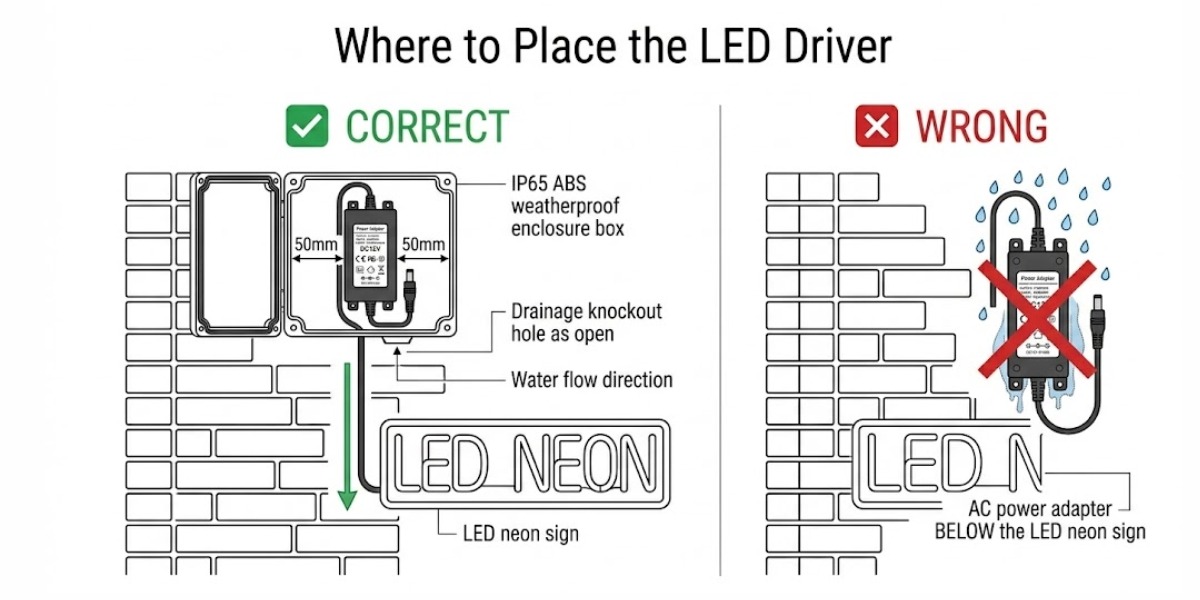
De meeste LED-stuurprogramma's zijn IP20 - ze hebben helemaal geen vochtbescherming. Een bestuurder die in een niet-gesproeide doos op een buitenmuur zit, zal binnen een jaar alleen door condensatie falen, zelfs als het nooit direct wordt geregend.
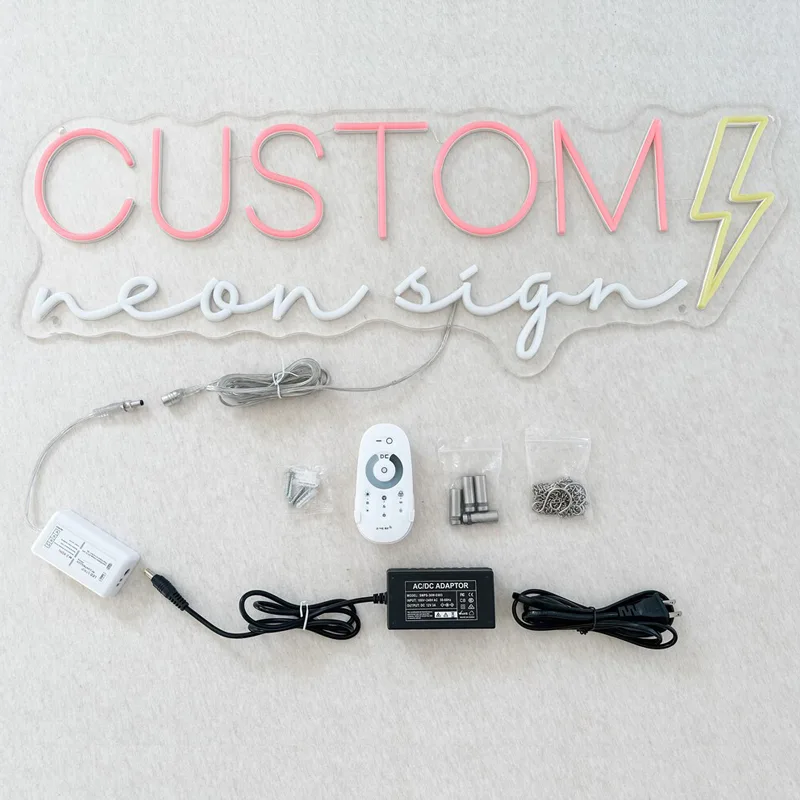
LED-adapter/LED-voeding met DC-poort (DC12V/24V)
- Ingangsspanning: AC100-240V
- Uitgangsspanning: DC12V/DC24V
- Uitgangsstroom: 3A/4A/5A/6A/8A/10A
- Watt: 72W/96W/120W
- Afmetingen: 120x55x30mm
- Certificering: VS CE ROHS AU
- IP-klasse: IP20
- Garantie: 2 jaar
Plaatsing van de bestuurders - do's en don'ts
| beginnen te beginnen | doen |
| Huisbestuurder in een IP65+ ABS-behuizing met een rubberen pakkingdeksel | Laat de bestuurder op een open buitenmuur achter zonder omhulsel |
| Plaats de bestuurder boven het bord zodat het water naar beneden en weg stroomt | Mount Driver direct onder het bord waar Rain Runoff verzamelt |
| Laat 50 mm speling rond de bestuurder in de behuizing voor luchtstroom | Pack behuizing met overtollige kabel - opgesloten warmte verkort de levensduur van de bestuurder |
| Tarief driver bij 120-150% van Total Sign Wattage | Laat de bestuurder bij zijn maximale nominale belasting continu draaien |
| Houd de uitschakeling van de basisafvoer van de behuizing open | Afdichting afdichting gaten — condensatie vormt zich binnen, ongeacht de kwaliteit van de dekselafdichting |
| Label de behuizing met het totale belastingsvermogen voor toekomstig onderhoud | Verlaat behuizing ongedocumenteerd — Creëert problemen tijdens elk onderhoudsbezoek |
Hoe ver kan de chauffeur van het bord zitten?
Dit is waar de meeste mensen verkeerd raden. De logica is duidelijk:
Hoger wattage = meer stroom getrokken = meer spanningsval per meter kabel = kortere veilige loopafstand.
De meeste mensen gaan ervan uit dat een grotere bestuurder een langere kabel kan aansturen. Het is het tegenovergestelde. Een bestuurder van 30 W op 12V kan veilig 5 meter lopen. Een 100W driver bij dezelfde spanning mag niet hoger zijn dan 2 meter op standaard 1,5 mm² draad.
| wattage bestuurder | Max Run op 12V (1,5 mm² draad) | Max Run op 24V (1,5 mm² draad) |
| 30W | 5 m | 10m |
| 60W | 3m | 6M |
| 100W | 2m | 4M |
| 150W+ | 1,5 m — Schakel over naar 2,5 mm² draad | 3m |
Als de bestuurderslocatie vast is en de kabelafstand deze afstanden overschrijdt, schakelt u over naar een 24V-systeem. Het halveert de stroom bij hetzelfde wattage en snijdt de spanningsval naar verhouding.
Drainage & ventilatie: waarom spoelmontage vroegtijdig tekent
Door een achterwand direct tegen een buitenmuur te monteren, ontstaat een afgedicht luchtzak. De temperatuurdaling 's nachts zorgt ervoor dat vocht in die zak condenseert op de achterkant van het acryl en de bevestigingshardware. Gedurende maanden corrodeert dit schroeven, verzwakt de ankerpunten en vindt zijn weg naar kabelinvoerafdichtingen. Standoff montage met open drainage lost dit volledig op.
Standoff Gap & Drainage Specs per tekengrootte
Onder de 50 cm Afstand: 15mm — Bodemafvoer: 8mm open opening — Bovenopening: 8mm open
50cm – 100cm Afstand: 20 mm — Bodemafvoer: 10 mm open of één 10 mm huilgat per 30 cm — Bovenopening: 10 mm open
100cm – 150cm Afstand: 25 mm — Bodemafvoer: twee 10 mm treurgaten, gelijkmatig verdeeld — Bovenopening: 15 mm open
meer dan 150 cm Afstand: 30 mm+ — Bodemafvoer: drie of meer huilgaten of volledig open onderkant kanaal — Bovenopening: 20 mm open + zijventilatie aan de zijkant
Siliconen nooit de onderkant van het bord aan de muur. Die kloof is de condensafvoer. Sluit alleen de bovenrand en de kabelinvoerpunten af - nooit de onderkant.
Afstandelijke hardware maatvoering
M6 Barrel Standoffs bij 20-25 mm Dek de meeste buitenborden correct af en lijn uit met de standaard voorgeboorde acrylgatposities. Borden van meer dan 10 kg op metselwerkoppervlakken hebben M8-standoffs nodig met M8 Rawl-boutankers - de grotere ankerdiameter biedt een aanzienlijk betere uittrekweerstand onder aanhoudende windbelasting.
UV-bescherming en langdurig buitenonderhoud
IP67 verwerkt water. Het stopt niet met siliconen die afbreekt bij aanhoudende UV-blootstelling. Op muren op het zuiden of volledig ongearde posities breekt direct zonlicht langzaam de waterdichtingslaag en plaklaag eronder - waardoor microscheurtjes ontstaan die vocht in een strip laten die er nog steeds van buitenaf uitziet. De schade is onzichtbaar totdat het water de LED's bereikt.
UV-risico door installatiepositie
Muur op het noorden Minimale UV-blootstelling. Standaard IP67 is voldoende — geen extra actie vereist.
Onder overdekt terras of luifel Weinig tot geen directe zon. Standaard IP67 behandelt deze positie zonder extra maatregelen.
Grondniveau of in de buurt van afwatering Laag UV maar verhoogd vochtcontact. Gebruik overal IP68-connectoren en controleer de afvoergaten elke 6 maanden.
Muur op het zuiden - Ongearceerd 6-8 Uren van directe zon per dag. Monteer een UV-beschermende luifel of overhang boven het bord en inspecteer de siliconenlaag jaarlijks op vroege scheuren.
Volledig zichtbare dakbewegwijzering hoogste risicopositie. Specificeer UV-bestendige siliconencoating rechtstreeks van de fabrikant in de bestelfase — achteraf inbouwen is niet effectief. Jaarlijkse professionele inspectie is hier niet onderhandelbaar.
Jaarlijks onderhoudsschema
Groepeer uw cheques op hoe vaak ze moeten gebeuren - niet alles heeft dezelfde aandacht nodig.
Elke 3 maanden
- Test de GFCI-uitgang — druk op de testknop, deze moet elke keer weer schoon worden en opnieuw worden gereset.
Elke 6 maanden
- Controleer de remschijven op roest - oppervlakteroest betekent hardware vervangen; structurele roest betekent volledige hermontage.
- Reinig het oppervlak van het bord met een zachte doek en milde zeep - vuilophoping blokkeert de ventilatieopening achter het bord.
Elke 12 maanden
- Inspecteer strip siliconenconditie - zoek naar vergeling, oppervlaktescheuren of broosheid op buigpunten.
- Controleer de afdichtingen van de leiding en de kabelinvoer - gebarsten buisbody of een krimpende siliconenkraal moet onmiddellijk opnieuw worden afgesloten.
- Controleer de pakking van de bestuurdersbehuizing - Een gecomprimeerde of gebarsten pakking moet worden vervangen voor het volgende natte seizoen, niet na.
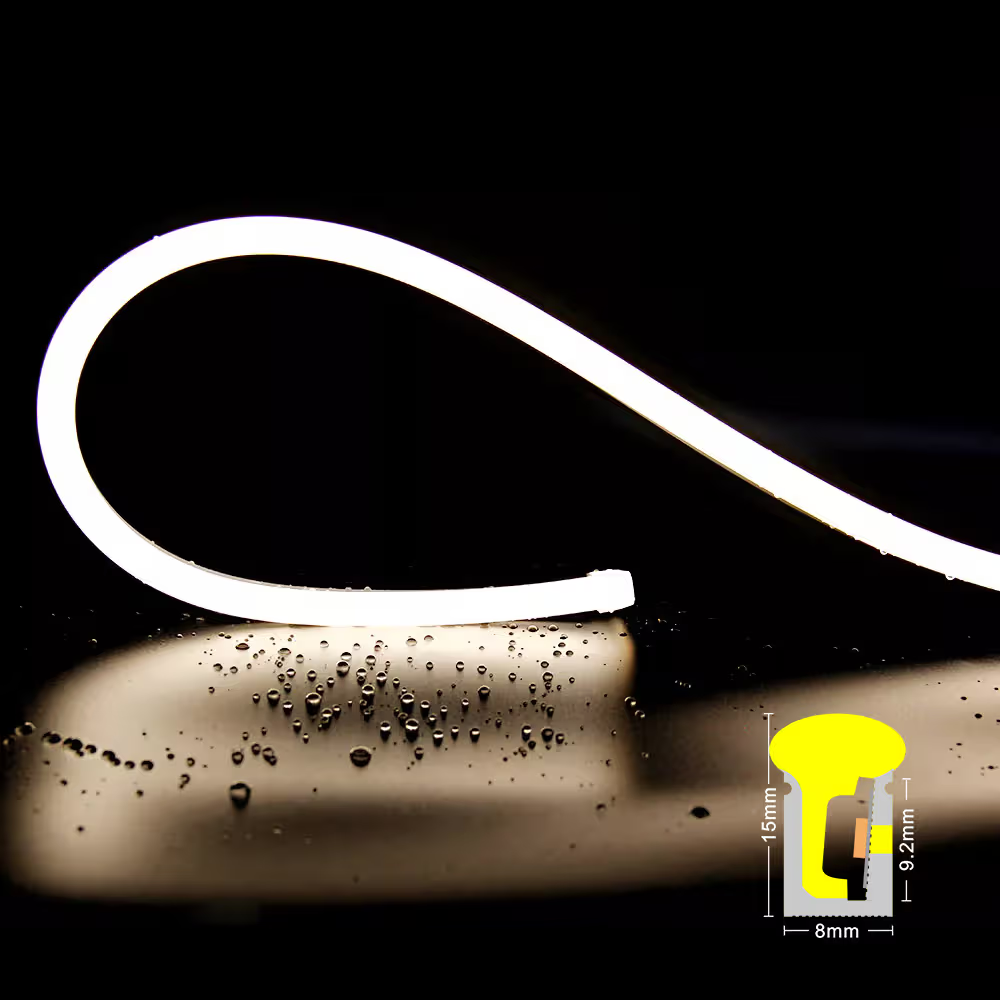
Zijbocht S0815 Silicone LED Neon Flex Licht
Veelvoorkomende installatiefouten en hoe ze te repareren
De meeste storingen in het buitenlampje van de neontekens zijn geen productstoringen - het zijn installatiestoringen. Dit zijn de negen meest voorkomende.
- IP20-connectoren bij outdoor-knooppunten Water komt in het eerste natte seizoen elk niet-verzegeld splitsingspunt binnen - teken flikkeren of secties sterven. → repareren: Vervang door IP68 met gelgevulde of krimpkousen op elke buitensplitsing.
- Bestuurder in een niet-gesproeide behuizing Condensatie corrodeert terminals van binnenuit — meestal binnen 6-12 maanden na installatie. repareren: Ga naar een IP65+ ABS-behuizing met een rubberen pakkingdeksel en open de drainage-knockout.
- Kabel te lang op 12V Spanning daalt over afstand — zichtbaar dimmen verschijnt aan het uiteinde van het bord vanaf de eerste dag. → repareren: Verkort de run of schakel de volledige setup naar een 24V-stuurprogramma en strip.
- Backboard gemonteerd flush - geen afstandsbekers Geen luchtstroom achter het bord betekent dat condensatie gedurende maanden vast blijft zitten en hardware corrodeert. → repareren: Installeer opnieuw met 20-25 mm vatstandoffs en laat de onderkant volledig open.
- Niet-GFCI Outdoor Outlet Geen aardlekbeveiliging in natte omstandigheden — stroomlekkage is niet automatisch uitschakelbaar. repareren: Vervang door een weersaanduiding GFCI-outlet ontworpen voor gebruik buitenshuis.
- Niet testen voor montage Een losse terminal die na volledige installatie wordt gevonden, betekent dat het bord weer naar beneden komt. → repareren: Ren op maaiveld gedurende 15-20 minuten voordat het montagewerk begint.
- Onderste bordrand verzegeld met siliconen Blokkeert de enige condensafvoer - vochtigheidspools permanent achter het acryl. → repareren: Verwijder de onderste afdichting. Alleen de bovenrand en de kabelinvoerpunten moeten worden afgedicht.
- Standaard zwart PVC-buis op blootgestelde runs UV breekt PVC buitenshuis af — Oppervlaktescheuren verschijnen binnen 2-3 jaar en de bedrading blijft bloot. repareren: Vervang door UV-geclassificeerd gegolfd polypropyleenleiding op elke blootgestelde run.
- Teken aangedreven door een gedeeld verlengsnoer Aanhoudende belasting op een snoer zonder rating veroorzaakt warmteophoping bij connectoren of schakelt het circuit uit. repareren: Wijd een goed beoordeelde, door het weer beschermde buitenoutlet aan het bord.
De levensduur van 30.000 uur op een kwaliteits-LED-neonbord van hoge kwaliteit is alleen haalbaar als de installatie eronder stand houdt. De LED-strip faalt zelden eerst - de bestuurdersbehuizing, kabelknooppunten en afvoerspleten wel. Zorg dat die drie goed zijn en het teken zorgt voor zichzelf.
Veelgestelde vragen
Gerelateerde berichten